Fleet Routing also includes the Route Optimization feature. Not sure which routing tool to use?
Check out the article Understanding Route Optimization and Fleet Routing.
Overview
Fleet Routing assigns and optimizes a group of appointments across multiple Service Agents or teams. It helps distribute work efficiently by considering appointment locations, service durations, available resources, required skills, GeoZone restrictions, and other active routing constraints.
After a route solution is generated, you can review the suggested assignments, adjust the order of stops, and commit each route to the calendar. Fleet Routing is especially useful when scheduling a large number of appointments or coordinating routes across several Service Agents, teams, or starting locations.
Fleet Routing is an add-on service. If it is not included in your serviceminder subscription, you will not be able to use this feature. You can purchase Fleet Routing through Marketplace or speak with your Brand Administrator for approval.
This article will review:
Fleet Routing Settings
General Settings
To review your Fleet Routing settings, navigate to Control Panel > Tools > Route Settings.

Here, you can review the vehicle count included in your billing plan and access the available configuration options.

Route Optimization Settings include:
- Initial Start Time: Check this box to set the start time for the first appointment to be the availability start time plus the initial drive time.
- Commit Confirmations: Enable this to send appointment confirmations automatically when a route solution is committed. If reminders are not sent when you commit a route, you have two other options:
- Select Resend Confirmations after committing the route to manually send appointment reminders.
- Configure Appointment Notifications in the Control Panel so emails are automatically sent to queued appointments at a specified time each day.
- Hold Route Builder Edits: Edits to the route builder configuration will not apply until saved.

Routing Breaks reserves blocks of time when the routing engine cannot schedule appointments. Use Routing Breaks for meal or rest periods, warehouse resupply stops, or other planned pauses during the workday.
Building Routes
-
Open the calendar in Day View.
-
Find the Queued Appointments list below the active Service Agents and teams. If the list is empty, no appointments are currently awaiting assignment.
-
Select Route to open the Route Builder.

-
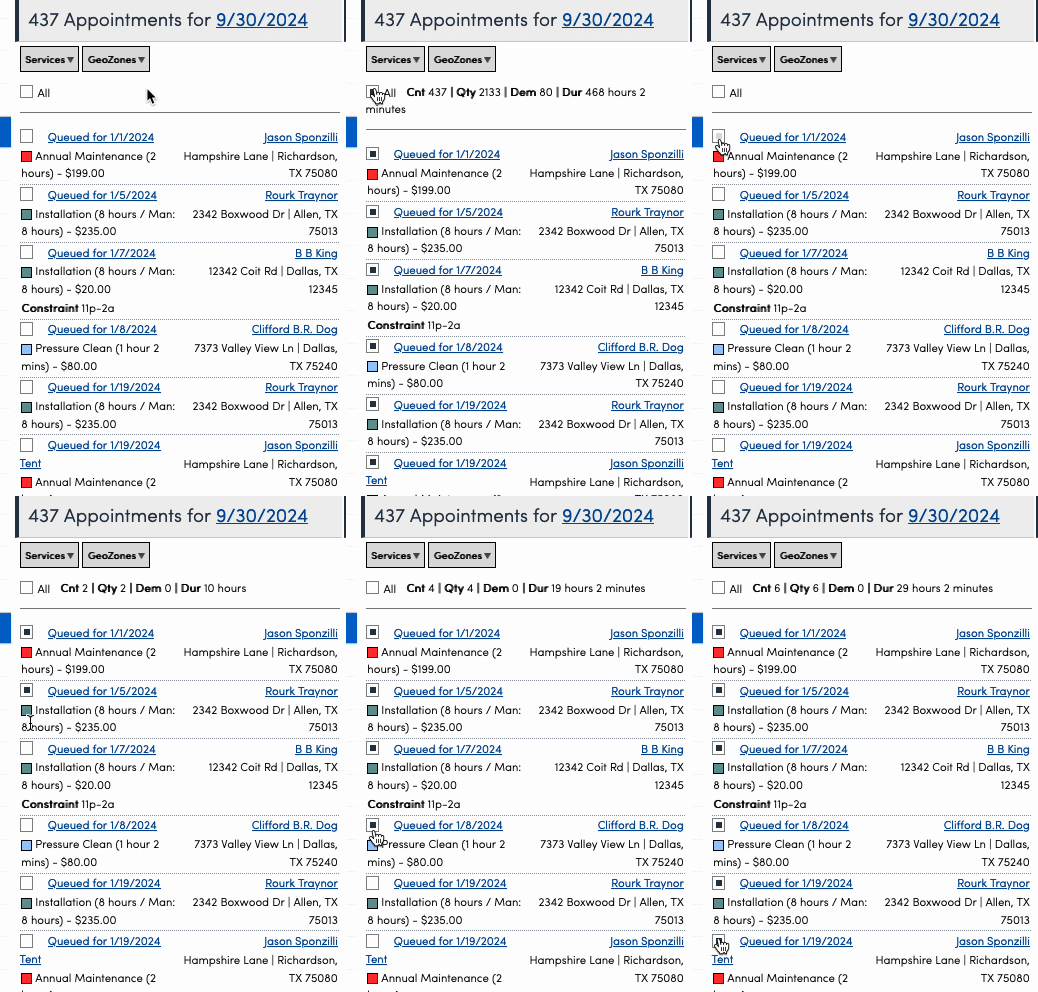
Filter appointments by Service or GeoZone, if desired. Then select appointments individually or select All to include all available appointments.

-
You can also use the lasso tool to select a group of appointments directly from the map. Select Lasso from the top right corner, then click individual points to build a shape around the area you want to lasso. You can also make multiple lasso passes to build a larger section. Each new pass adds to your existing selection instead of replacing it, so you can select stops from different areas of the map without starting over.

-
The Route Builder also displays the Existing Schedule (appointments already scheduled on the calendar). Current Appointments can be reviewed alongside queued appointments and included in a new route solution.


The Route Builder lasso is different from the lasso available on the Appointments Map:
-
The Route Builder lasso selects appointments to include in a route solution.
-
The Appointments Map lasso selects appointments for bulk rescheduling.
See Maps and GeoZones for more information about these tools and how pin colors, dates, tooltips, and InfoZooms work across the maps.
-
Configure the appropriate Route Builder settings before optimizing (see below).
Route Builder Settings
| Setting | Description |
|---|---|
| Route Name | Optional, but useful for identifying and tracking route solutions. |
| Load | Determines how appointments are distributed across Service Agents or teams. For example, a value of 100% means the first Service Agent or team receives all possible appointments before the system begins assigning appointments to another resource. |
| Duration Scale | Adds a buffer to appointment durations to account for expected delays, such as traffic or weather. For example, a value of 1.5 increases the duration of each appointment by 50%. |
| Demand | Controls inventory or equipment requirements. For example, use Demand when a vehicle must carry a particular product, such as bug repellent or fertilizer. |
| Disable Constraints | Gives the system greater scheduling flexibility by ignoring constraints that would otherwise limit appointment assignments. |
| Optimize Vehicles | Builds the route solution using the fewest vehicles possible. |
| Balance Return Times | Use this instead of Optimize Vehicles when you want appointments balanced across Service Agents or teams. It moves stops between routes so the Service Agents or teams return at approximately the same time, rather than minimizing the total number of vehicles used. |
Reviewing and Committing a Route
-
Select Optimize to generate an efficient route solution.
A message will indicate that you are free to continue working elsewhere in serviceminder while the solution is being created.
 Review the generated route solution.
-
Look for appointments highlighted in orange. An orange highlight indicates that the appointment conflicts with a constraint.

3. Contacts in red indicate that they are currently on a credit hold and likely should not be scheduled. 
-
Drag and drop stops to manually adjust their order, if needed.

5. Review the routes on the map.
- Each route will be color coded based on the service agent or team's color.
- The starting point for each route is denoted by a charcoal pin with a house icon.
- The number on the pins represents the order of that stop along the route.
- The suggested driving route will be indicated as a line connecting the appointments.

6. Select Commit to finalize the route and apply it to the schedule. Once committed:
- The route appears on the calendar.
- Customers receive automatic confirmations if confirmations are enabled.
- Each committed stop displays its sequence number on the map.
- Committed pins use the assigned team’s color.
Recovering a Route Solution
If you leave the Route Builder without committing the solution, the suggested route remains available from Calendar Day View. You can view, accept, or decline the route solution above the Queued Appointments list.
If someone attempted to route the same appointments more than once, each attempt will be displayed in the Routing History. The route name identifies the solution, and the Started column shows the date it was created.

Building Multiple Routes Back-to-Back
You can build and commit multiple routes during the same Route Builder session without leaving the screen or refreshing the page.
-
Select the appointments for the first route, configure the Route Builder settings, and select Optimize.
-
Select View to look more closely at that proposed route. Then choose the map icon next to the date. This will display only the appointments included in that route solution. This hides the other map items so you can review the route on its own.

-
Review and commit the route.
-
Select the Map Icon next to the Commit button to restore the full map.

-
Review everything committed so far.
-
Repeat the process as needed.


Committed stops retain their sequence numbers and team colors, making it easier to distinguish each team’s stops as additional routes are created.
Multiple Starting Locations or Depots
For fleets with multiple warehouses, depots, or independent vendors, use the back-to-back workflow to create a separate route for each starting location.
-
In the route builder, select the appointments associated with the first depot using the lasso tool to select appointments within the appropriate geographic area, or by filtering the appointments by GeoZone.
-
Assign the appropriate Service Agents or teams.
-
Configure the route settings.
-
Optimize, review, and commit the route.
-
Return to the full map.
-
Select the appointments associated with the next depot.
-
Repeat the process until each depot has its own route.
Keep the following requirements in mind:
- Each appointment should appear in only one route.
- Each Service Agent or team should be assigned to only one route.
- The route solutions should be mutually exclusive.
- Adjust the Load setting as needed to balance appointments.
- Each route must be reviewed and committed individually.
- Multiple route solutions cannot be merged or committed together in a single action.
Route Constraints and Calculations
Routing Constraints limit appointment assignments based on customer preferences or geographic restrictions.
To configure Routing Constraints:
-
Open the Contact Details page.
-
Expand the contact information.
-
Select Edit beside Routing Constraints.
-
Configure the applicable limitations.

Use constraints sparingly. The more limitations applied to a route, the fewer valid scheduling options the routing engine has, which may result in a less efficient route.
Required Skills
The system first separates appointments according to their required skills.
This creates:
- One group for appointments that do not require a skill
- A separate group for each required skill
The system then reviews the available Service Agents and matches them to the appointment groups based on their assigned skills.
If a service requires a skill and no available Service Agent has that skill, the affected appointments will be unroutable. A red banner will appear.
GeoZones
The system then separates appointments according to GeoZones.
Service Agents are grouped based on their GeoZone restrictions and assigned appointments located within those areas.
If a Service Agent has a GeoZone constraint but there are no appointments in the applicable GeoZones, that Service Agent will not receive any appointments in the route solution.
For more information about Service Agent GeoZone constraints, see [Service Agents and Subcontractors].
Required skills, GeoZone restrictions, Service Agent availability, and other active constraints can all cause appointments to become unroutable.
For additional information about common reasons appointments become unroutable and settings to review, see Optimizing an Individual Service Agent’s Route with Route Optimization.
Printing Work Orders
To print work orders for all routes, select Print below the Day View of the Calendar (just above the Route Solutions section). Check the box to Include Tickets to print each individual work order. This will generate one large PDF of all work orders for you to print.
To print work orders for an individual Service Agent or team, select the printer icon beside that Service Agent or team.

FAQs
Can several route solutions be committed at once?
No. Route solutions must be committed individually.
Build and optimize the first route, review it, and select Commit before moving to the next group of appointments.
You can remain in the Route Builder and create routes back-to-back, but each solution requires its own commit.
Can multiple routes contain the same appointments?
No. You cannot commit multiple routes containing the same appointments.
Once you commit a route, its appointment times and assigned Service Agents appear in the mobile app and on the Contact Details page.
If the work has not been completed, you can uncomplete the route and begin again. Once a stop has been completed, it cannot be changed.
What happens when an appointment is canceled in the field?
The appointment returns to the queue.
From the queue, it can be added back to the schedule for the same day or moved to another day using Move. Depending on the options selected, an email can also be sent to the customer.
What do Load, Duration Scale, and Balance Return Times do?
- Load controls how appointments are distributed across Service Agents or teams. A value of 100% means the first resource receives all possible appointments before the next resource is used.
- Duration Scale adds a buffer to every appointment’s duration to account for delays such as traffic or weather. A value of 1.5 adds 50% to each appointment’s duration.
- Balance Return Times distributes stops so Service Agents or teams return at approximately the same time. It is an alternative to Optimize Vehicles, which attempts to use the fewest vehicles possible.
Why is a route taking a long time to generate?
Routing a large number of appointments may take several minutes. If a route takes longer than a few minutes to generate, refresh the page. If the route solution was successfully created, your work will not be lost. You can find the solution in Calendar Day View above the Queued Appointments list.
If the solution was not created, a scheduling condition may be preventing the system from generating a valid route. Review the following before retrying:
- Contact constraints
- Service Agent or team availability
- Required skills
- GeoZone restrictions
- Other active scheduling constraints
