Overview
Branding Email Campaigns are crucial for maintaining consistent communication with your customers, promoting new products or services, and driving engagement. It helps in building brand loyalty and can significantly impact your marketing efforts by reaching a wide audience efficiently.
This article will help you understand how to launch brand-wide email campaigns. By following these steps, you can effectively create, customize, and launch email campaigns to engage your audience.
This article will review:
Video Tutorial
Settings and Navigation
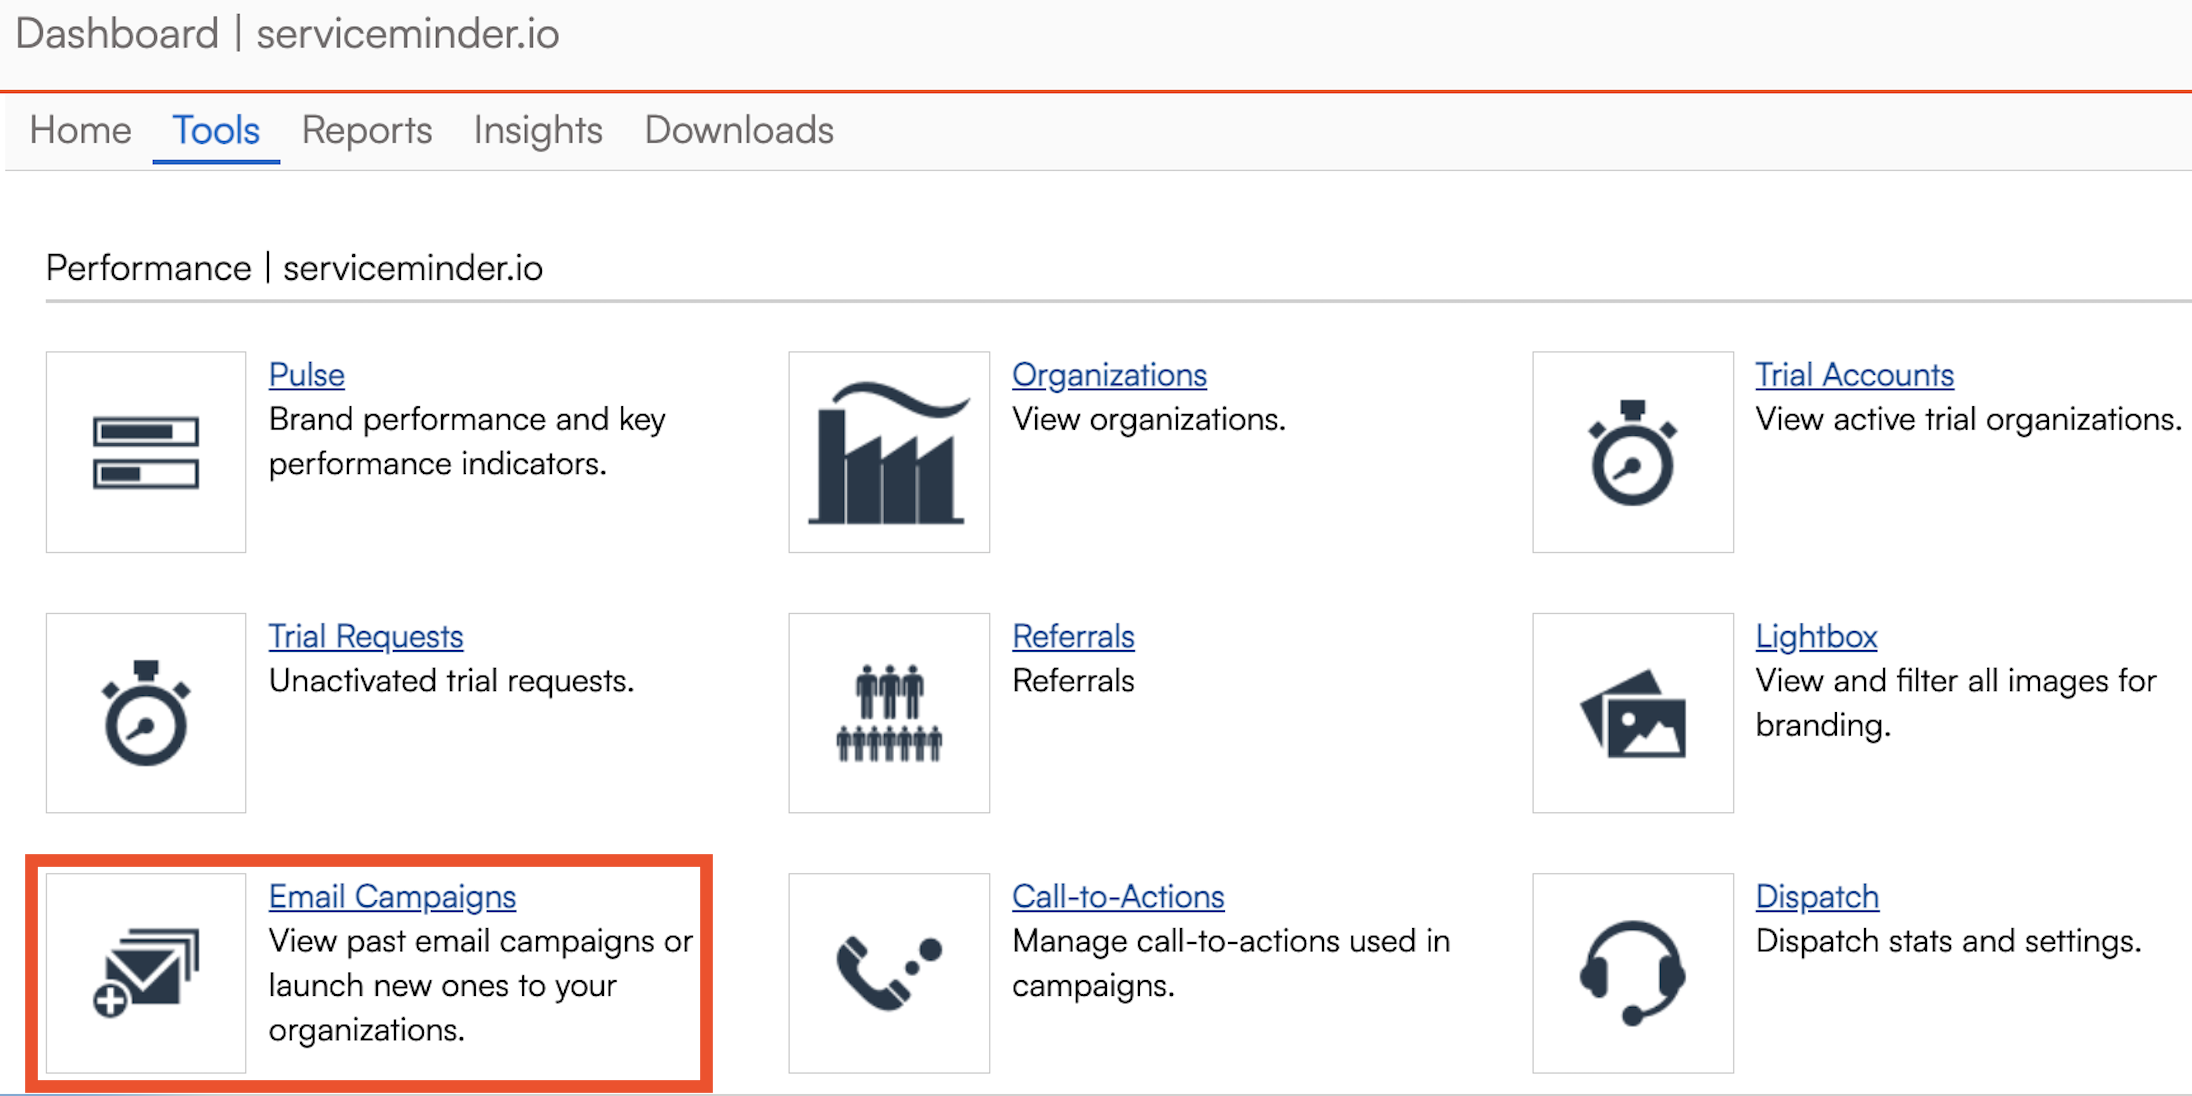
To launch a new campaign or review existing campaigns, navigate to the Dashboard. Click on the Tools tab. Under the Performance section, select Email Campaigns.
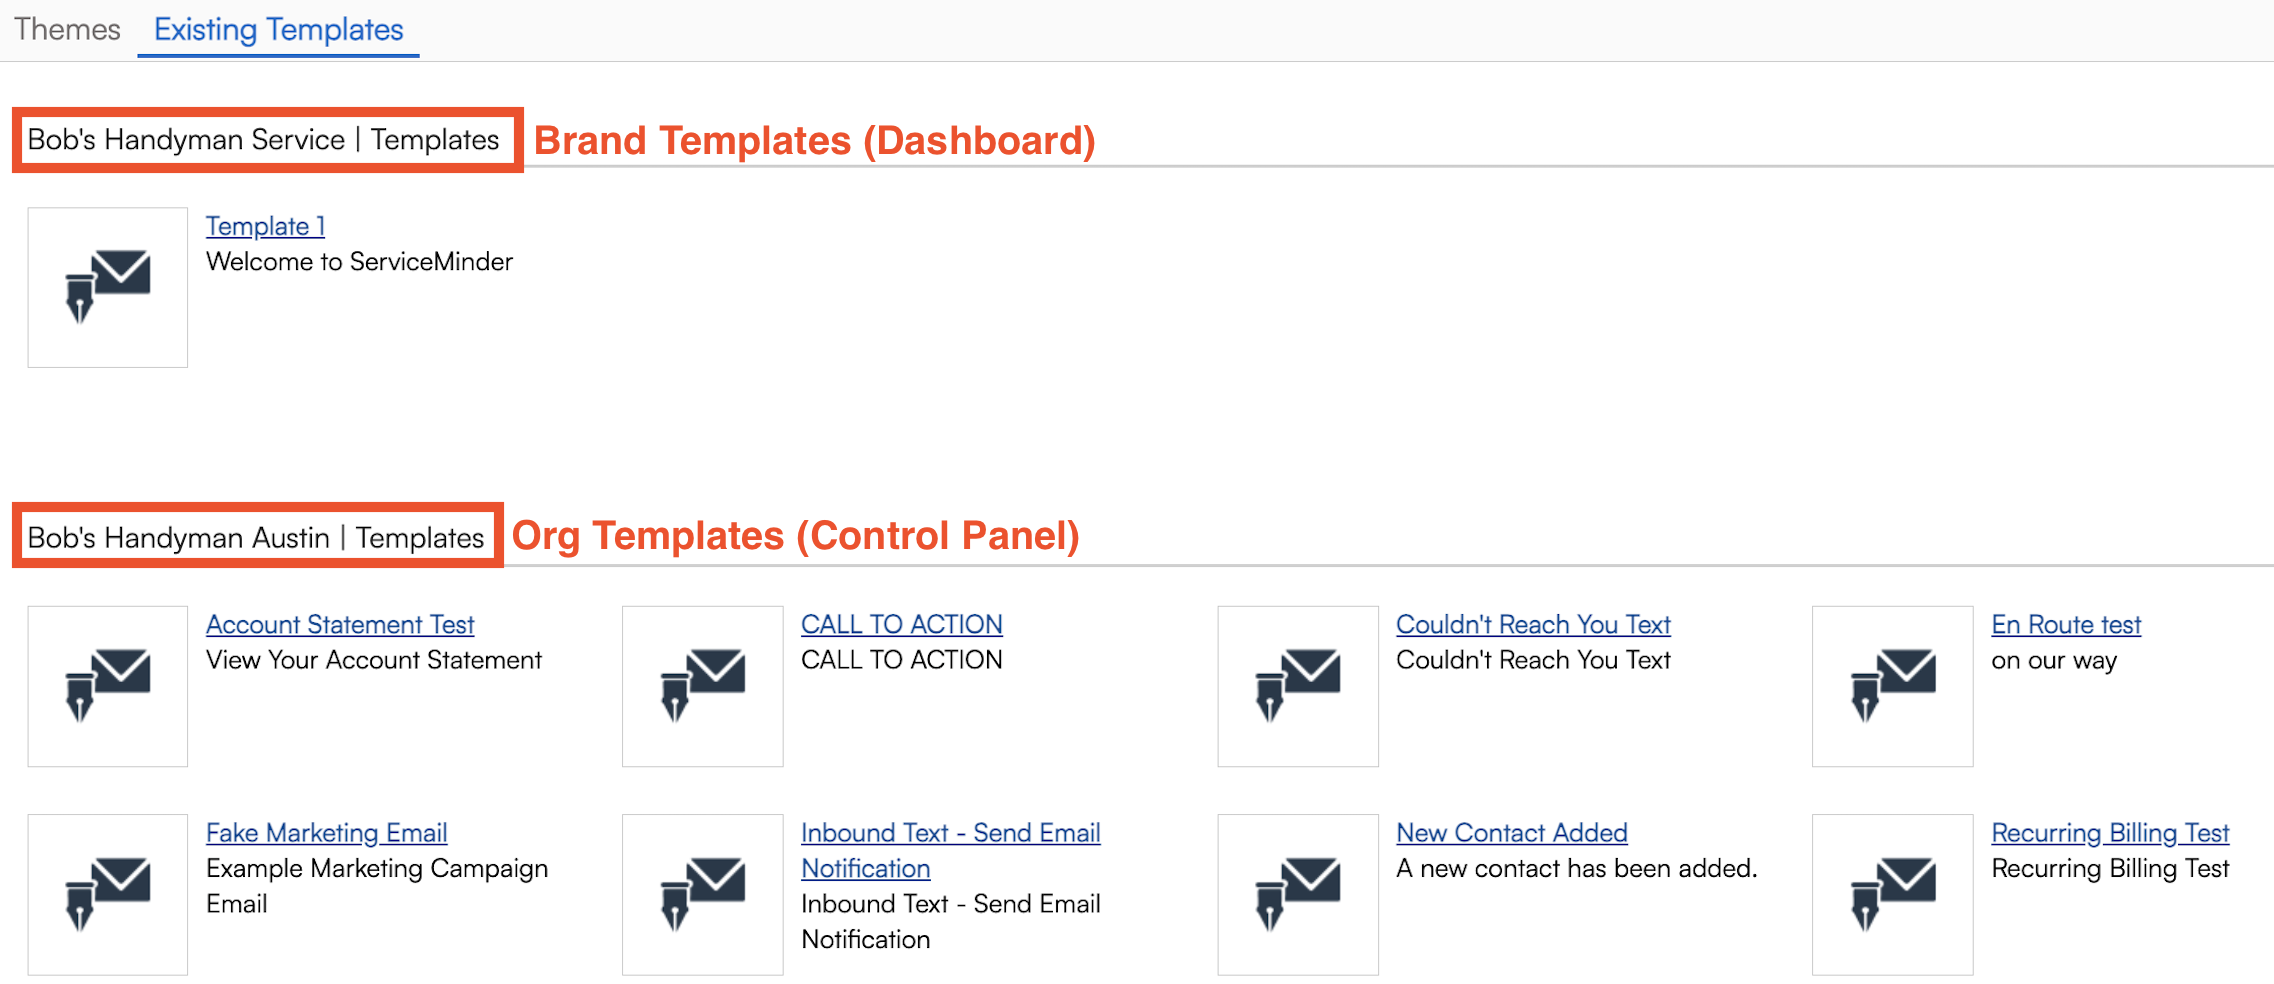
Before creating a brand email campaign, you may want to create a brand email template. Alternatively, you can set up an email theme to use and draft the body of the email while creating the campaign. To do this, navigate to the Dashboard. Click on the Tools tab. Under the Settings section, select Email Templates or Email Themes.
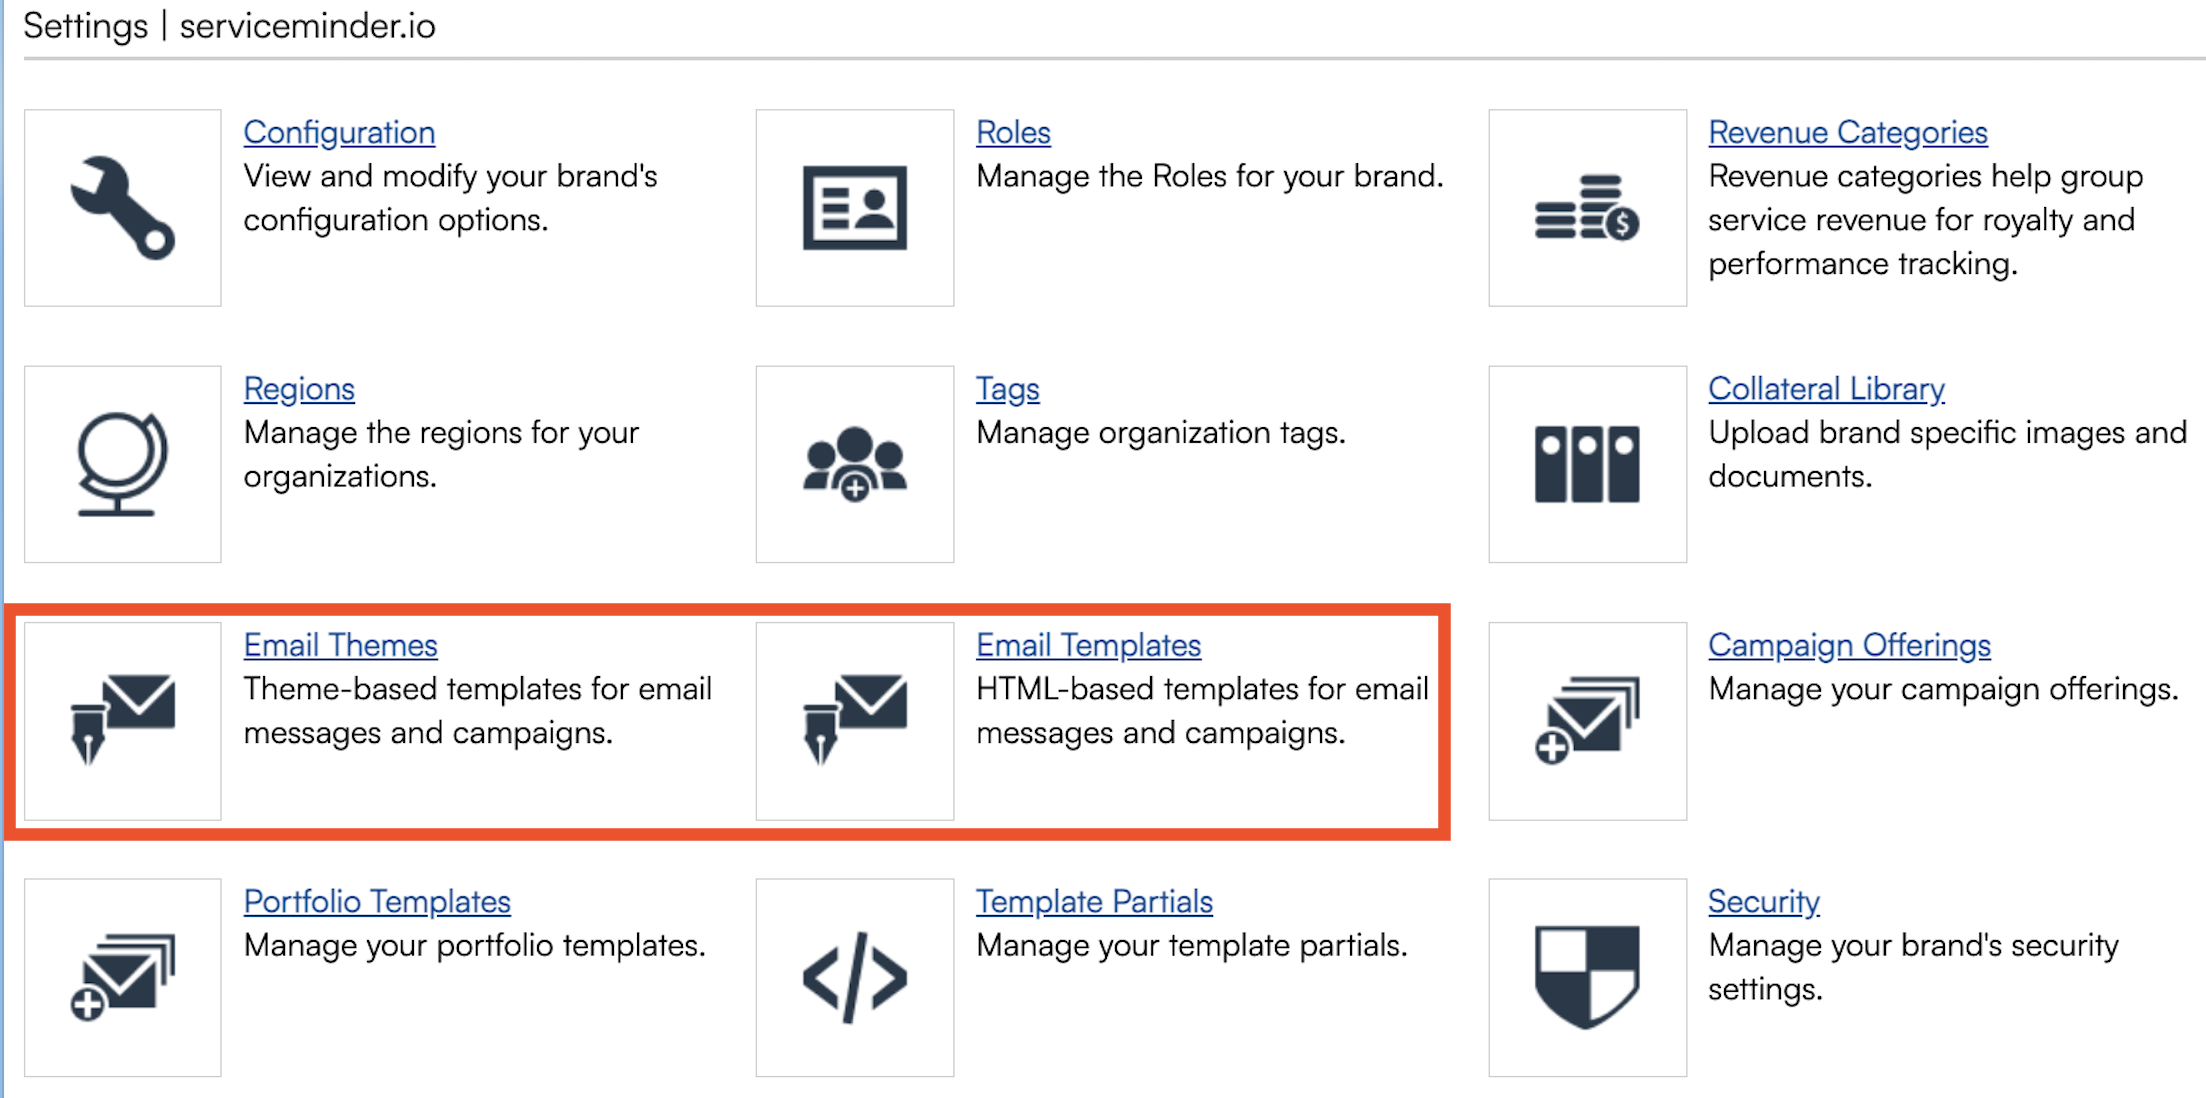
These are separate from Ad Hoc Email templates that can be deployed to organizations, but follow the same formatting settings. You can learn more about how to create an email template HERE.
Launching a Branding Email Campaign
Create a new campaign by clicking Add or Launch New Campaign at the top of the Email Campaigns grid. 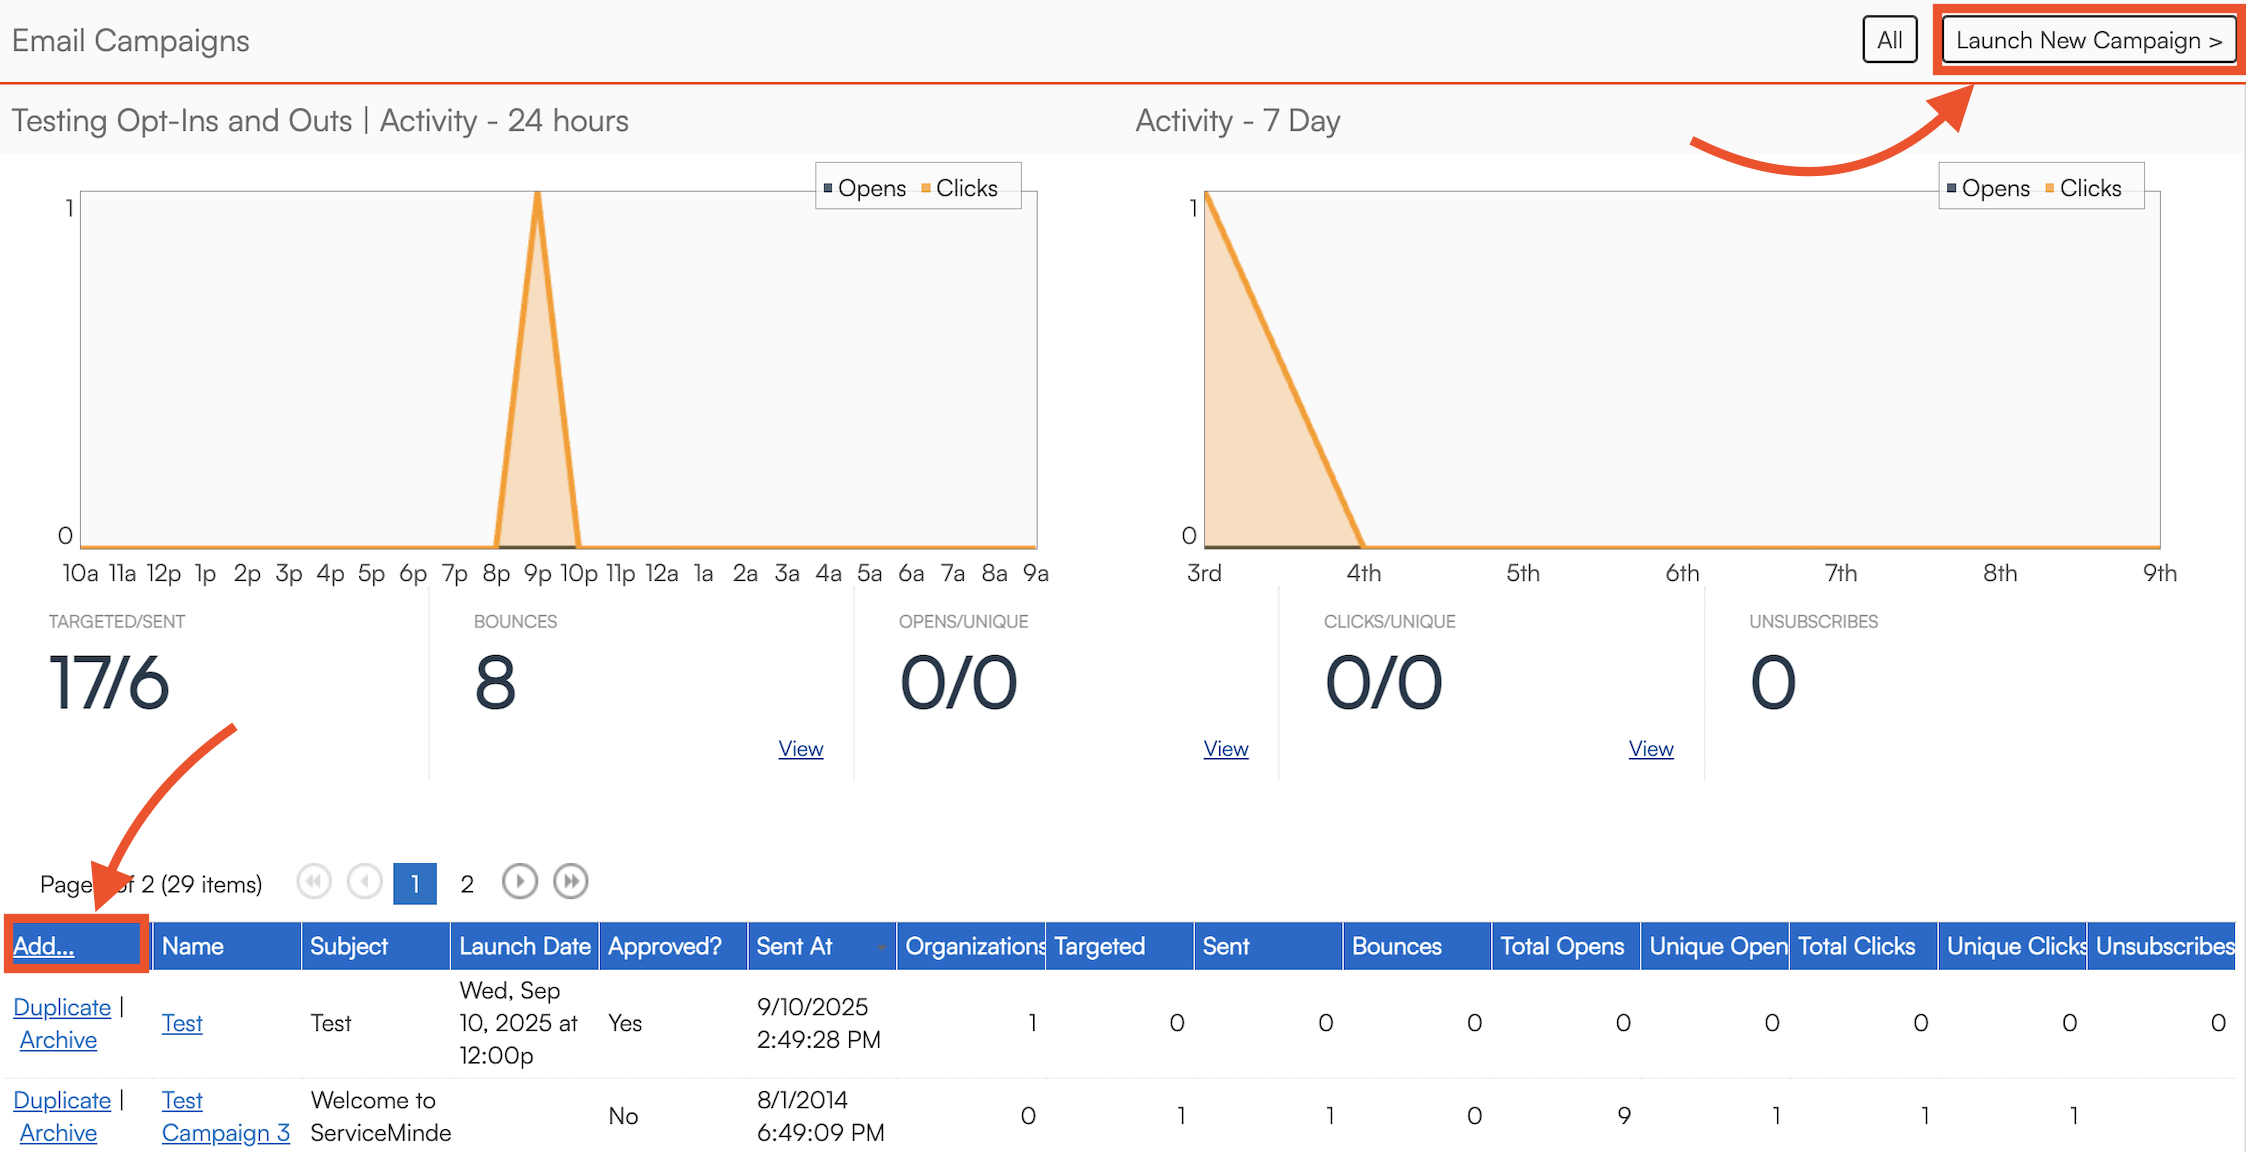
Select the Audience
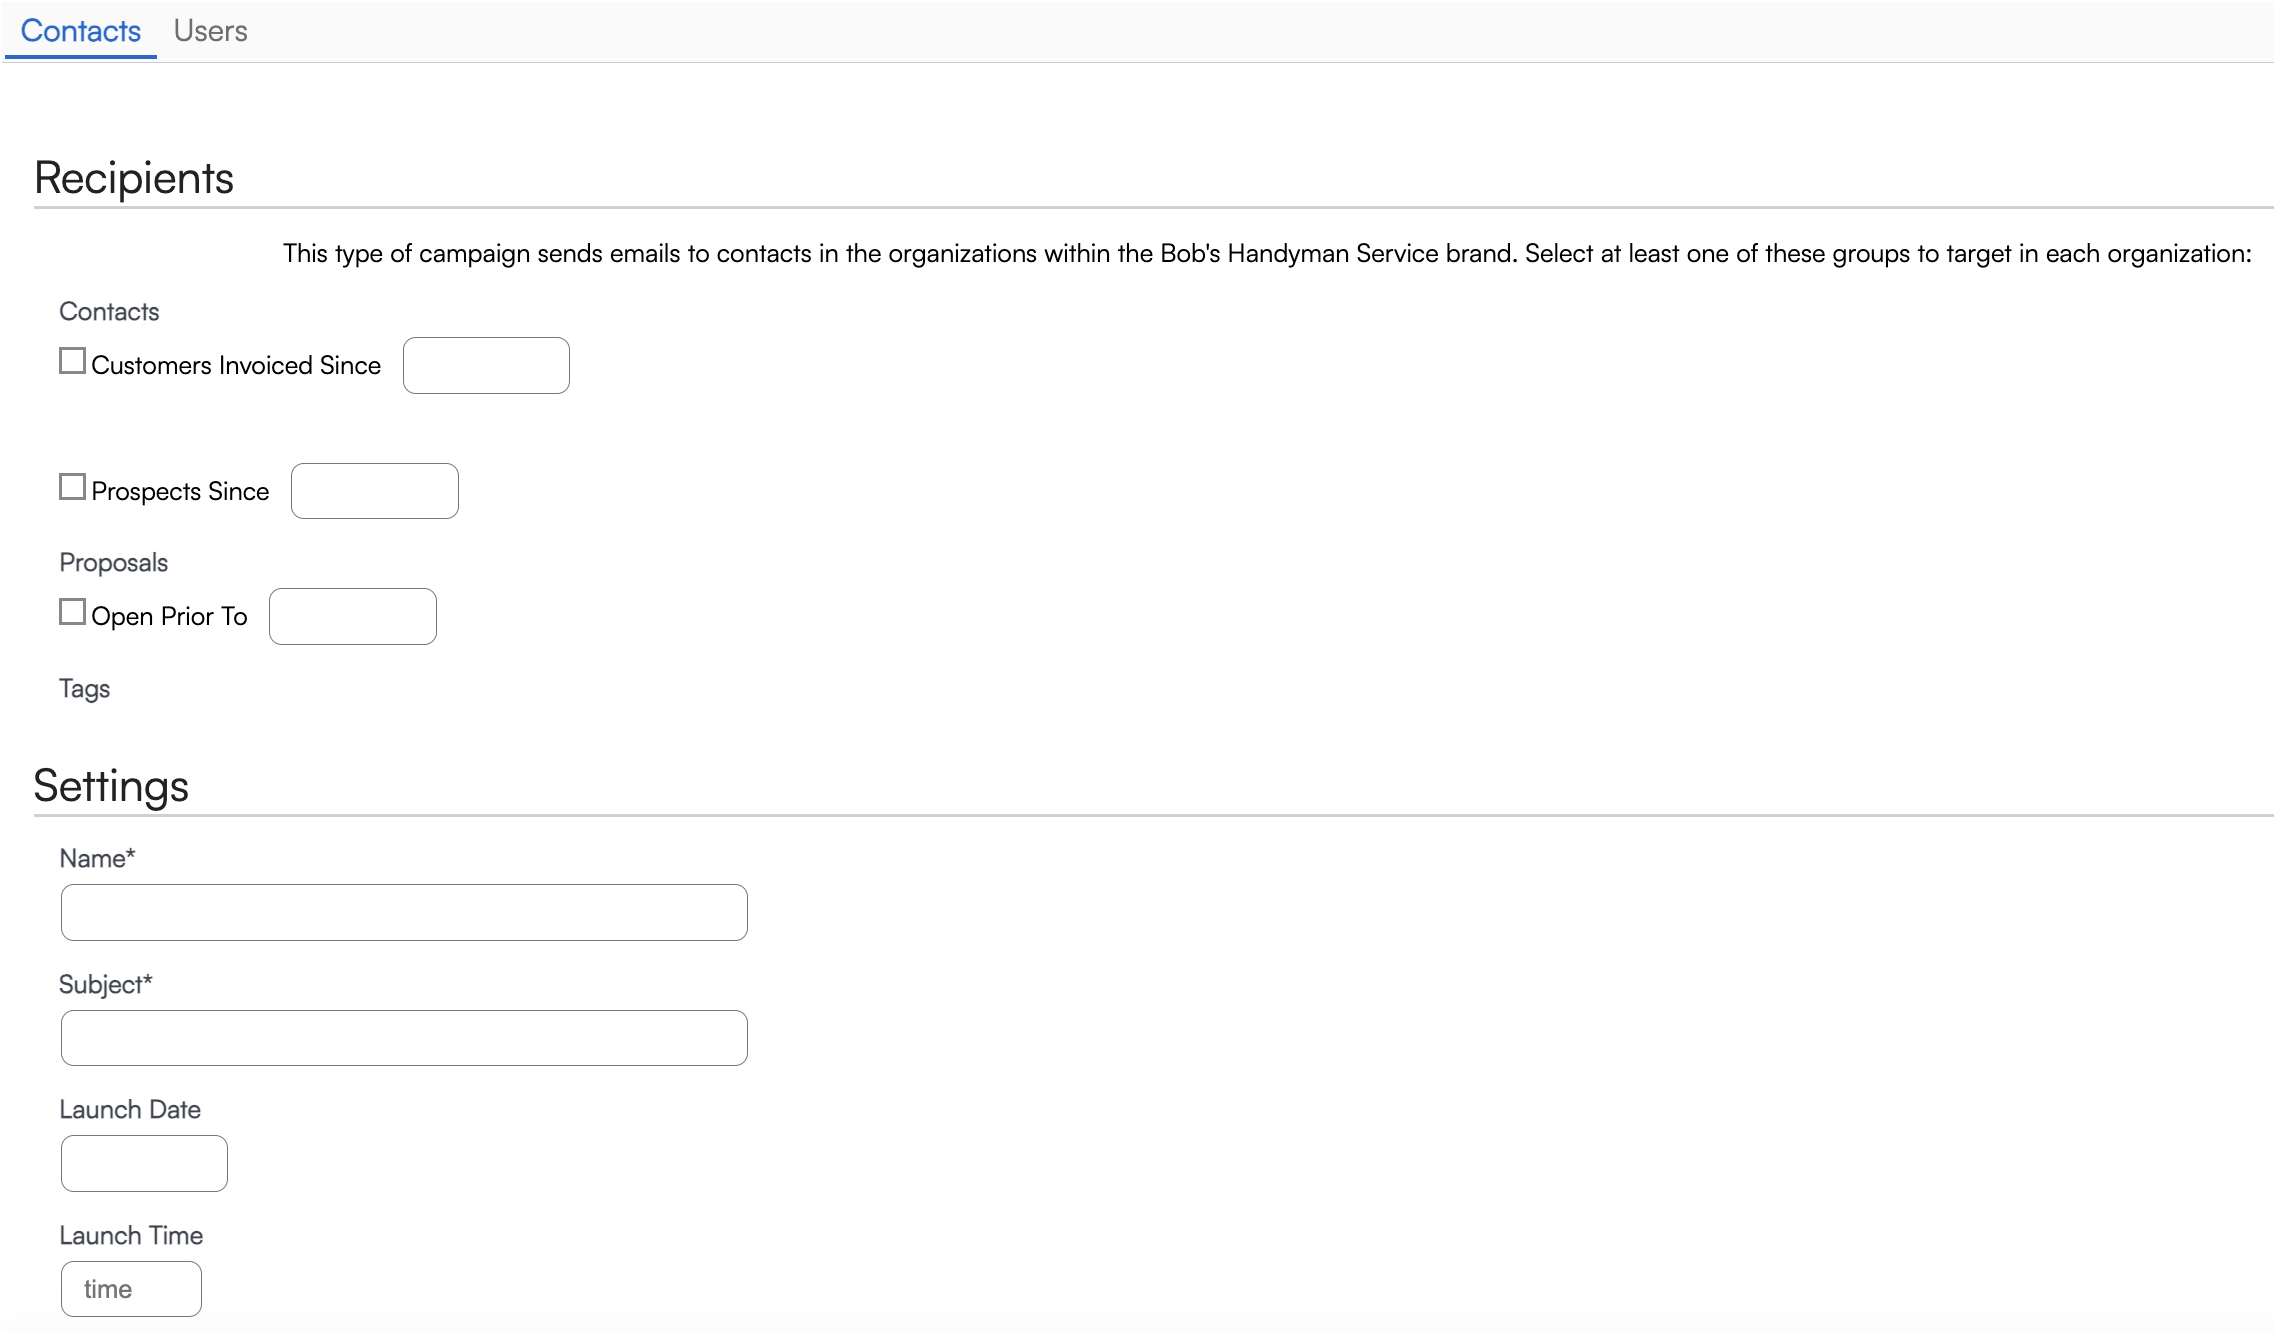
- Select the Contacts tab to launch a campaign to select contacts in this brand's organizations
- Select the Users tab To launch a campaign to this brand's users
Contacts Campaign
Recipients: This type of campaign sends emails to contacts across the organizations within your brand. Select at least one audience to target, then use the available filters to further refine who receives the campaign. Audience Options Include:
- Contacts who have been invoiced after a specified date
- Contacts who were added as prospects after a specified date
- Contacts with proposals that were open prior to a specified date
- Contacts with a specific tag
Appointment Filter: When any appointment filter is set, recipients are limited to contacts whose appointments match. Recipient filter selections for Customers / Prospects / Open Proposals / Tags are ignored for that campaign.
- Service – Target contacts with appointments are associated with a specific service.
- Appointment Scheduled Date – Target contacts based on when qualifying appointments were scheduled.
- Appointment Completed Date – Target contacts based on when qualifying appointments were completed.
These filters can be combined with the selected audience to create more targeted campaigns.
Settings:
- Name the Campaign: Enter a name for your internal reference
- Set the Subject Line: Enter a compelling subject line for your email
- (Optional) Schedule the Launch: Set a date and time in the future to launch the campaign
Users Campaign
- Recipients: This type of campaign sends an email to internal users within your brand.
- Organizations: Filter by the status of the organization - Active, Inactive, or Expired Trials
- Roles: Filter by user role
- Settings:
- Name the Campaign: Enter a name for your internal reference
- From Name: The display name of the sender
- From Email: This email address will be displayed as the sender
- Set the Subject Line: Enter a compelling subject line for your email
- Schedule the Launch: Set a date in the future to launch the campaign

Click Continue in the top right corner.
Select and Customize an Email Theme or Template
- Choose from pre-built email themes or existing templates.
- When selecting an existing template, you can choose from brand templates (created in Dashboard) or the ad hoc email templates that were created in the organization you are working from.
- Customize the template by adding text, images, and links.
- Ensure that the email includes an unsubscribe link to comply with regulations: {unsubscribe_url}
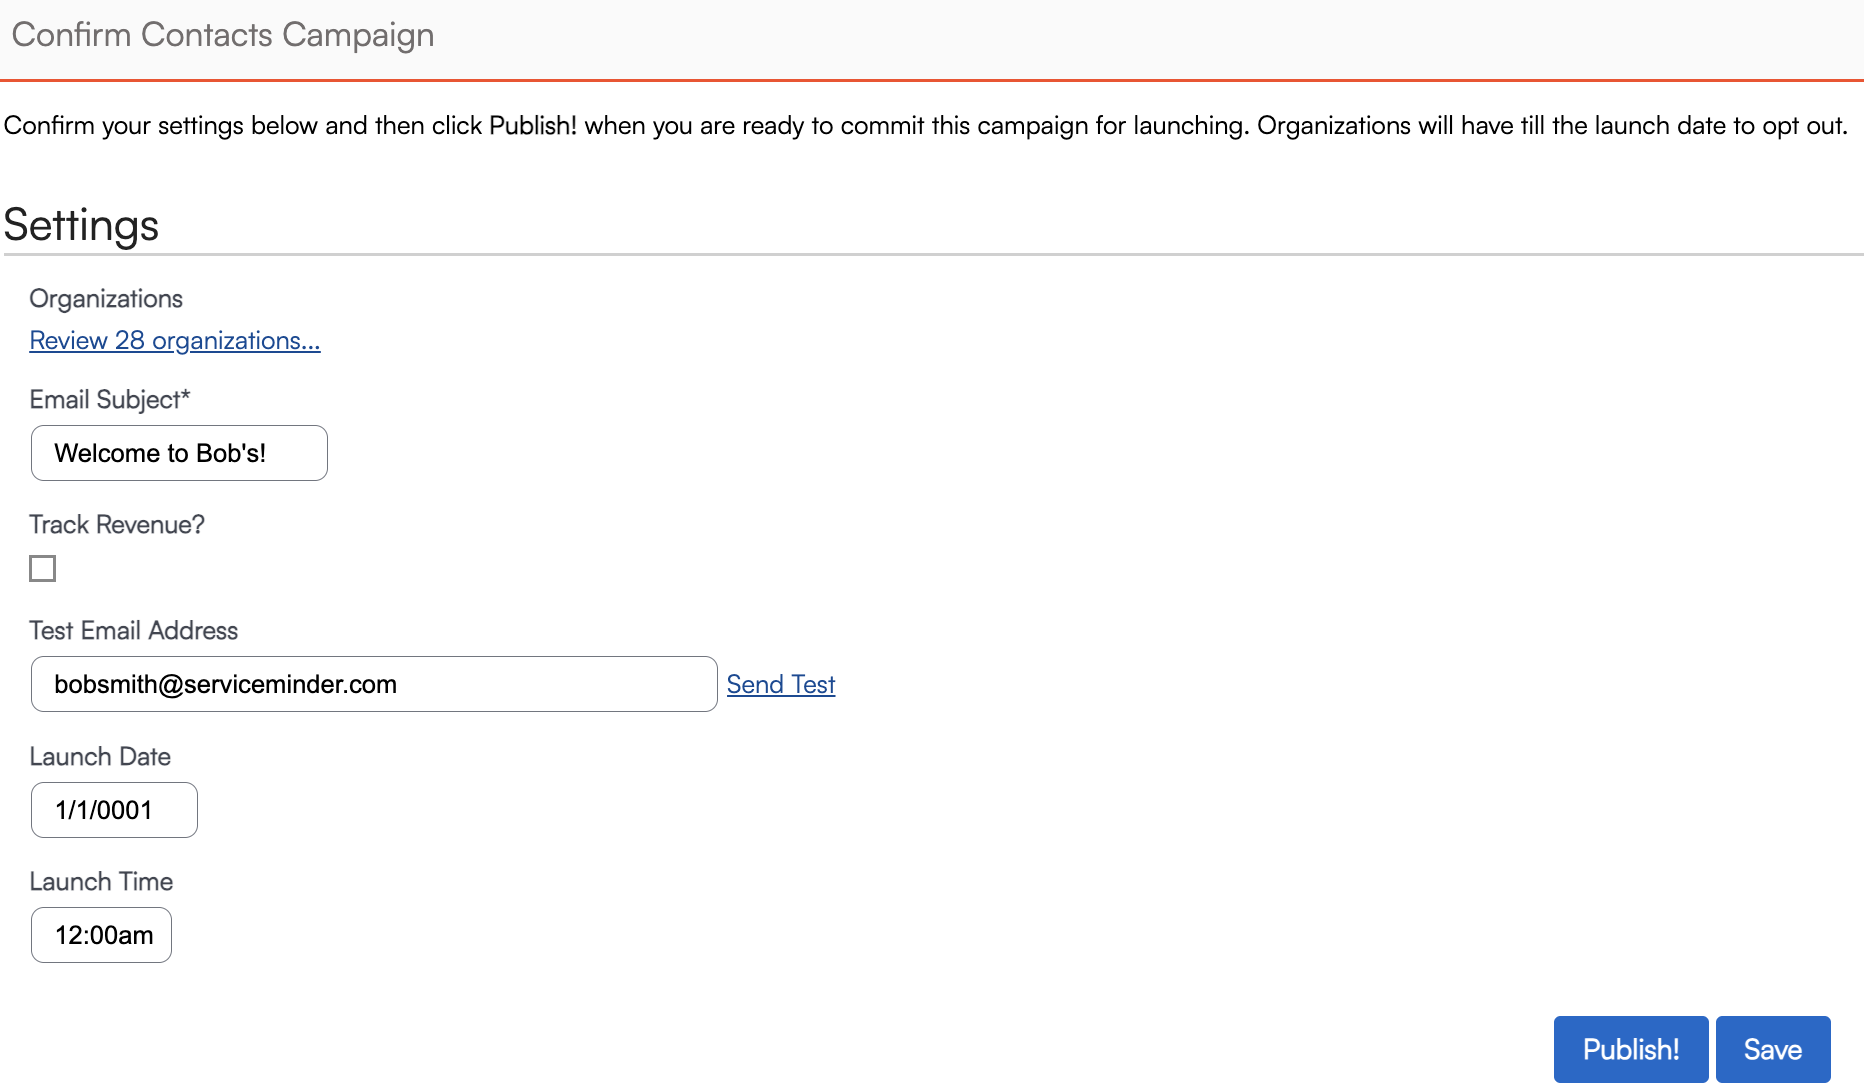
Confirm the Campaign Details
- Follow the link to confirm which organizations should be opted in to this email campaign. Uncheck the box for any organization that should not be included in the campaign and click Save.
- Review the email subject line
- If you enable Track Revenue when launching your campaign, you’ll gain access to additional performance insights:
- Accepted – Number of targeted proposals that were accepted after the campaign was launched (proposal campaigns only).
- Proposals – Total number of new proposals generated for recipients after the campaign was sent.
- Revenue – Total invoice amount from any proposals that were either targeted by or created for those contacts after launch.
- Test Email Address: Send a test copy of the email to yourself to preview the formatting.
- Please note that some shortcodes that generate URLs will not function with this field because they don't have an active contact to pull information from. Non-URL shortcodes will generate random data.
- Review Launch Date & Time
- Publish your campaign.
Branding Campaign Reporting
Above the list of Email Campaigns, you will see two graphs that pull data from the first 24 hours and first 7 days of the most recent campaign.
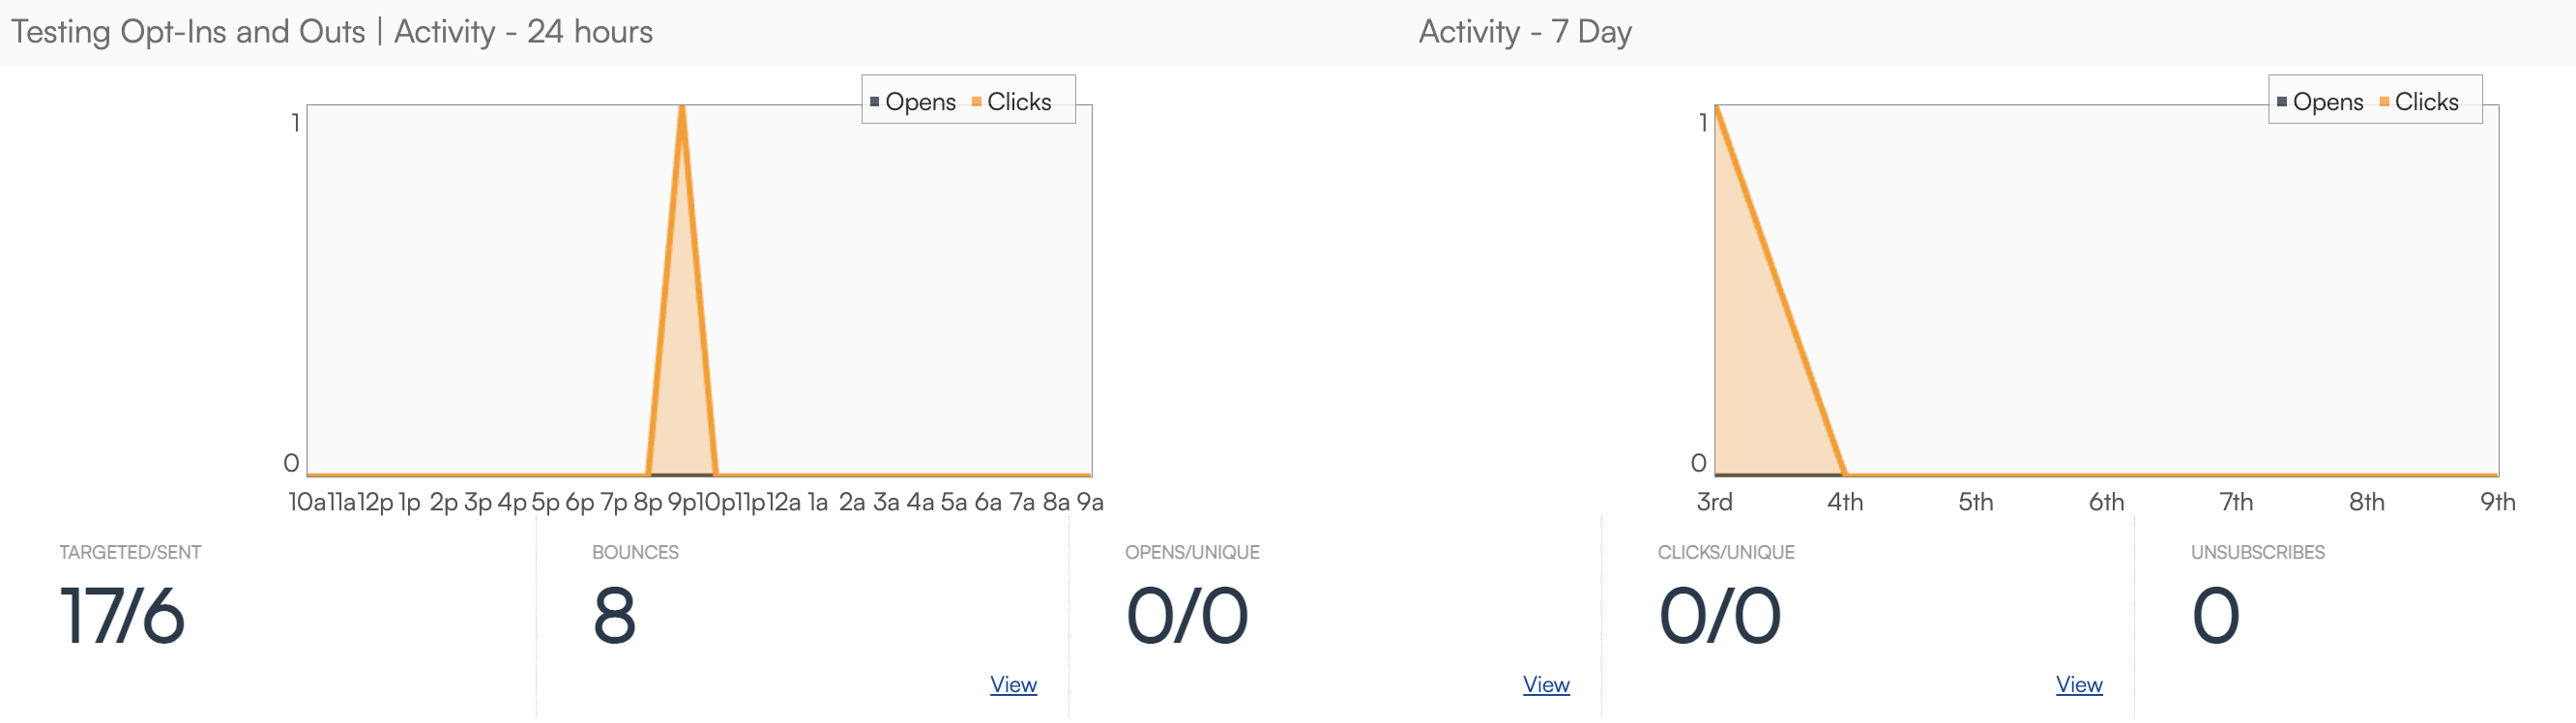
Below the graphs, various statistics are presented about that campaign:
- Targeted/Sent: The first number shows how many people were targeted by the campaign. The second shows how many unique emails were successfully delivered to inboxes.
- Bounces: The number of emails that couldn’t be delivered.
- Opens / Unique Opens: Total email opens, including multiple opens by the same person, followed by the number of individuals who opened the email at least once.
- Clicks / Unique Clicks: Total clicks on any links in the email (including repeat clicks by the same person), followed by the number of unique individuals who clicked at least once.
- Unsubscribes: The number of recipients who clicked the unsubscribe link.
The table displays the same statistics listed above for all previous campaigns. It can be toggled to show All campaigns (including archived ones) or only Unarchived campaigns using the button in the top right corner.

