Overview
ServiceMinder offers several flexible billing options designed to reduce manual work, improve cash flow, and simplify the customer experience.
This article explains how each option works, when to use it, and how they fit together.
| Feature | What It Does | When to Use |
|---|---|---|
| Automatic Payments (Auto-Pay) | Securely charges a saved card or ACH when a job is completed. | To get paid automatically per job. |
| Recurring Billing | Creates scheduled invoices on a fixed timeline (weekly, monthly, quarterly, etc.). | For ongoing service contracts or subscriptions. |
| Consolidated Payments | Groups multiple Auto-Pay transactions into a single charge each month. | For repeat customers with many visits. |
| Consolidated Billing | Sends one combined monthly statement of all open invoices. | For customers who pay manually (check, e-transfer, etc.). |
This article will review:
Automatic Payments
Automatic Payments (Auto-Pay) allow you to charge a customer’s saved payment method automatically when a service is marked complete.
This is the simplest way to get paid faster and eliminate manual billing.
Use Auto-Pay when:
- You want each completed job to charge automatically.
- Customers have authorized card or ACH information on file.
- You prefer faster payment turnaround.
Configuration
1. Enable Auto-Pay on Services
Navigate to Control Panel > Services, Edit a Service, and find the Invoicing section. Check the Auto Pay When Complete box. 
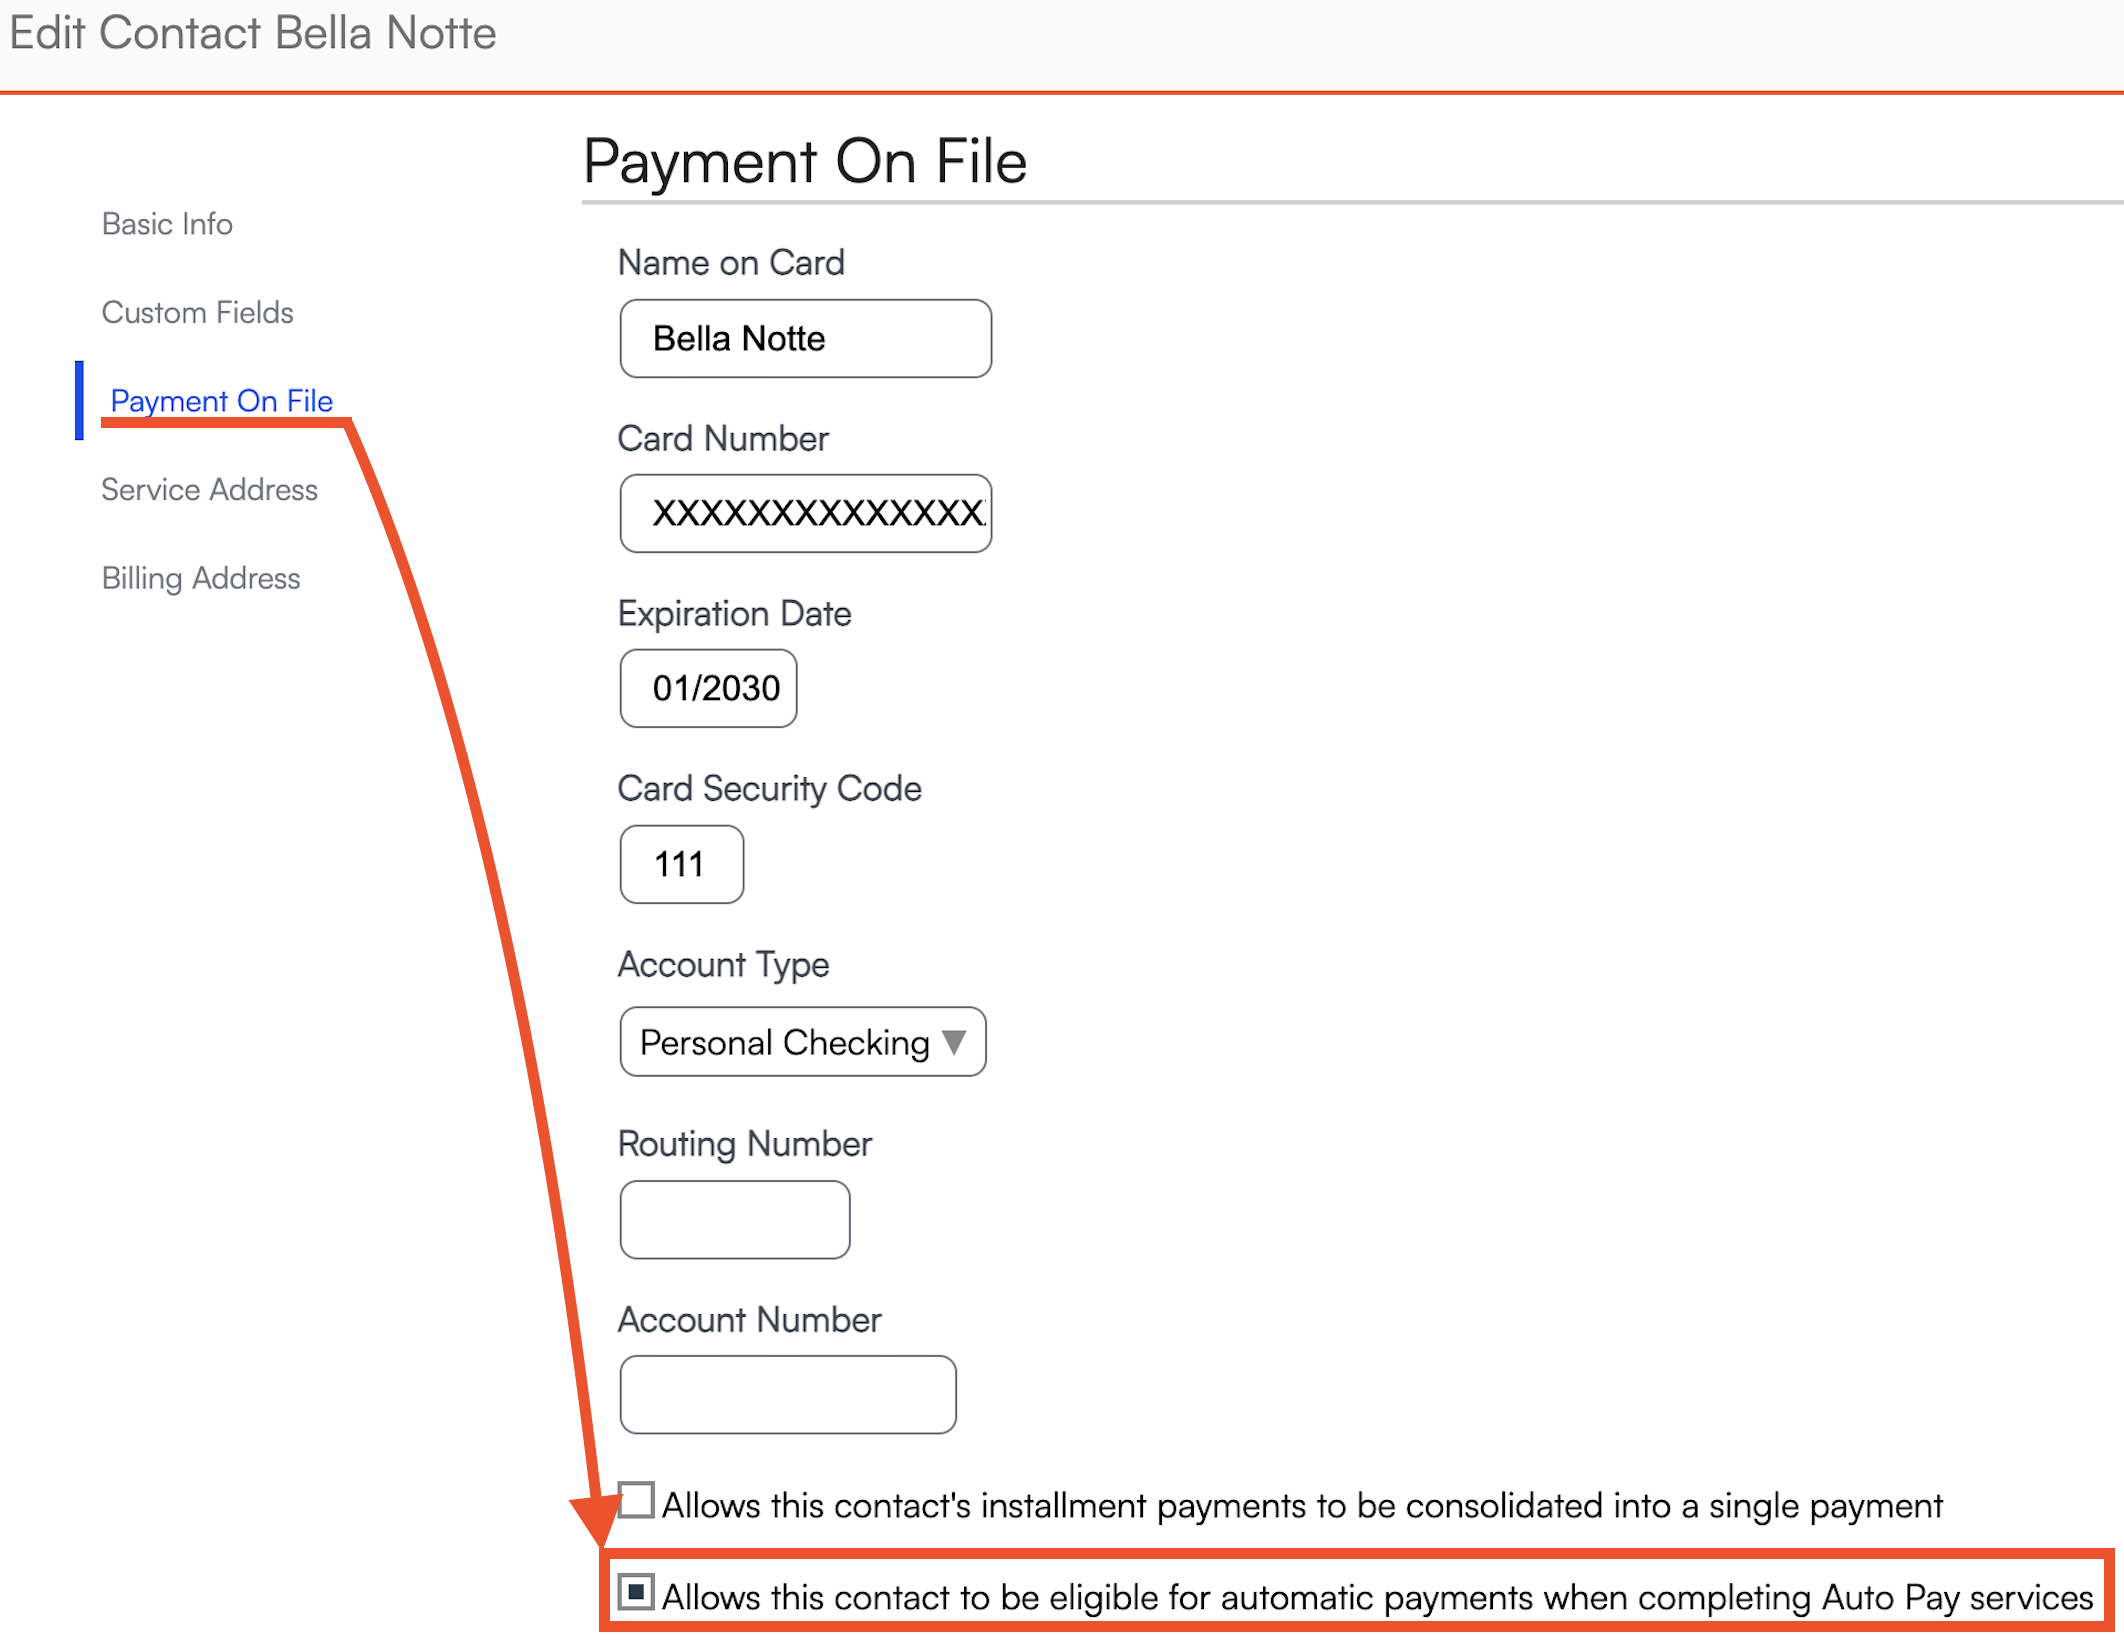
2. Enable Auto-Pay for Contacts
On the Contact Details page, you can opt the contact in to Auto Pay by:
- Adding a payment method on file
- Checking the Auto Pay box
3. Review General Payment Settings
Go to Control Panel > Integrations > Payments.
If Card on File Optional is checked, customers are allowed to choose if their card is saved on file. You can always enter their card information manually in the system, but if you want to save it automatically when they enter it themselves, make sure this box is not checked.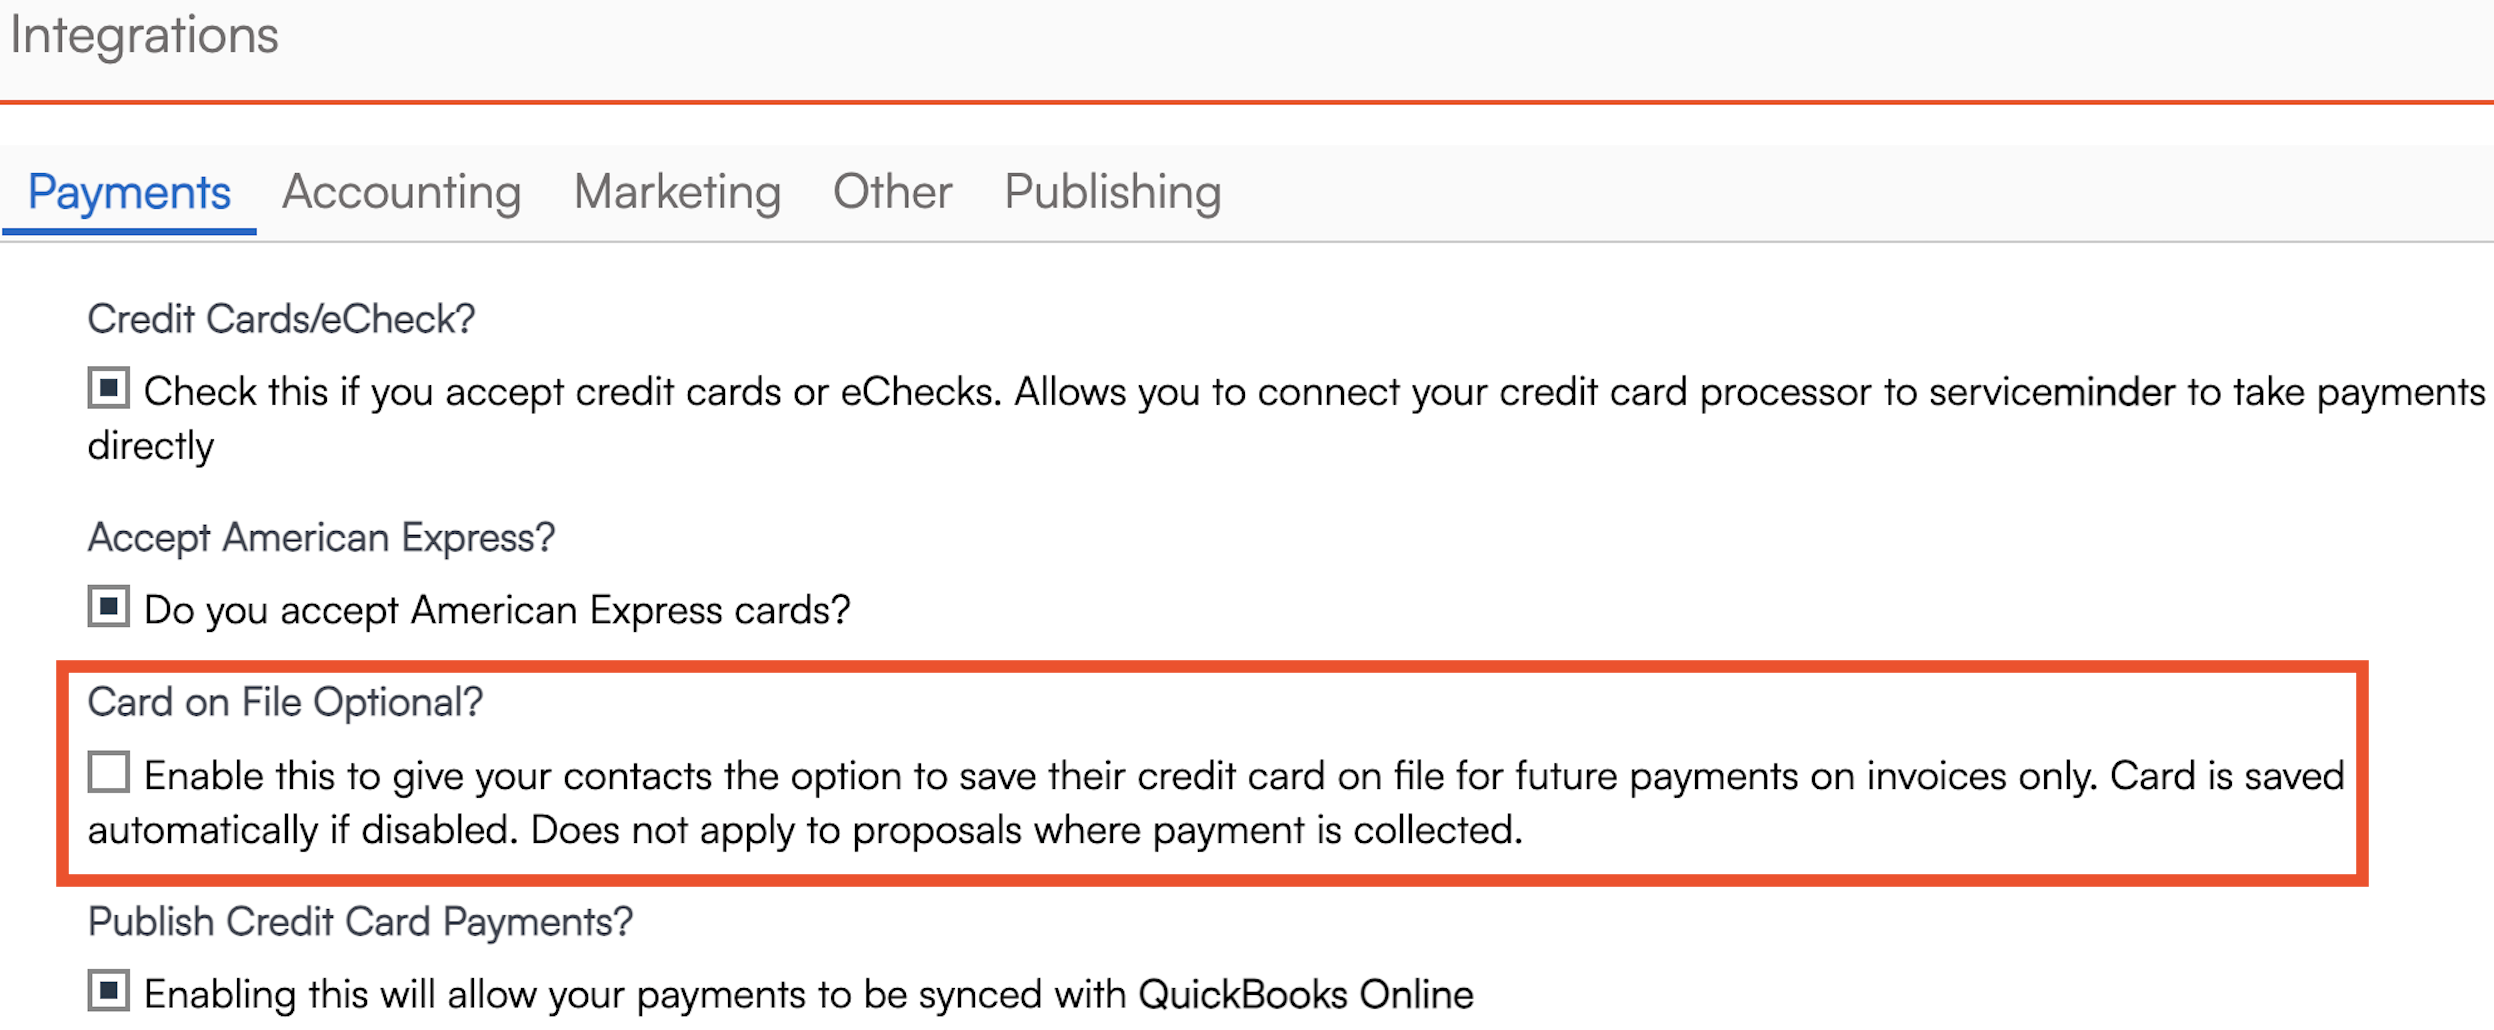
Using Auto Pay
If Auto Pay is on when the appointment is finished, and the contact has a card on file, an Installment Payment is automatically generated and scheduled to run shortly after completion. This will charge the contact's card, apply the payment to the invoice, and send them a receipt.
Failed Payments
If the payment fails, the installment payment will be in failed status (listed in the Failed Payments snapshot) and will send a notification to the contact that it failed with a link for them to click and update their card on file. When they do this, the charge will try again immediately and the payment will be applied to the invoice.
The installment payment will continue to be tried daily up to 3 times until it is successful or runs out of retry attempts.
If the contact does not have a card on file, we will send them the invoice to prompt for payment and to store the card on file for future services.
Recurring Billing
Recurring Billing lets you automatically create invoices for ongoing or subscription-based services — separate from job completion or Auto-Pay. It’s ideal for memberships, seasonal plans, or service bundles billed on a schedule.
Use Recurring Billing when:
- You want predictable revenue cycles (e.g., “bill every 1st of the month”).
- Services aren’t tied to individual job completions.
- You need to pre-bill or post-bill customers regularly.
Create a Recurring Billing Template
In Control Panel > Recurring Billing, you can create templates that define billing schedules for one or more services. Templates let you manage billing frequency, invoice type, and charge behavior in one place.

Important Settings
| Setting | Description |
|---|---|
| Frequency | The interval at which this billing plan runs (e.g., monthly, quarterly, annually). |
| Type | Defines how the payment appears on the contact’s record:
|
| Amount | The dollar amount charged on each occurrence of the plan. |
| Quantity | Used only when your Invoice Mode for this service is set to Accumulate (for subscription-style credit tracking). Leave blank otherwise. |
| Skip Charge | If checked, the system will not automatically charge the card on file. Instead, an invoice will be sent to the contact. |
| Send Invoice | Works only if Skip Charge is ON. If both Skip Charge and Send Invoice are checked, the system automatically emails the invoice to the customer for manual payment. |

Add or Review Recurring Billing Plans on a Contact
To see active or historical billing plans for a customer:
- Open the Contact Details page.
- In the Additional Details section, go to the Invoices tab.
- Select Recurring to view all current and past billing plans.
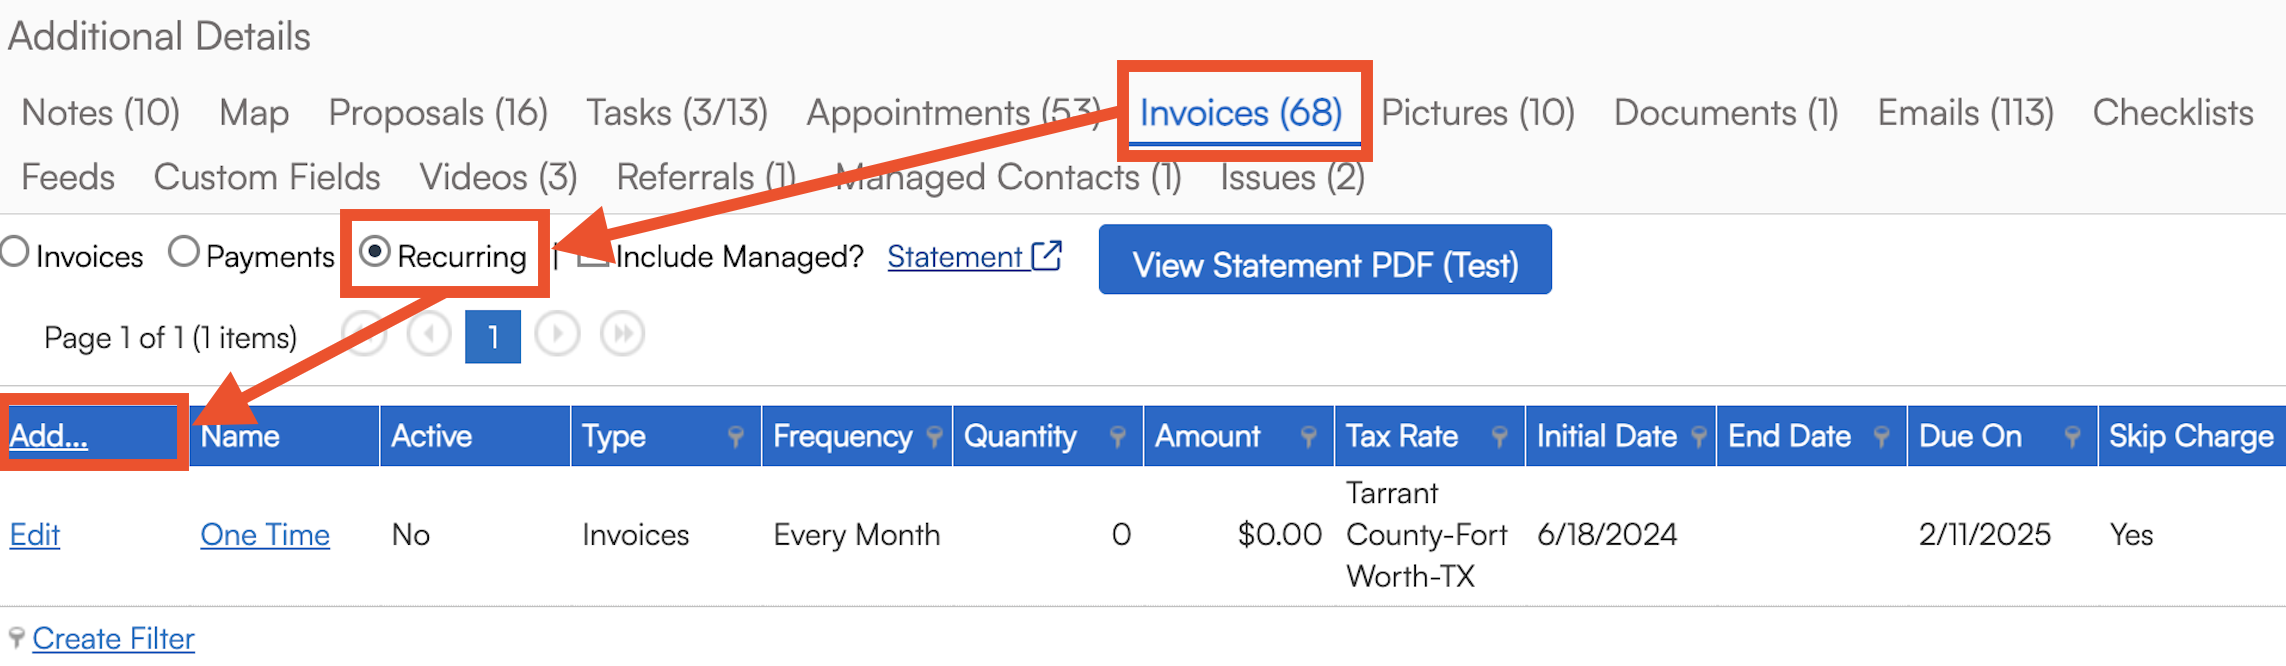
4. Click Add if you want to add a billing plan directly to this customer's account.
- Use the Template dropdown menu to choose a template that you've previously created.
- Fill in the information manually to create a custom billing plan.
You can also review all active Recurring Billing plans via the Recurring Billings tab in the Snapshots section of the navigation menu. This snapshot will not display in the menu until after you've got at least one active Recurring Billing plan in your organization.


End a Recurring Billing Plan
You can end a plan from either the contact’s record or the Recurring Billings grid.
- Click Edit next to the plan you want to end.
- Choose one of the following:
- Uncheck Active to end the plan immediately, or
- Enter an End Date to let the plan run until that date.
Once inactive, no new invoices will be generated for that plan.

Common Uses
-
Maintenance Plans: Offer annual or semi-annual service contracts billed monthly to make payments more manageable.
-
Subscription Credits: Use “Deposit” type billing to prepay for a set number of future visits or service credits.
-
Prepaid Packages: Bill clients upfront and apply credits automatically as jobs are completed.
Consolidated Payments (Batched Auto-Pay)
If you have Consolidate Payments enabled, Auto Pay will still create the installment payment but it won't run the card. All Auto Pay generated installment payments will instead run on the configured day and time.
When consolidated payments run, it will group all pending installment payments from prior appointments, charge the contact's card for the total amount of those payments and then apply that payment to the corresponding invoices.
Consolidating payments does not affect the original invoices. If you have 4 appointments that each generated a $25 invoice and consolidated payments are used, we will run a single charge for $100 and apply that payment to all 4 invoices.
Enable Consolidated Payments
- Go to Control Panel > Invoicing, navigate to the Consolidated Payments section and check the Consolidate Payments box.
- Choose whether or not to send separate invoice emails (the invoice emails are separate from the receipt email, which will be sent once per month when the payment is run).
- Select a date and time to run payments each month (payments can be run any time after 8:00am Central)

- Navigate to Control Panel > Services, edit any applicable service(s), and check the Auto Pay When Complete box.

- When adding a new contact, Consolidate Payments will default to the organization-level setting. This means it will automatically default to "On" for all new added contacts if it is enabled for your organization and you must turn it off for any new contacts that you wish to exclude.
- If contacts are in a "Managed By" relationship, Consolidated Payments will apply as long as both parent and child are opted in to Consolidate Payments and Auto Pay AND the parent contact (manager) has a card on file.


Transaction Error
If that transaction fails, we will send a notification to the contact and retry over the next two days. If the contact updates their card on file from the notification, we will run a single consolidated payment and apply to the open invoices.
Schedule
The auto-payments function only process payments between 8 a.m. and 8 p.m. in your timezone. This is intended to be a client-friendly favor so they aren't getting payment notifications on their phones at odd hours.
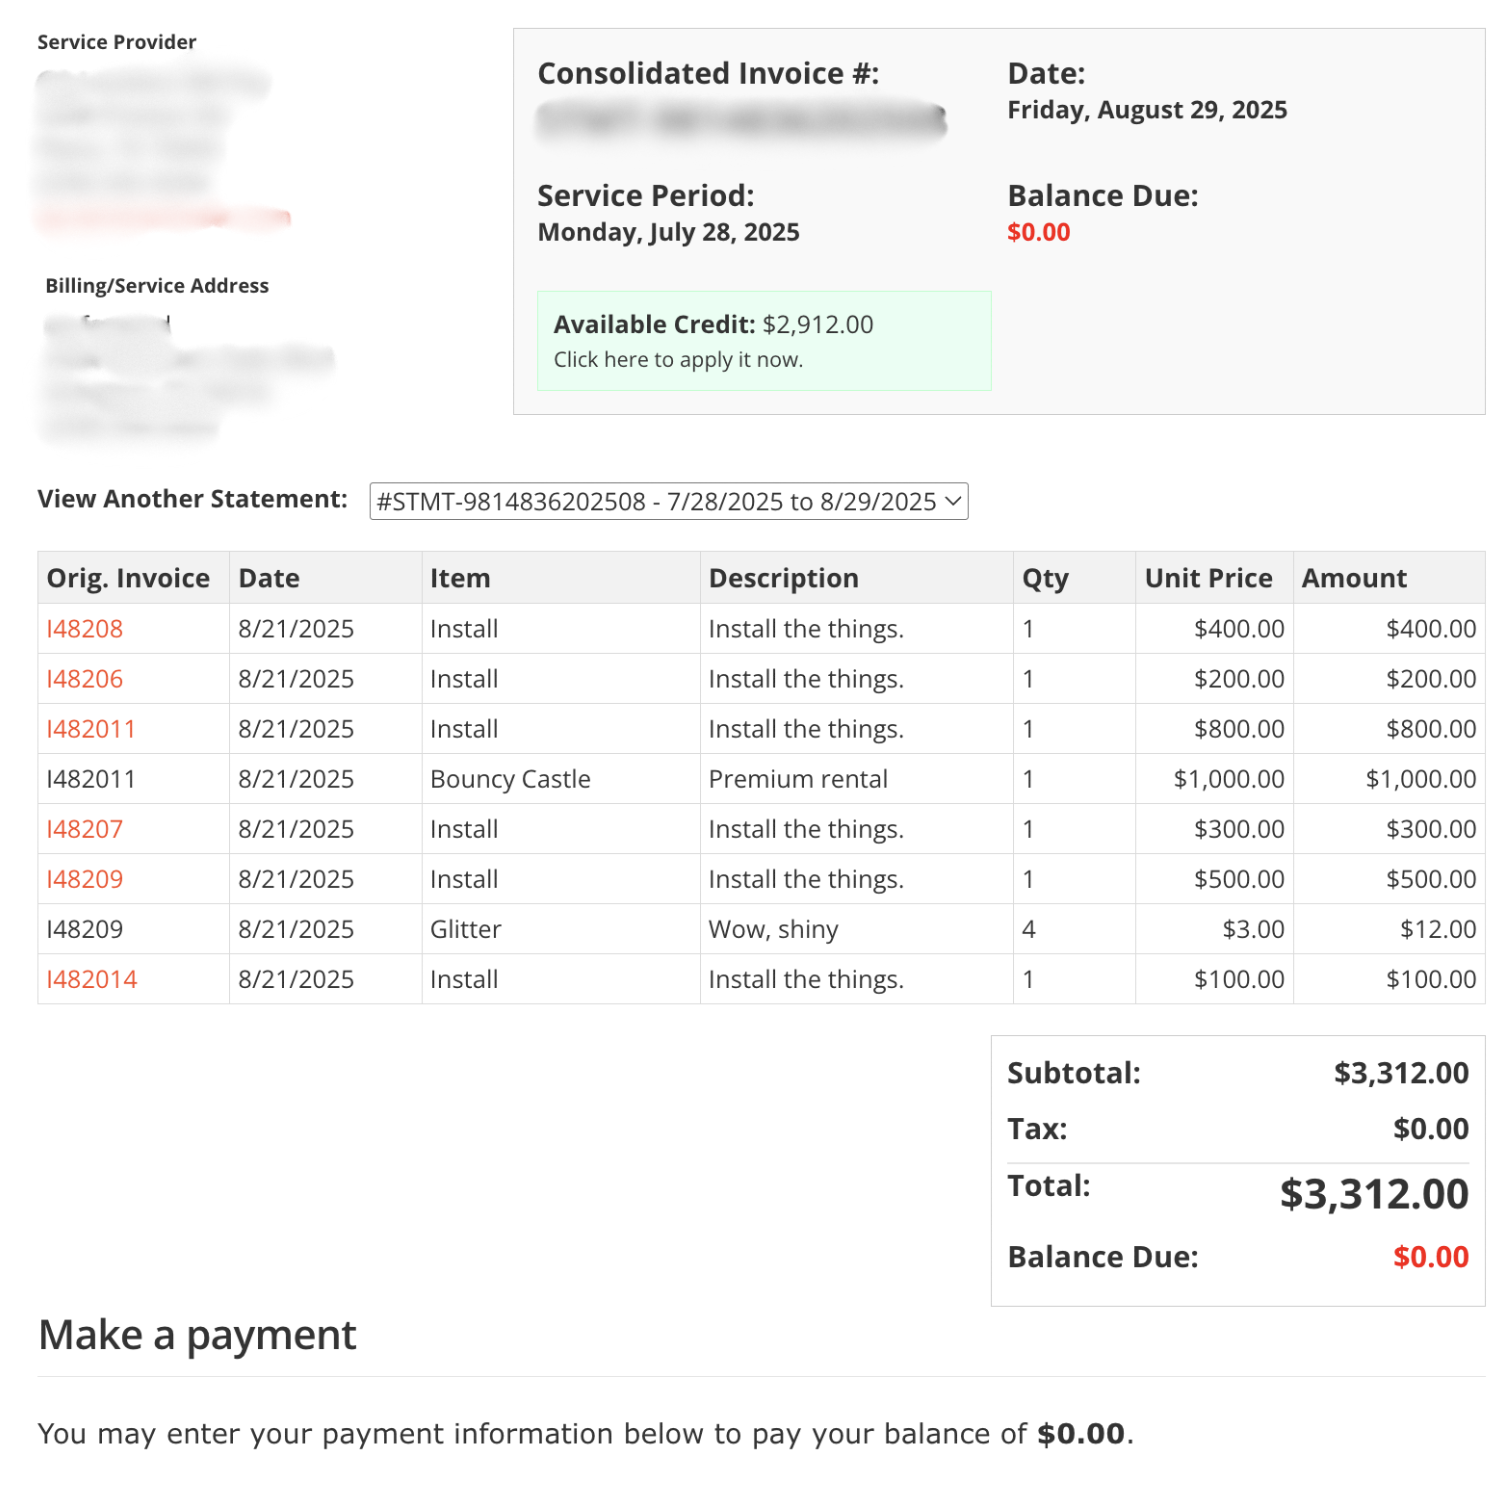
Consolidated Billing (Monthly Statements)
When Consolidated Payments is enabled, you can choose to send clients one consolidated invoice per billing cycle instead of an individual invoice for each appointment.
-
Enable at the organization level: Go to Control Panel > Invoice Settings > Payments and select the Consolidated Invoices checkbox (requires Consolidate Payments to be enabled).

Opt-out at the contact level: From any Contact Details page, in the Payment on File section, you can turn off consolidated invoices for specific accounts. 
Each consolidated invoice is generated on the scheduled payment date. It includes all open invoices for the billing period with:
- Original invoice numbers, services, descriptions, and dates
- Full itemized breakdown and credits applied
- Account total due, payment status, and terms
Statements are:
- Emailed automatically to the primary contact and any CCs using the automated email template titled "Statement Ready Notification"
- They will be emailed on the day of the month that is entered into the Consolidated Payments Day.
- If Consolidated Payments are not set up, no payment will be charged but the invoice statement will still be sent.
- Emails will include a link to view the statement on the web as well as a PDF copy of the statement for download.
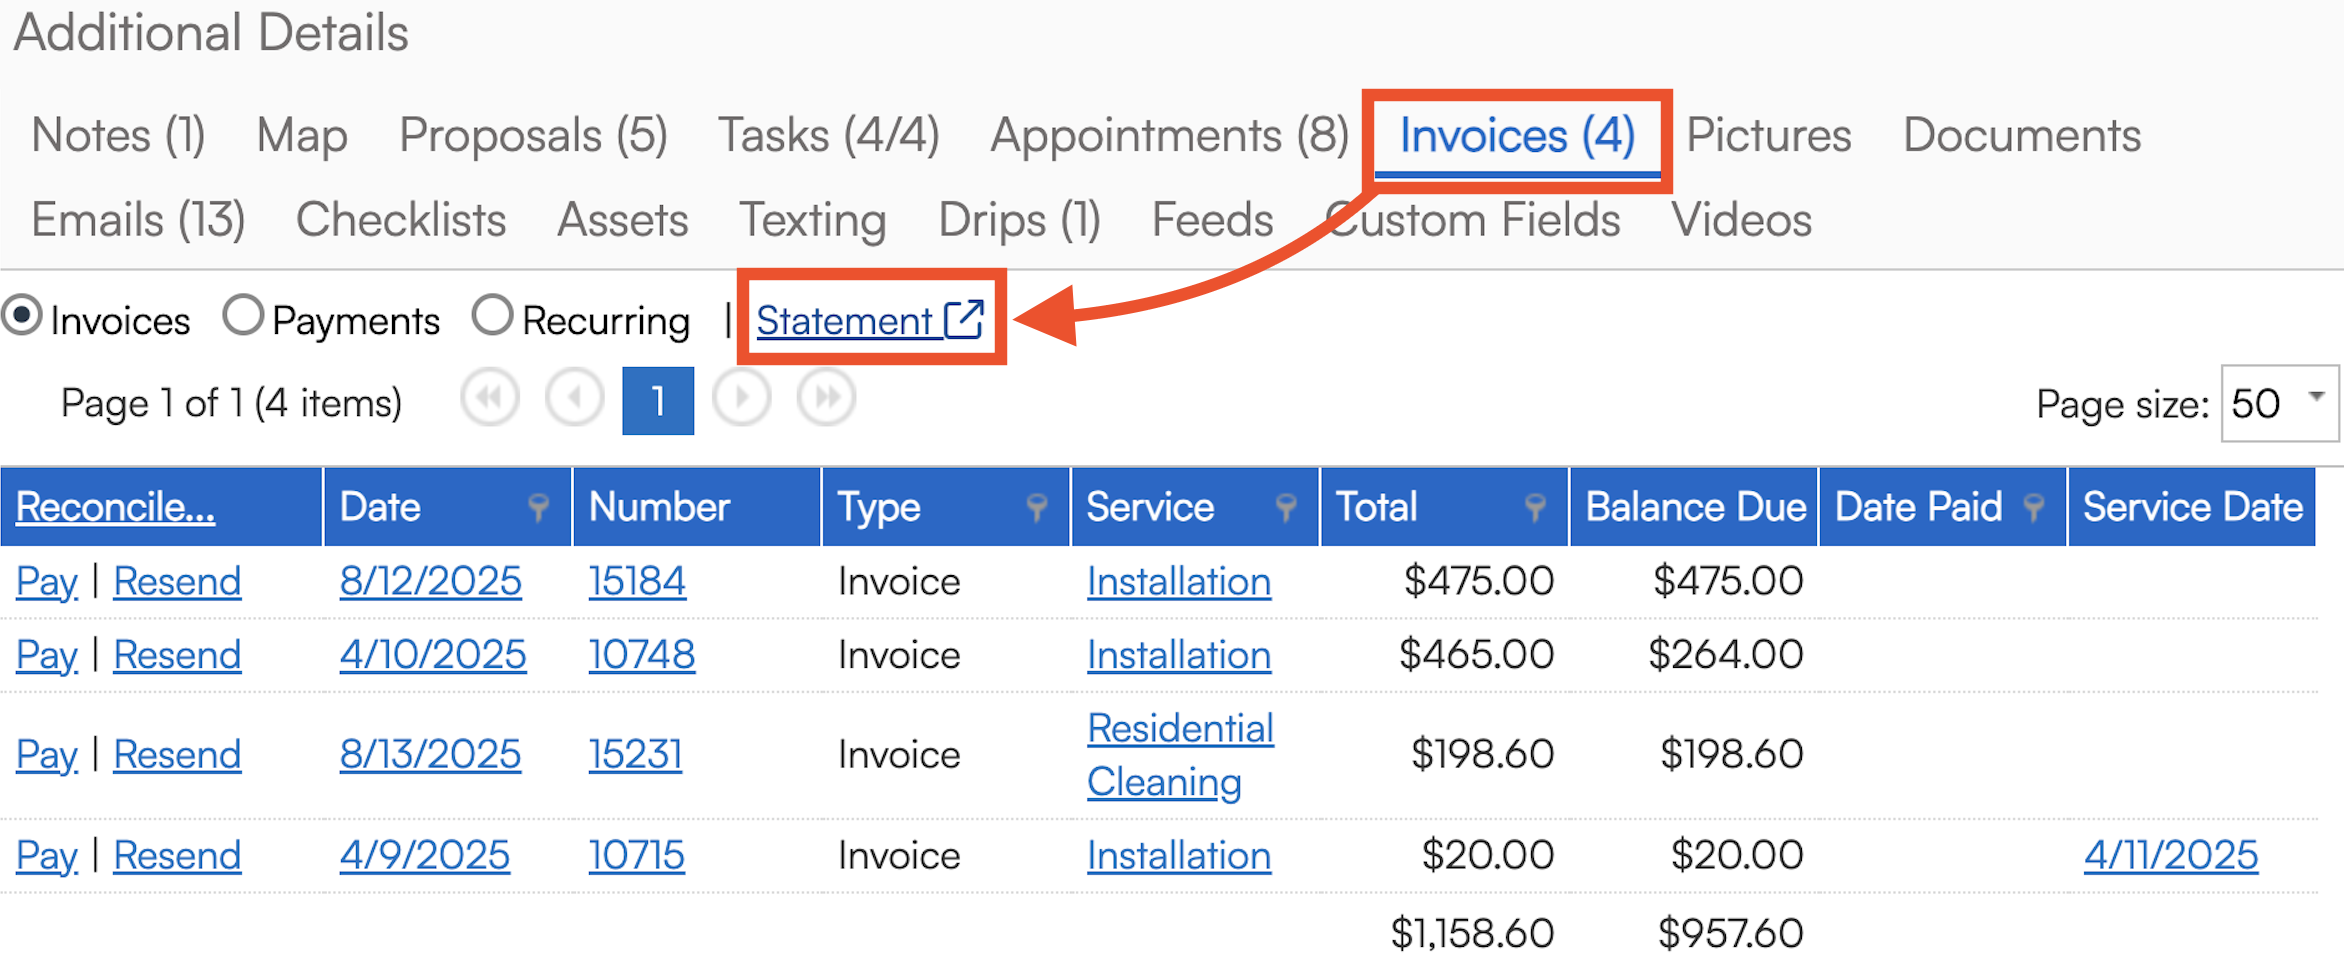
- Stored in the contact record under the Invoices tab > Statements for re-download or resend by period (MM/YYYY)
- Choose different statements by selecting a different date range using the "View Another Statement" dropdown menu
- Choose different statements by selecting a different date range using the "View Another Statement" dropdown menu

FAQs
If we want consolidated payments to happen on the last day of the month, should we put 31? Or would putting 31 cause all the months that end in 30 or Feb to miss?
Setting the consolidated pay date for 31 will run on the last day of each month (i.e., June 30 or February 28).
How do I know if someone has their card on file?
You will see it on their Contact Details Page. There is a Card on File section that appears with a blue pencil and an X next to it in case their cc information needs to be updated or you want to remove that cc completely.
Will historical invoices be backfilled into statements with Consolidated Invoicing?
No. Consolidated invoicing begins after your organization enables it. Past invoices remain as-is.
