Overview
Drips is an add-on feature available in serviceminder. If you don’t see Drips in your side navigation panel, this feature hasn’t been activated for your account. Please check with your brand administrator before purchasing.
Drips consist of two core components:
Triggers – One-time events that initiate a single action.
Campaigns – Multi-step sequences triggered by an event and executed over a period of time.
This article focuses on Drip Campaigns—automated workflows that guide contacts through a series of timed actions like emails or texts.
This article will review:
What is a Drip Campaign?
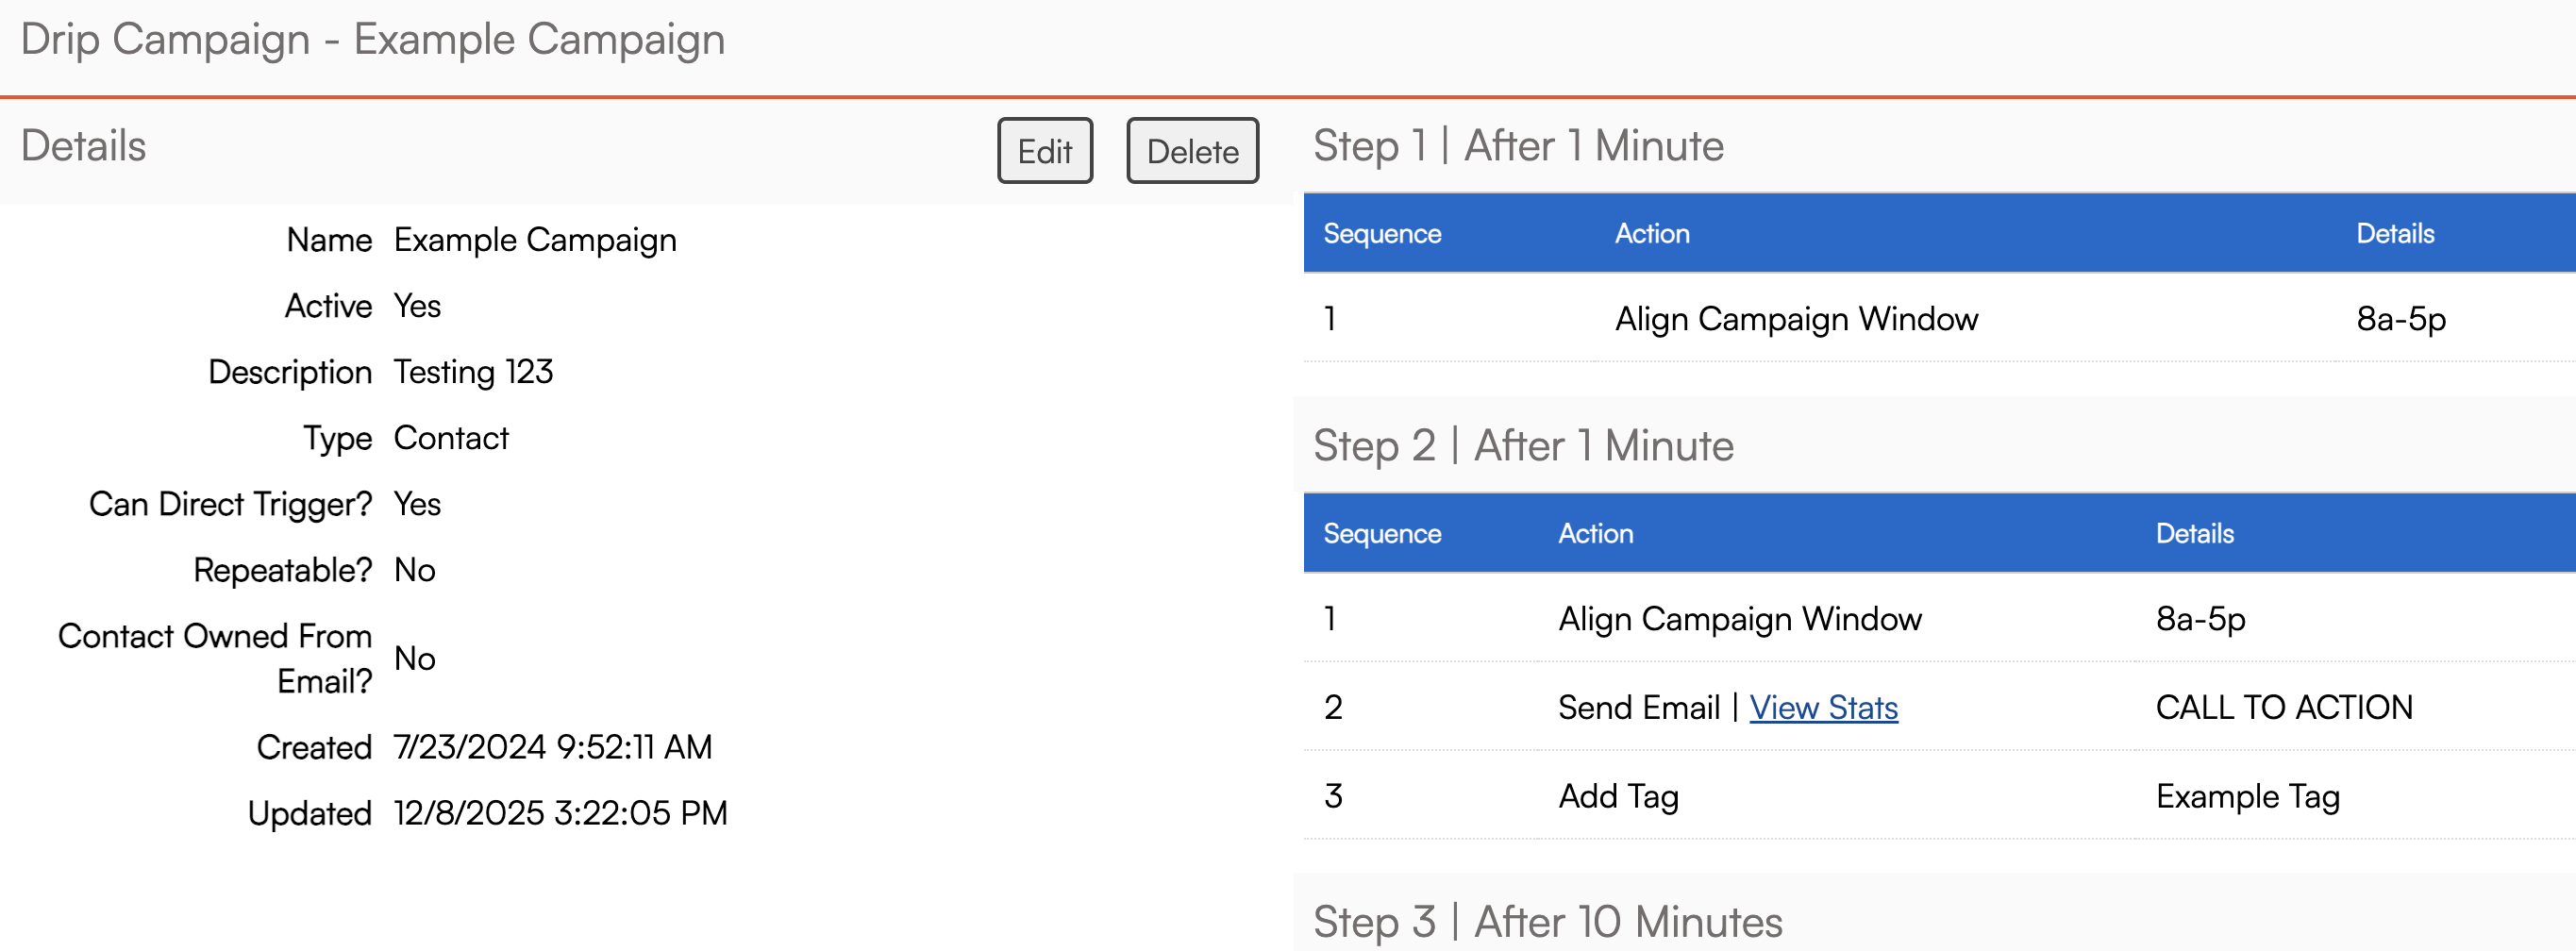
A Drip Campaign is a scheduled sequence of actions that run based on time intervals you define—ranging from minutes to months. Each step in the sequence can execute one or more actions (such as sending an email or updating a contact record).
Example:
Let’s say you want to follow up after sending a proposal:
Day 0: Send a "Thanks for considering us" email.
Day 10: Send a "Why we’re the best" message.
Week 3: Deliver additional educational content.
All messages can include a link to the proposal, keeping your contact one click away from moving forward.
Once the prospect accepts the proposal, you’ll want to stop the campaign. You can do this using a Trigger that detects proposal acceptance and includes an action to stop the associated campaign.
Video Tutorials
Drip Campaign Tutorial
Using Ad Hoc Emails with Campaigns
Settings and Navigation
In the side Navigation panel, scroll to the Administration section and select Drips.
Select Campaigns to view, edit, or create campaigns.
Create a Campaign
Click Add at the top of the campaign list to create a new campaign.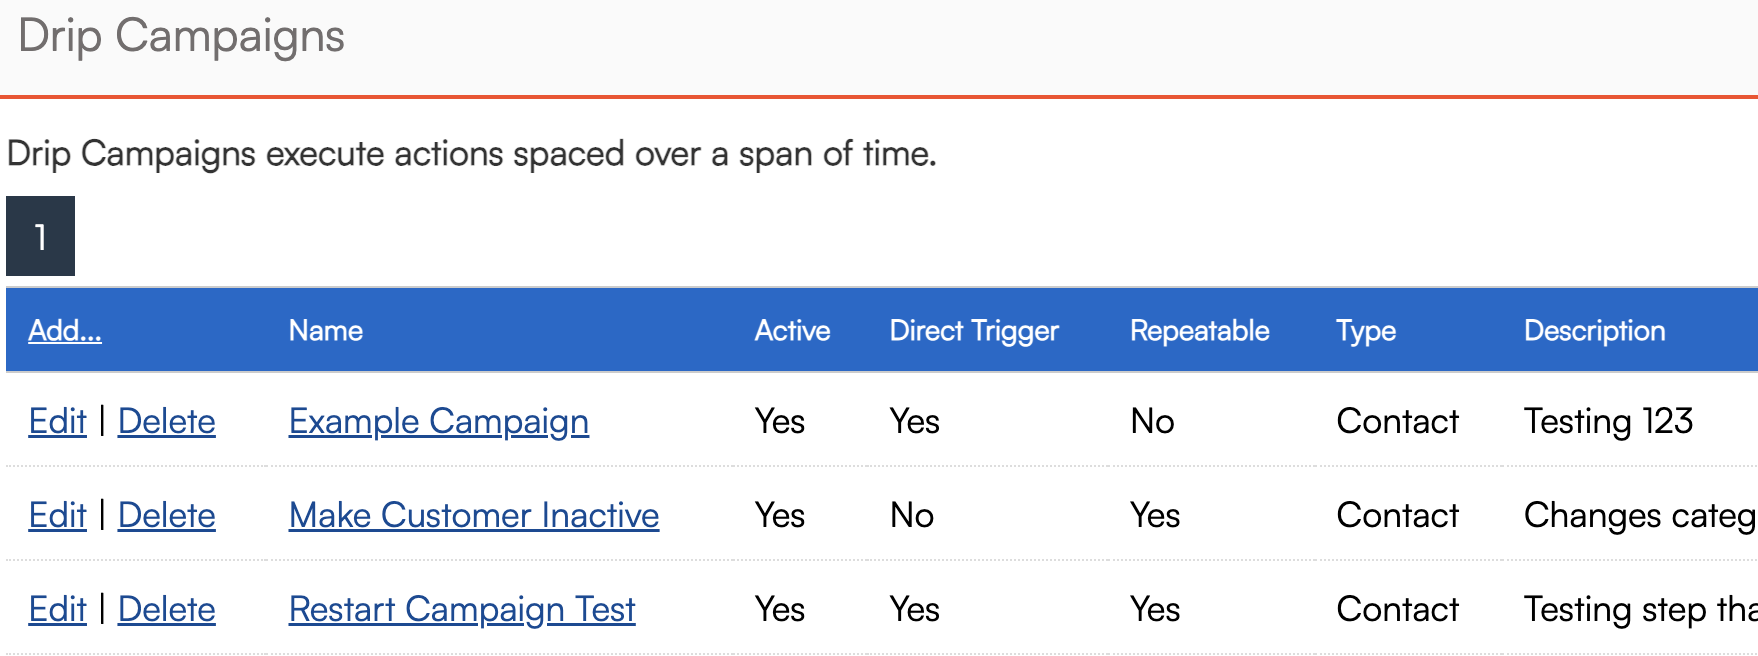
Required Settings
- Name – Internal label for the campaign.
- Description – Explain the purpose or strategy.
- Related To (Type) – Must match the related Trigger Type and Ad Hoc Email Type:
- Contacts
- Appointments
- Proposals
- Invoices
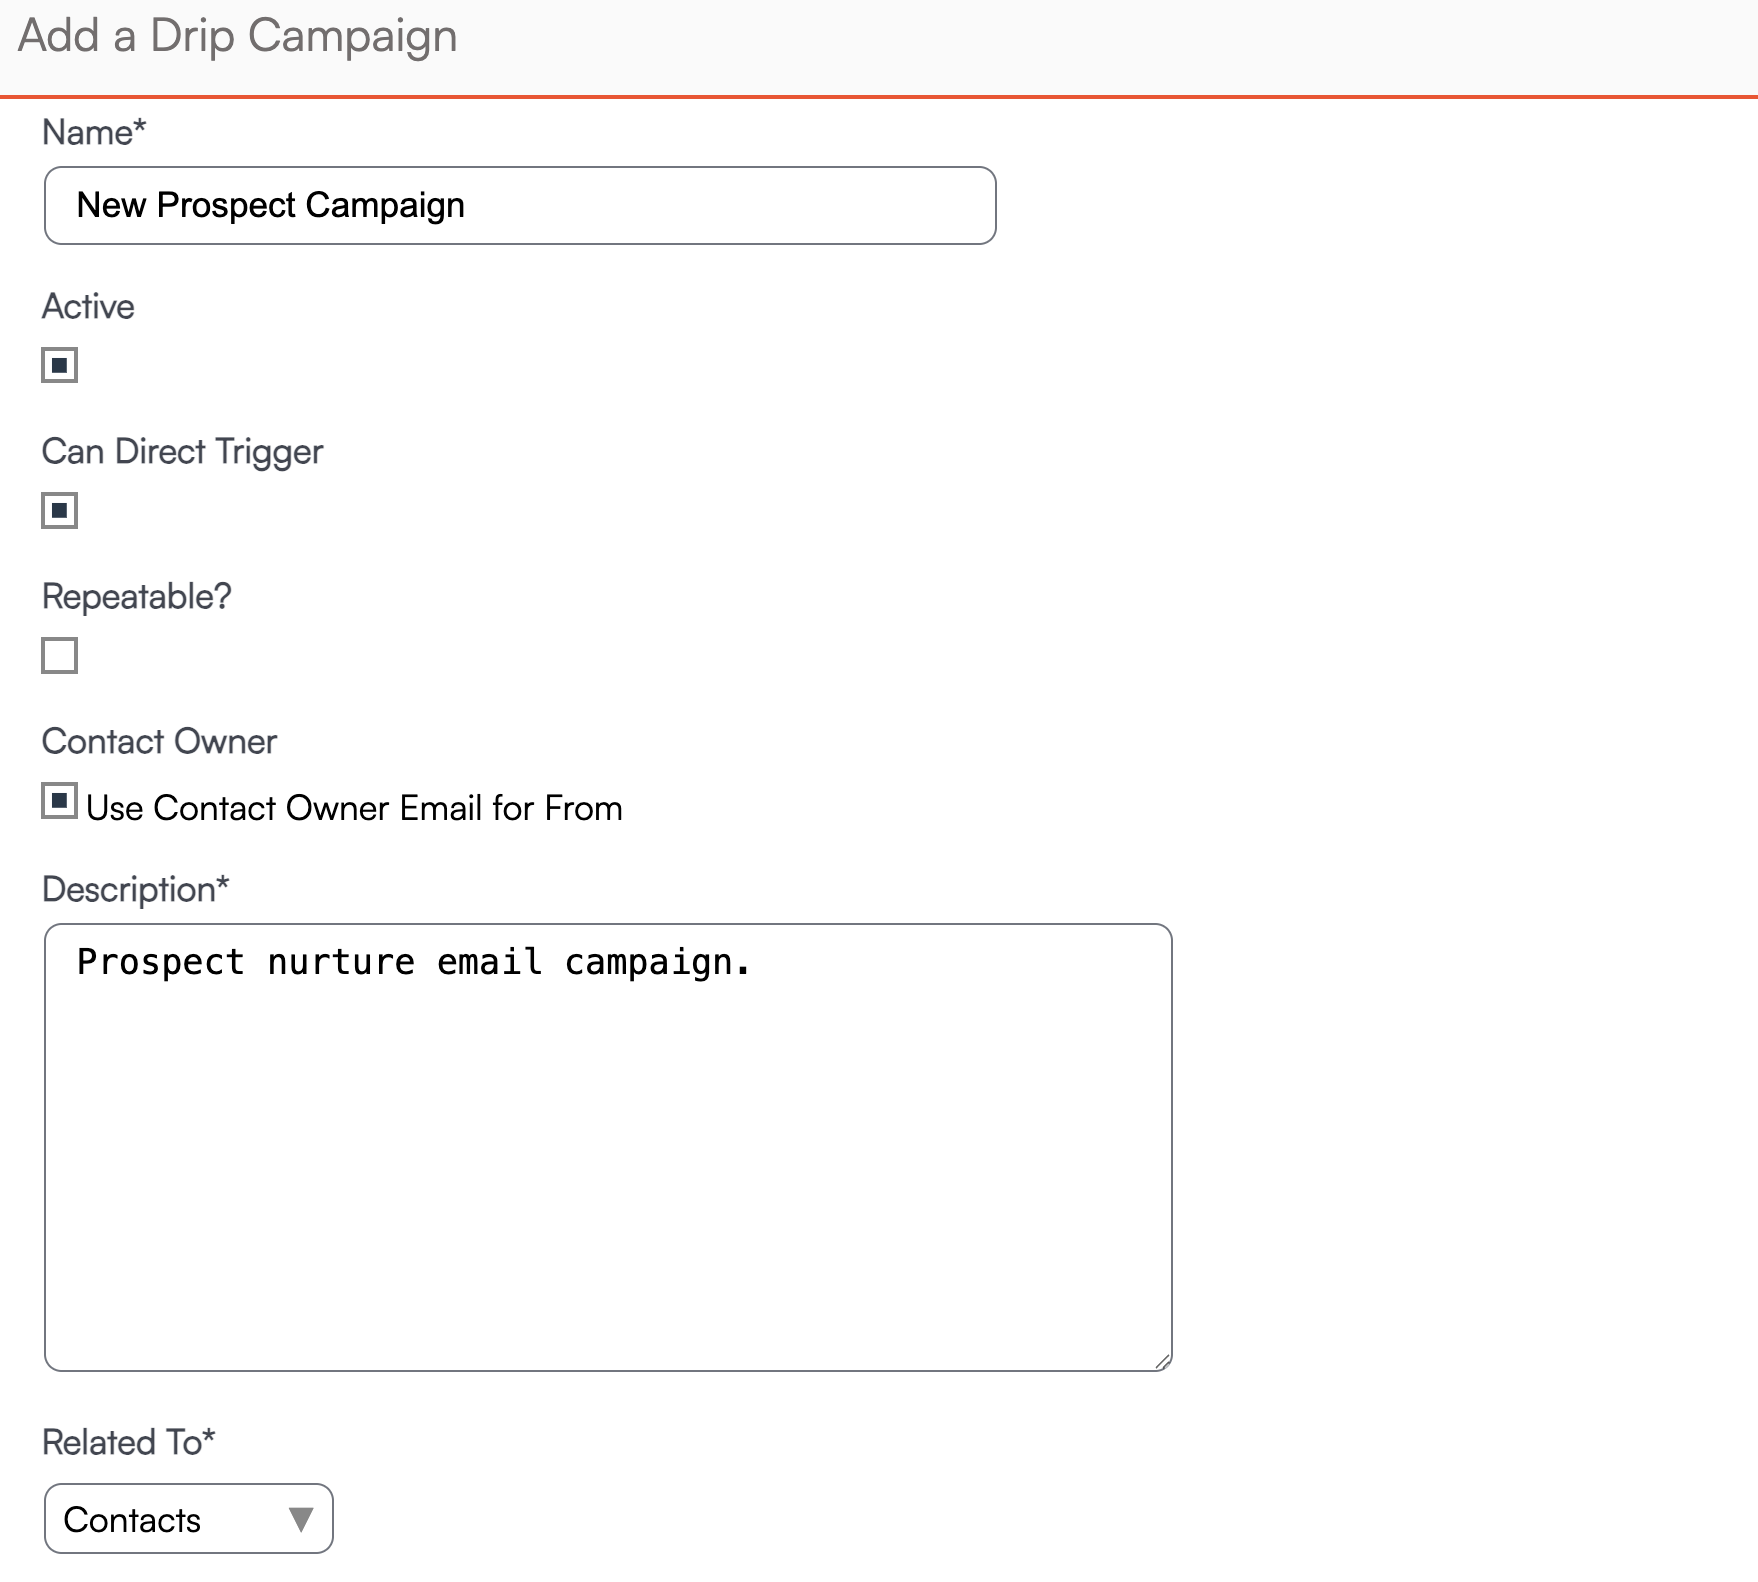
Optional Settings
- Can Direct Trigger – Allows you to manually start this campaign from a details page (e.g., Proposal Details) using the Drip option.
- Repeatable – Allows the same contact to enter this campaign more than once.
- Contact Owner – Uses the owner's email for sending messages.
Building Your Campaign
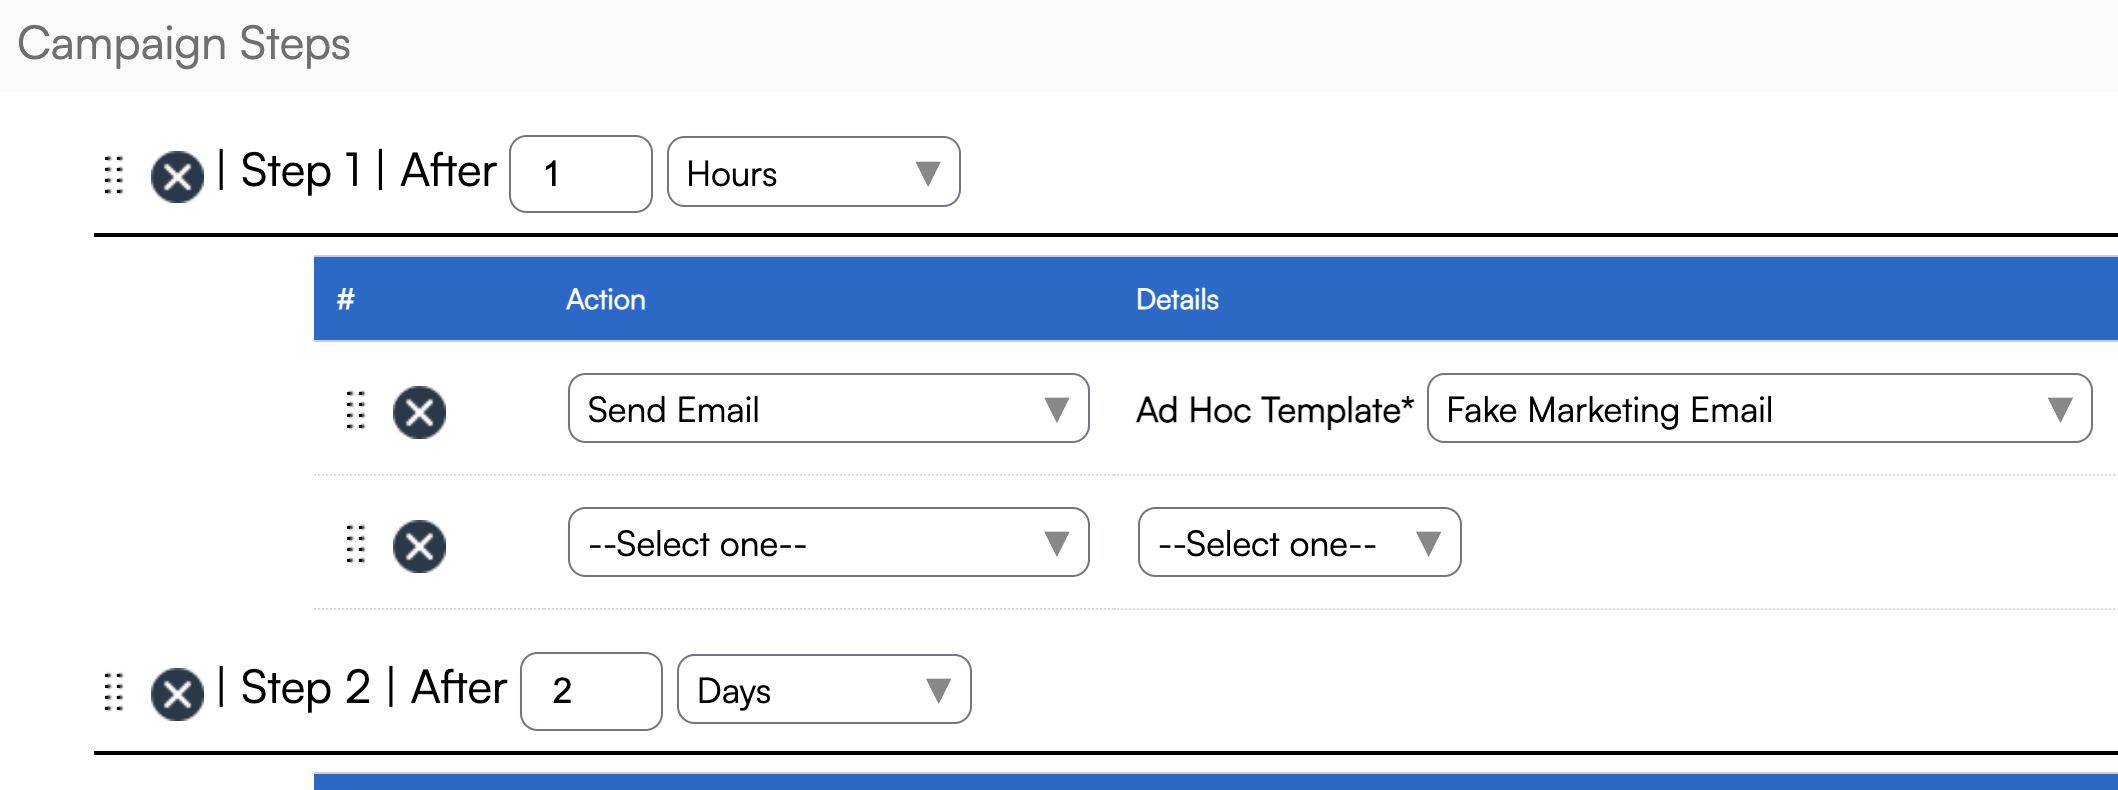
Each campaign is made up of steps, executed based on a delay from either the trigger or the previous step. Time intervals are relative, so be mindful of cumulative timing if you need specific delivery dates.
Step Example:
- Step 1: 5 days after trigger fires → Send an email using an Ad Hoc Template.
- Step 2: 3 weeks after Step 1 → Send another email.
Note: Email templates must be created ahead of time to appear in the dropdown menu.
Controlling When Campaigns Run
Use the Align Campaign Window action to:
- Send actions only during specific times (e.g., weekdays, between 9–5)
- Prevent emails/texts from being sent at odd hours
To set the first step to run at a specific time:
Step 1: Add only an "Align Campaign Window" action (acts as a dummy step).
Step 2: Add your actual campaign action.
The Align Campaign Action ONLY affects the step which follows it. So, you'll need to add this action to EVERY step in a campaign if you want the next step to be tied to a specific time or day or day of week.
Manually Start a Campaign
From the contact details page, use the Actions menu in the top right corner. Select Drip!
 Choose the desired drip campaign from the dropdown menu and click Launch.
End a Campaign
Automatically End Campaigns:
- Use a separate Drip Trigger to stop the campaign based on an event (e.g., proposal sent).
- Use the Exit If action within the campaign:
- Filter contacts based on Tags or Categories.
- Filter based on associated Services or Parts.
- Use the End Campaign check box to stop the entire campaign (recommended for early steps).
- Without End Campaign selected, only the step containing the Exit If action is skipped.
Tip: It’s best to define your audience with your start Trigger or build separate triggers to stop Drip Campaigns, rather than relying too heavily on Exit Ifs. It makes it more clear cut for the system to react whenever that event takes place.
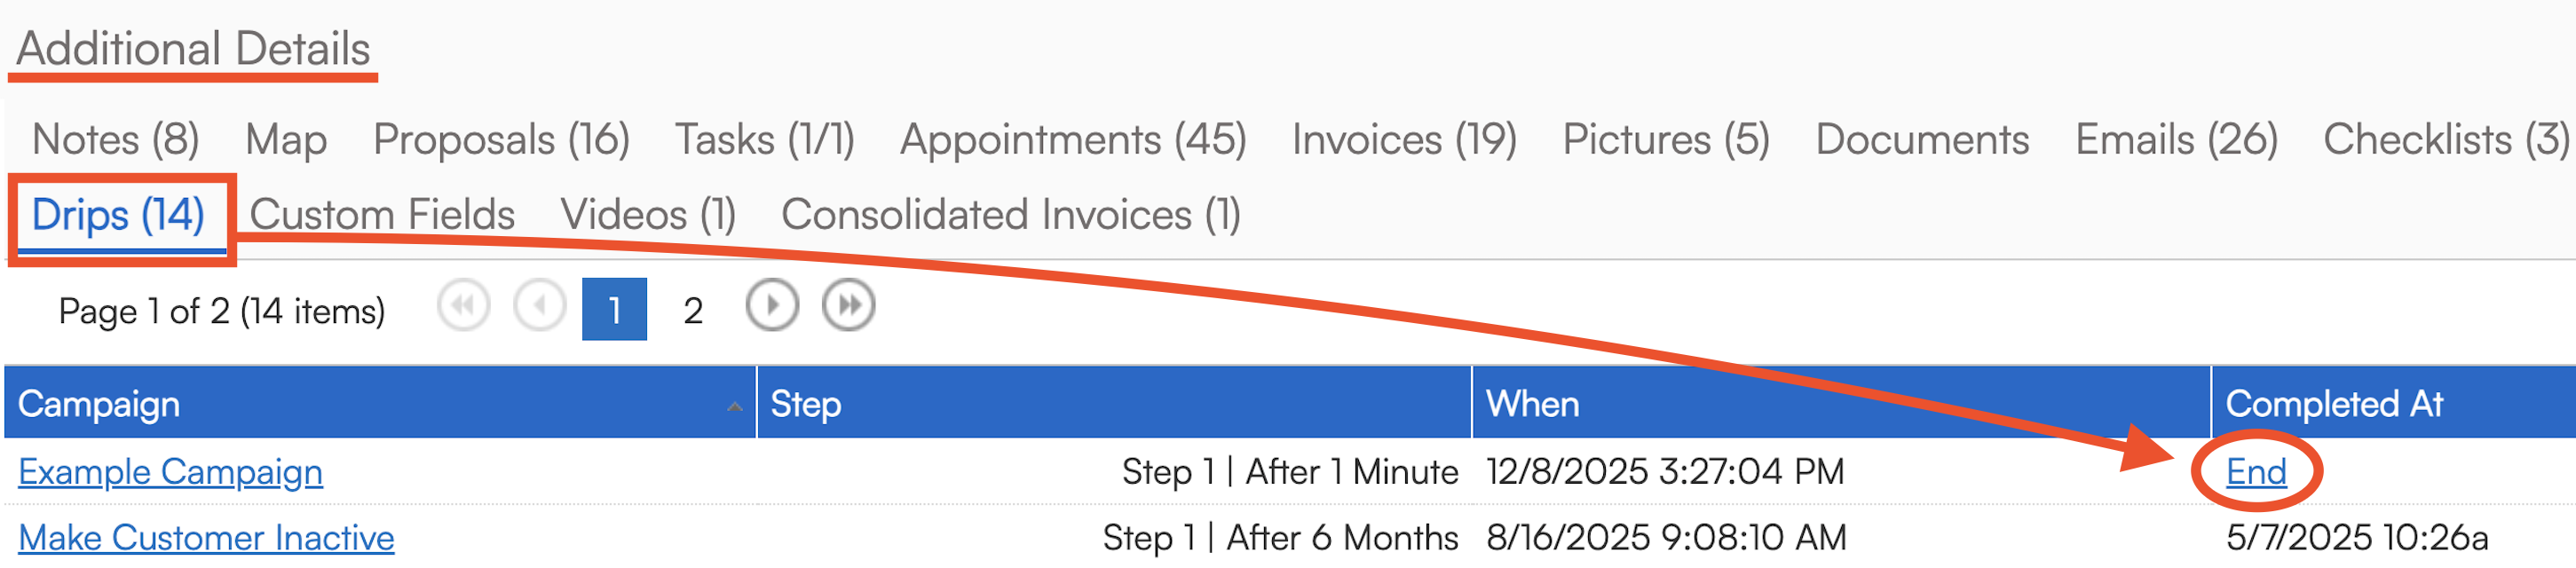
Manually End a Campaign
Go to the Contact > Additional Details > Drip section.
You’ll see a list of active campaigns and have the option to end them manually.
Testing Campaigns
Before launching your Drip Campaign live, thorough testing ensures everything works smoothly and avoids unexpected issues.
Here’s a streamlined approach to testing:
1. Create a Test Contact and Trigger
- Set up a dummy contact (e.g., "Test User") and tag it specifically for testing (like "TestDrip").
- Build a temporary trigger based on that tag to safely start the campaign without involving real prospects.
2. Speed Up the Timeline
- Adjust step delays to minutes or an hour instead of days or weeks.
- This allows you to move quickly through the entire campaign without long waits.
- Once you validate the flow, adjust delays back to your real-world intervals.
3. Add Notification Actions
- Insert "Send Notification" actions after key steps to receive email alerts during testing.
- This helps you confirm each step is executed as expected and allows fast troubleshooting if needed.
4. Review Every Message
- Check each email or text that is sent during testing for:
- Correct personalization
- Working links
- Proper branding and formatting
- Make any necessary adjustments to your templates before going live.
5. Test Campaign Exits
- Simulate actions that should stop the campaign (like proposal acceptance or status changes).
- Confirm that the Exit If actions or stop triggers behave correctly—either stopping the campaign entirely or just halting individual steps as configured.
6. Final Prep for Launch
- After a successful test, revert any timing changes.
- Remove any testing-specific triggers or tags.
- Confirm that reporting (opens, clicks, sends) looks accurate.
Pro Tip: If possible, do a soft launch with a few real prospects to catch any final surprises before rolling it out fully.
Editing Active Campaigns
Once a Drip Campaign is active and running, any edits need to be made carefully. Because contacts may already be moving through the steps, updates can impact live automation if not handled properly.
You cannot redeploy an edited campaign from the brand level without risks. If you do, it can:
Freeze contacts currently moving through the campaign
Remove contacts from the campaign entirely
Create duplicate campaigns if the name changes
Instead, updates must be made manually inside each organization. While it takes a little more effort upfront, it protects your active workflows and ensures a smooth experience for your contacts.
- No mass redeployment: Always edit campaigns directly within each organization if they are already active.
- Be careful when renaming: If you change a campaign name and redeploy, serviceminder treats it as a brand-new campaign.
- Editing is safer than redeploying: Minor edits like updating content, adjusting timing, or changing actions are fine—as long as you edit manually at the org level.
If you anticipate major changes (like a full restructuring of the campaign), it’s often smarter to create a new campaign instead of editing a live one. This keeps your current contacts moving through their original steps without disruption, while giving you a clean setup for the new version.
Drip Campaign Reporting
Back on the main Drips page, you will see three columns specifically about the emails and campaigns sent with tracking for opens and clicks.
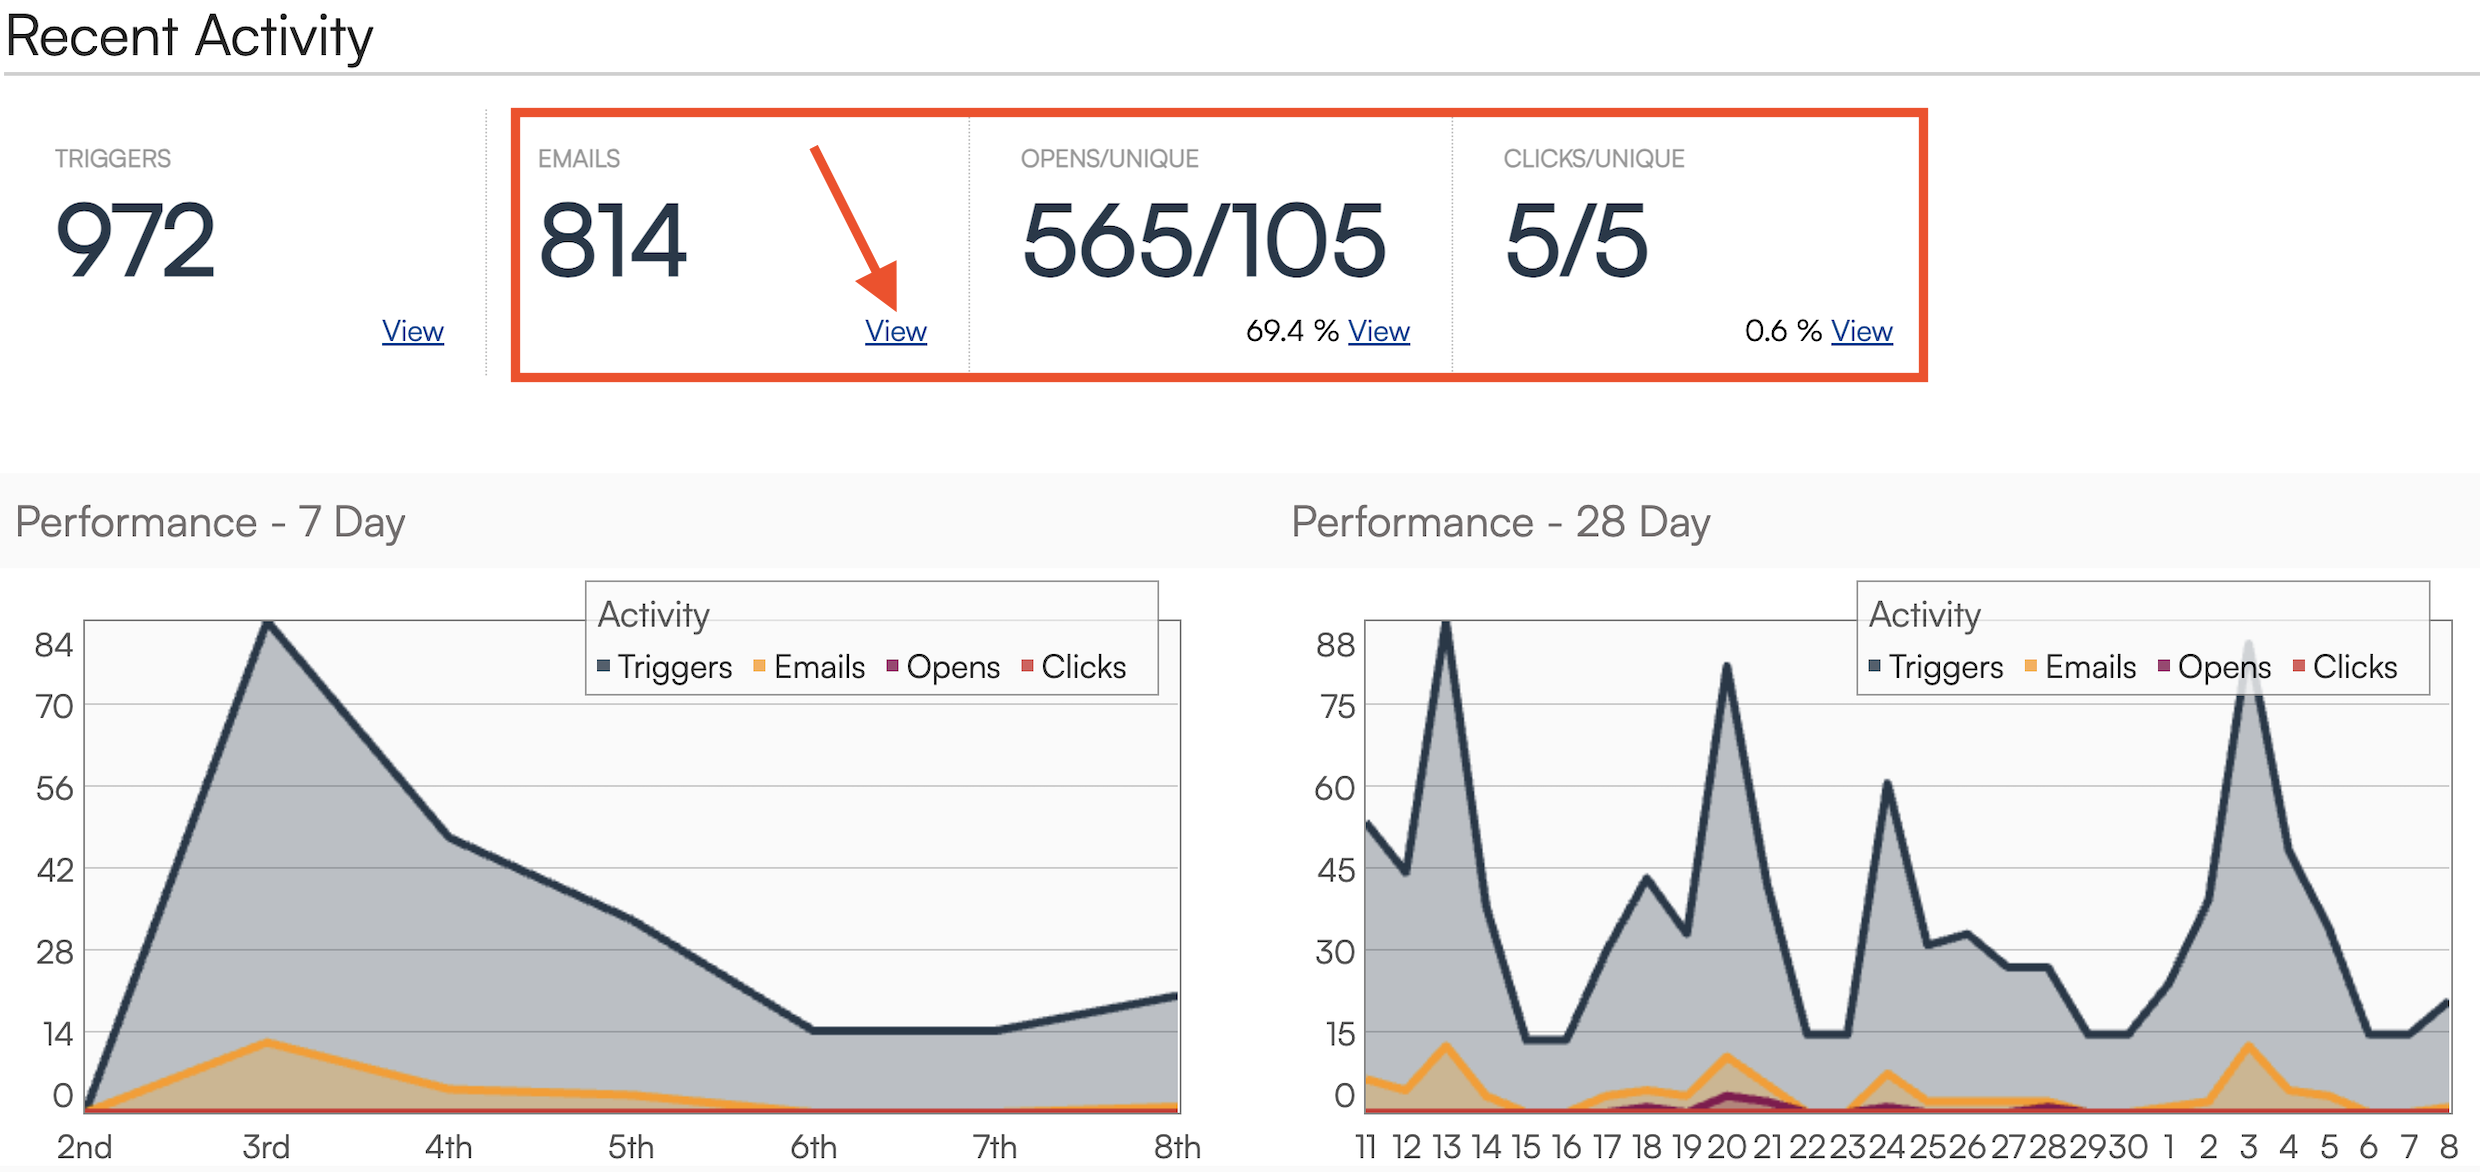
- Triggers - A count of all triggers that have recently been activated.
- Emails - A count of all emails that have recently been sent via trigger.
- Opens/Unique - These are a total number of times a drip email or text was opened. The same person may reopen the same email twice, so the Unique count provides a total of unique individuals who opened the email or text.
- Clicks/Unique - These are a total number of times a link in a drip email or text was clicked. The same person may clicked on the same link twice, so the Unique count provides a total of unique individuals who clicked on links.
You can click on any of the View links to get more details about recent actions.
FAQs
What’s the difference between Drip Campaigns and Campaigns?
The Campaigns button is for one-off marketing email blasts.
Drip Campaigns are multi-step automated sequences triggered by specific events, often tied into taskboards or contact actions.
How do I start a Drip Campaign?
You'll need to build a Drip Trigger that starts the campaign you've created.
Can I, as a franchisee, create my own campaigns?
Yes, if you have the Drips add-on enabled in your billing plan and the Drips permission granted. Franchisees can create their own drip campaigns, triggers, and taskboards, even if the brand provides standardized processes.
How can I separate lost leads between web leads and phone leads?
You can use tags to label contacts by source (e.g., "Web Lead," "Phone Lead"). Then, when building your campaign or triggers, filter based on those tags to target the correct group.
If you automate tagging when leads are created—such as through different API keys—you can fully automate this step!
Can a customer’s text message stop a campaign?
Yes, but it takes a little setup. You can:
Enable inbound text notifications so users are alerted when a customer texts back
Create a trigger that watches for common reply words ("stop," "yes," "no," "thanks") to exit the campaign
This helps you catch most inbound customer responses without manually checking each one.
Where should I start if I'm new to building automations?
- Start with a Taskboard first—lay out your stages and statuses.
- Then create Ad Hoc Email and Text Templates.
- Once those are ready, build your Drip Campaign, and finally, create the Triggers to start and stop the automation.
Take your time, test often, and consider piloting with a small group of users before full rollout.
Why can’t I see my ad hoc email template inside my campaign?
Your ad hoc email must match the same category type as your campaign. For example, if your drip campaign is "Appointment" based, the ad hoc email template also needs to be built for Appointments. If they don’t match, the system won’t show the template in the dropdown.
