Overview
Recurring Appointments is a scheduling option which allows you to create appointments that are set to occur on a regular basis. If you need to revisit a customer every two weeks on Wednesday at 9:00 am, this would be the way to do it. This page will go over the different options you'll have available to you when scheduling recurring appointments, as well as how each option will function in a live environment.
This article will review:
Video Tutorials
Create and Schedule Recurring Services
Edit Recurring Appointments
Settings and Navigation
In Control Panel > Services you can enable certain services to always be scheduled as recurring appointments. Under the Scheduling section, make sure that you choose Recurring in the Scheduling Mode dropdown menu. This will open a new set of options for you below.
 This will open a new set of options for you below where you can determine the frequency, number of occurrences, end date, initial pricing, and jumpstart count. Each of these settings will be discussed in detail in the rest of this article.
Frequency, Occurrences, and End Dates
Frequency
The frequency is set on the service level or on an individual appointment by using the Occurs dropdown menu. The frequency options available are as follows:
- Once: This is the default option. Functions exactly like creating a single appointment.
- Daily: Defines an appointment that occurs once every so many days (ex. occurs once every two days). Based on what you enter into the first box, the appointment will occur every n days.
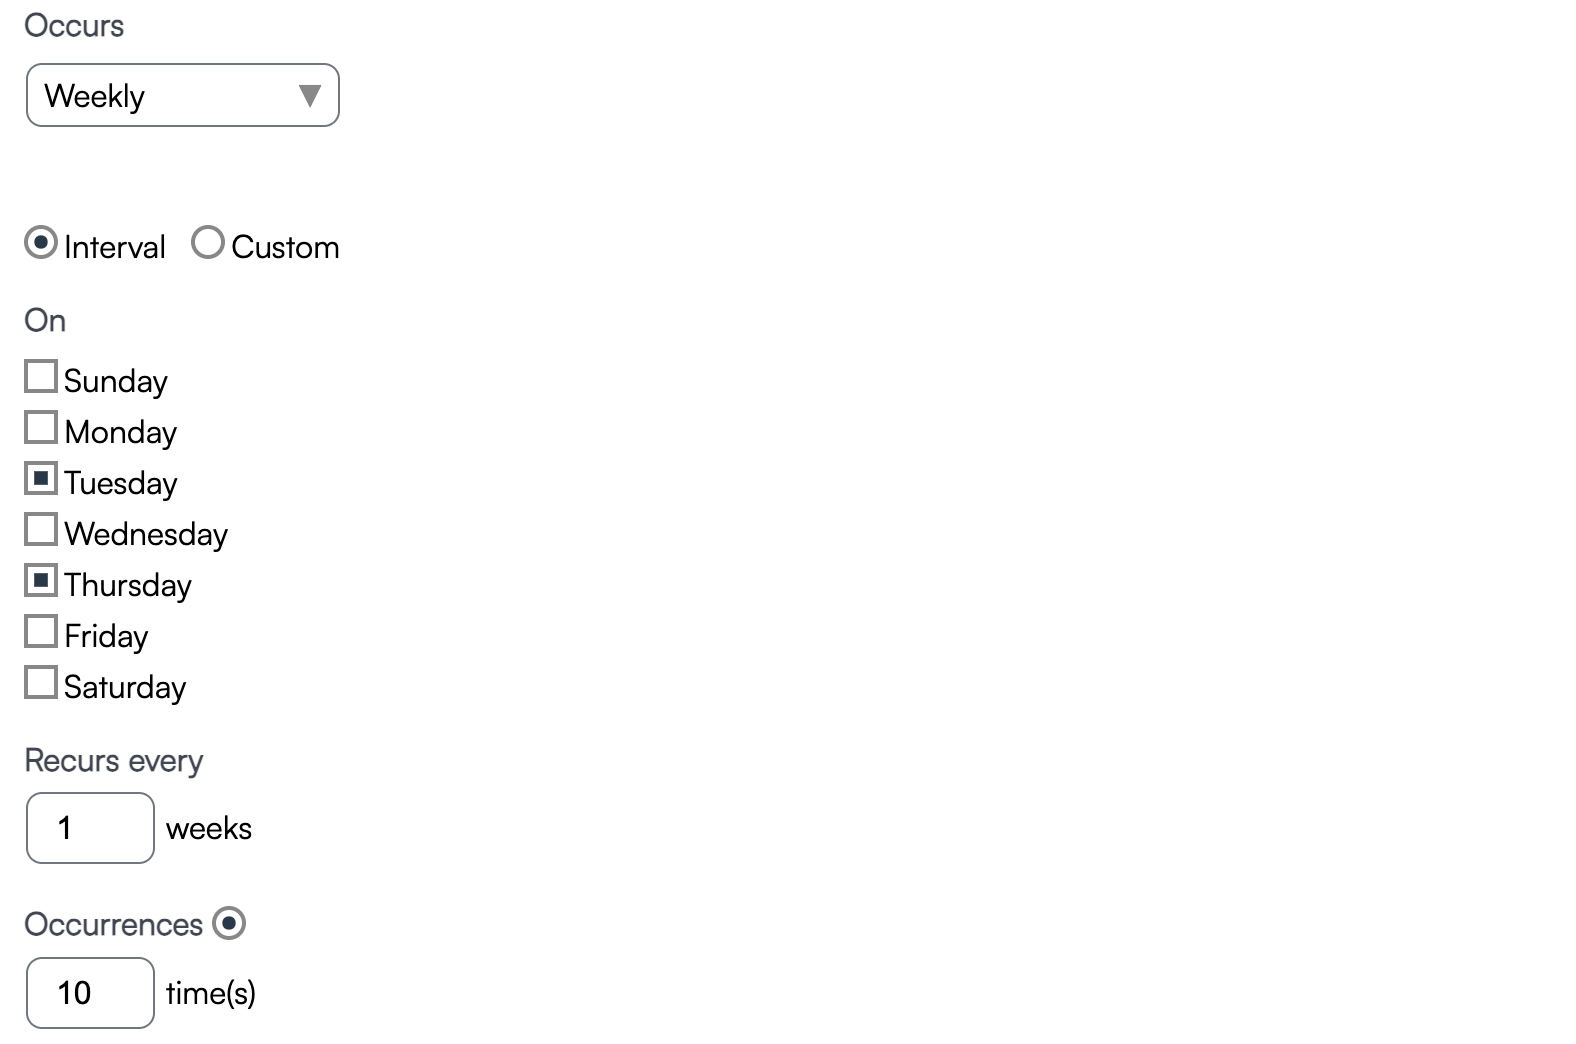
- Weekly: These appointments will occur every n weeks on the days of your choosing.
- Interval vs. Custom
- Interval: Appointments will repeat on an equal intervals
- Custom: You can choose exactly which weeks the appointments will occur. This option can be useful for very unique service schedules or to account for weeks you may not be operating with normal hours.
- Interval vs. Custom
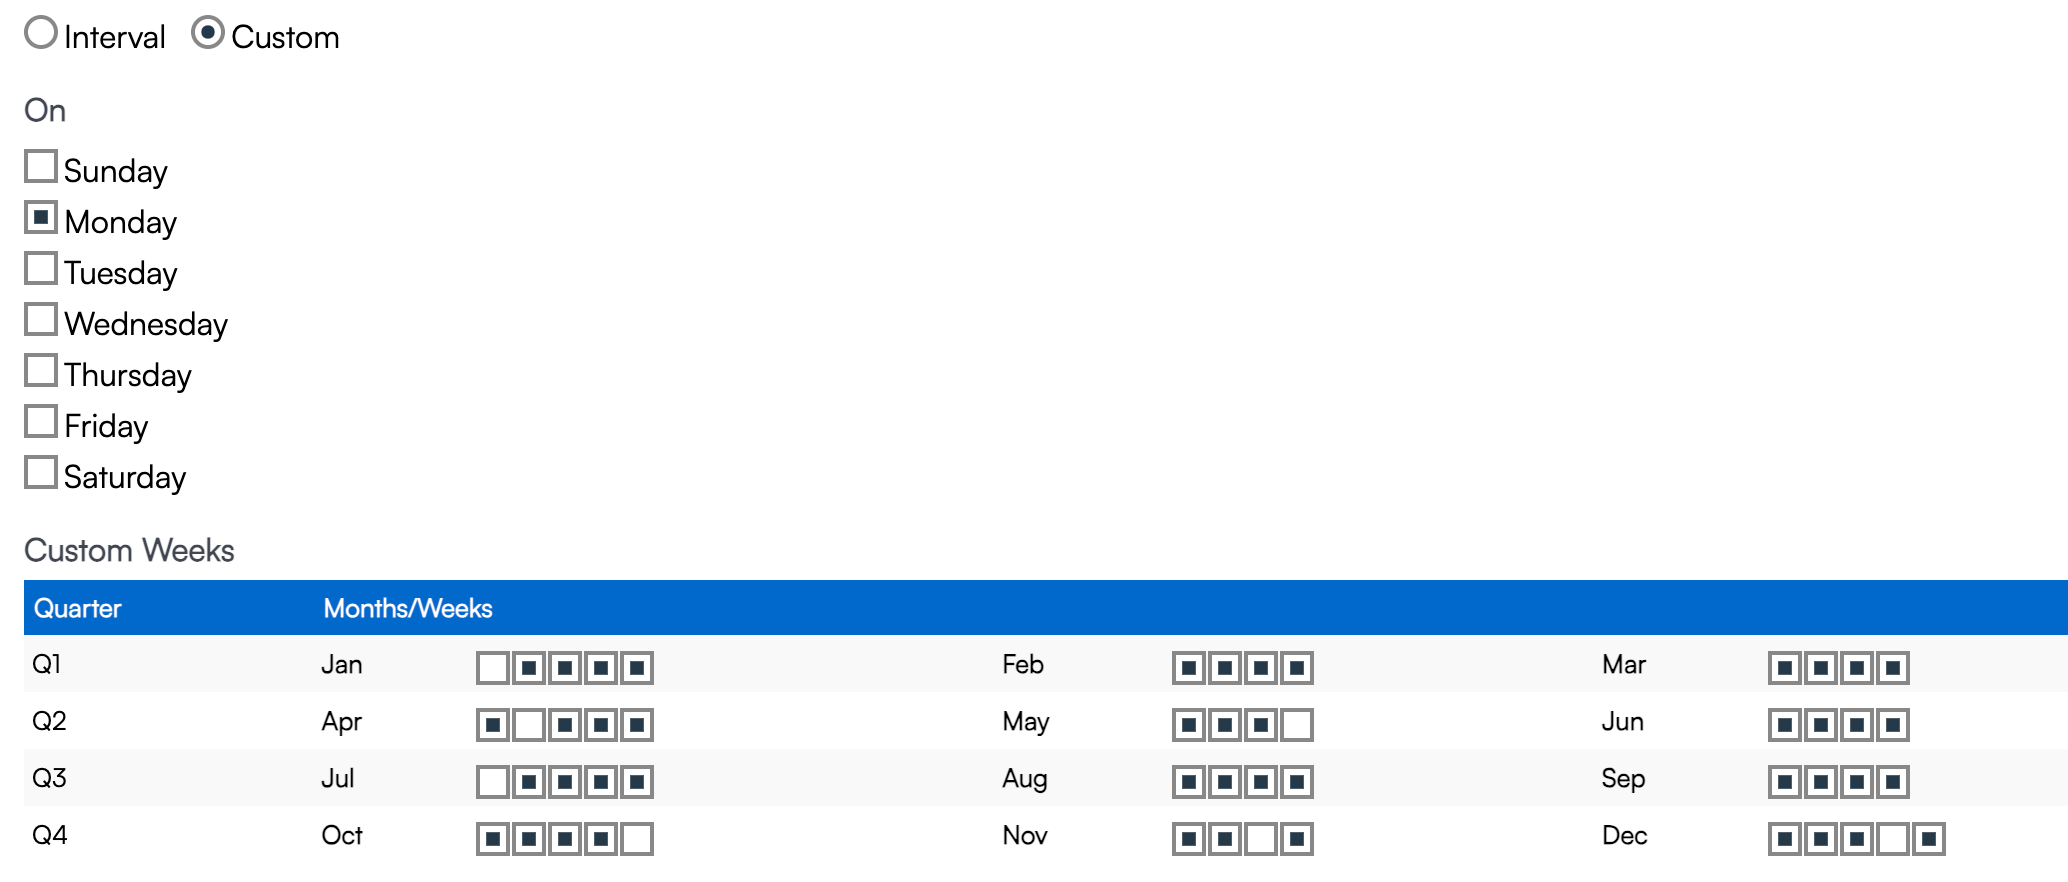
- Note: For Weekly intervals, the Occurrences setting impacts the number of weeks the appointments will repeat regardless of how many days of the week are selected. As seen in the photo below, if Tuesday and Thursday are selected and Occurrences are set to 10 times, this appointment would repeat 20 times — on Tuesdays and Thursdays for 10 weeks.
- Monthly: This option lets you schedule an appointment to take place every n months on the chosen date. The first box determines the date of the month to be used.
- The scheduled start date for an appointment that's created this way will be placed on the earliest possible date, based on your input into the first box. If it is currently the 15th of June and you choose to have the appointment occur on the 1st of every month, the scheduled start date for the first appointment will be on the 1st of July.
- If you leave the date box empty, the appointment will be scheduled on whichever date you choose on the calendar, and will repeat monthly on the date of the first (Master) appointment.
- If you choose a date that exceeds the number of days in certain months (ie., 31), the appointment will be scheduled on the last day of each month (i.e., February 28 or April 30).

- Monthly (Relative): This functions almost exactly like the monthly option but is instead based on the day of the week as opposed to the day of the month (i.e., the first Monday of every month).

Occurrences and End Date
When setting up recurring appointments, you can define either:
- A maximum number of occurrences, or
- An end date.
You may only select one of these options. If you leave both fields blank, appointments will not generate all at once. Instead, they’ll be created dynamically as you navigate your calendar. For example, if you schedule a monthly appointment starting on January 1, the February–July instances will only generate once you view July in your calendar. This approach prevents the system from creating endless appointments far into the future.
If you set a number of occurrences or an end date, all appointments in the series will be generated automatically when you save the first appointment.
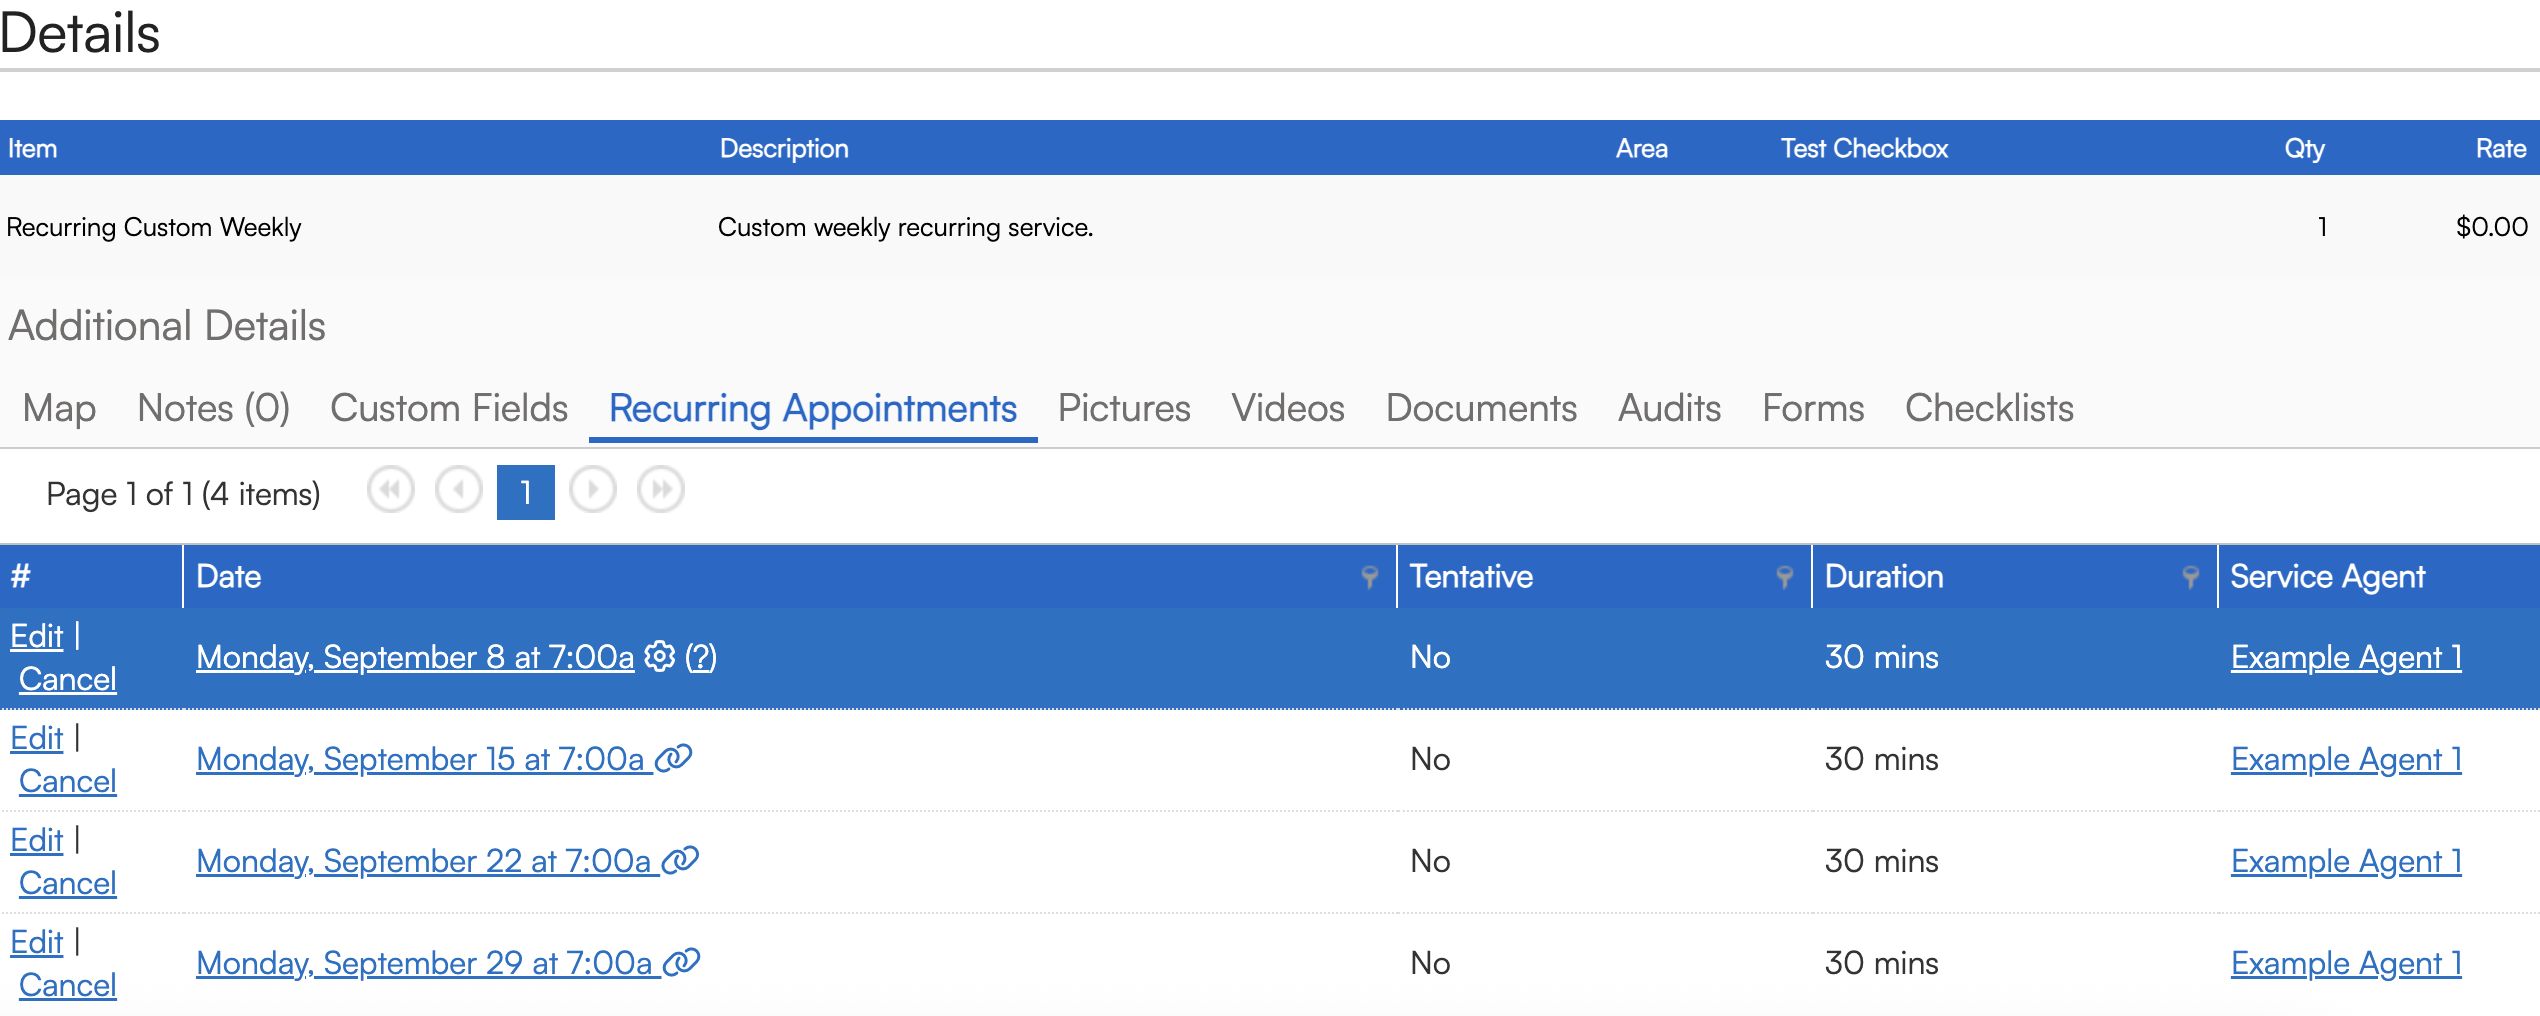
You can view the full series at any time from the details page of any appointment in the chain by clicking the Recurring Appointments tab on the right side of the page.
Initial Appointment Pricing and Jumpstart Count
Initial Appointment Pricing
When creating proposals or appointments, you can set the first “n” appointments at a different price than the regular recurring price.
This can be set as a default on the service or adjusted manually by clicking the pencil icon when creating/editing a proposal or appointment.
If applied on a proposal, the special pricing will also appear on the client’s view of the proposal (in the same area where payment plans normally display).
Current settings will also be shown on the service line, just below the description.
Jumpstart Count
You can specify a Jumpstart count either as a service default or when scheduling the appointment(s). This sets the number of appointments at the start of a recurring sequence that should occur weekly or monthly before transitioning to the longer recurring frequency.
For example: A bi-weekly service with a Jumpstart count of 2 would schedule appointments in Week 1 and Week 2, then switch to every other week going forward.
To set/change the Jumpstart value for a specific proposal or sequence, click the pencil icon on the service and enter the desired number in the Jumpstart field.
Master vs Shadow Appointments
Master Appointments
Master appointments are the foundation of a recurring appointment chain. They appear with a gear icon in the appointments list, indicating that they control all future appointments in the chain.
Template role: A Master acts as the template for newly generated appointments, especially in chains without a set end date or maximum occurrence. Since these appointments are created gradually (not all at once), the Master ensures consistency across the chain.
Position in the chain: The first appointment in a recurrence series is usually the Master. Once that appointment is finished or invoiced, the next appointment automatically becomes the new Master, and the process continues until the chain ends.
Shadow Appointments
Shadow appointments are the recurring appointments generated by the Master. They are shown with a chain icon in the appointments list.
Bulk updates: When you edit an appointment in the chain and choose to update “all” or “all future” appointments, only Shadow appointments are affected.
When they stop being Shadows: An appointment ceases to be a Shadow once it has been edited, started, finished, or invoiced. At that point, it becomes independent of the Master and will no longer be updated through chain-wide changes.
Starting, Finishing, and Invoicing Appointments
When you start, finish, or invoice an appointment in a recurring sequence:
That appointment is committed to history and is no longer a “shadow.”
If it was the first appointment in the sequence, the next appointment becomes the new “master” for recurrence settings. Any future changes should be made from that appointment forward.
If it’s later in the sequence, only that appointment is locked in history, and it will be excluded from future bulk updates to the appointment chain.
Get an Overview of Recurring Appointments
The Appointments Grid includes a column that shows the status of each appointment in a recurring sequence:
- Master – The original appointment that generates the recurring series.
- Shadow – An appointment created by the Master as part of the series.
- Altered from Master – A Shadow that has been modified and now functions independently of the Master chain.
- Blank – A standalone appointment with no recurrence.
This column can be especially useful if you need to identify Master appointments across multiple customers for a particular service.
View, Edit, and Cancel Recurring Appointments
When viewing the details page of an appointment that's part of a recurrence chain, you'll have access to a new tab that summarizes all appointments within the chain.
- The appointment highlighted in blue is the appointment you're currently viewing.
- The Gear icon designates the Master appointment and the chain link icon refers to Shadow appointments.

How to Edit Recurring Appointments
Recurring appointments follow specific rules to keep chains consistent and manageable. Here’s what you need to know:
No nested recurrence: If you edit an appointment that was automatically generated by recurrence, that appointment cannot have its own separate recurrence settings.
- Edit options: When you edit an appointment in a recurrence chain, you’ll be asked whether to apply your changes to:
- Only this appointment
- All appointments in the chain
- All future appointments in the chain
Breaking from the chain: If you edit a single appointment’s date, time, agent, or other details, it will “break” from the chain. This means future bulk updates (to all or all future appointments) will not affect that appointment. Appointments that remain linked in the chain are called Shadow appointments.
Changing recurrence settings: If you update the base recurrence settings for a chain, all Shadow appointments will be cleared, and a new set of appointments will be generated using the updated settings.
Splitting the chain: Updating all future appointments creates a new chain. The original chain remains as-is for past appointments, while future ones get a new Master appointment to carry forward your changes.
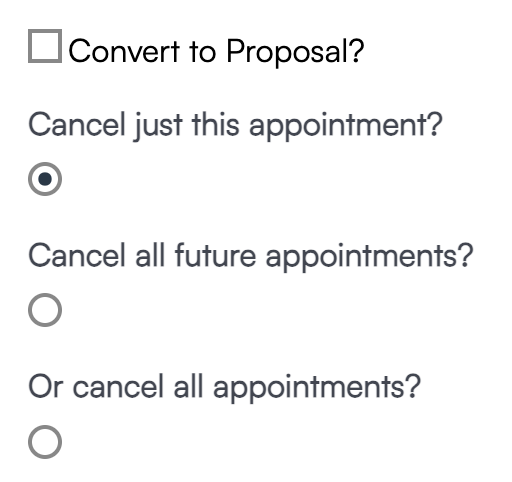
How to Cancel Recurring Appointments
If you have recurring appointments but the customer cancels, it is easy to stop the chain of repeating appointments. Go to the Contact detail page. On the right-hand side of the screen, select the Appointments tab and click "Cancel" for the upcoming recurring appointment so they are no longer on the agenda.
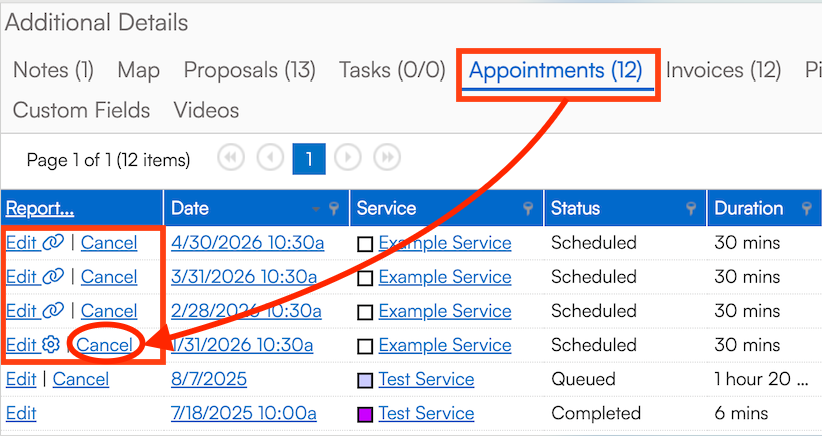
When cancelling one appointment in a recurring chain, you have the option to cancel just one appointment, all upcoming appointments or to cancel all appointments (past and future).
Seasonal Recurring Services
Recurring services can follow different schedules throughout the year. This is especially useful for businesses that operate seasonally or offer more frequent visits during peak months.
ServiceMinder supports these scenarios using Seasonal Settings and Seasonal Overrides. You can use Payment Plans to collect all money for the season up front or have customers pay via regular installments.
Seasonal Overrides
In the Scheduling section, you can define different recurrence patterns for specific date ranges. Once you have chosen a frequency for the appointment (i.e., weekly or monthly) a Seasonal Overrides option will allows you to define different recurrence patterns for specific date ranges.
For example, a service may use the following schedule:
| Date Range | Frequency |
|---|---|
| April 1 – October 31 | Every 3 weeks |
| November 1 – January 31 | Every 9 weeks |
| February 1 – March 31 | Every 6 weeks |
When appointments are generated, ServiceMinder automatically applies the correct frequency based on the appointment date. This gives you the flexibility to adjust appointment frequency throughout the year based on seasonal needs or changes in service availability.

Click the X to add a new row of date ranges.
Seasonal Section
When a service is configured with a Recurring Scheduling Mode, a Seasonal section appears on the service setup page.
Use this section to define the standard service season by entering:
- Season Start: Season launch service date
- Season Expiration: Auto-renew through this date

Season Start acts as a floor on the first appointment. Whenever serviceminder computes a target/base date for a new appointment on this service — whether from a contact buying a proposal, a Drip Engine auto-schedule rule, or the route schedule's base date — it compares that date against Season Start. If the computed date is earlier than Season Start, it gets bumped forward to Season Start. So if you sell a spring fertilization package in December but Season Start is set to March 15, the customer's first stop is automatically pushed to March 15 (or the first valid route-schedule day after that).
Season Expiration acts as the ceiling for auto-renewal. For subscription/recurring services, serviceminder keeps generating the next appointment in the chain only while the next computed date is still earlier than Season Expiration. Once the next date would cross that line, the chain stops creating new appointments. It also caps the through-date used when projecting future subscription dates and recurring-window totals on proposals.
Note: Seasonal dates are optional. If no dates are entered, the service is treated as available year-round.
Payment Plans for Seasonal Recurring Services
When setting up a Payment Plan, the Months field for the Required Deposit Amount is used to tell the payment plan to calculate the deposit based on a time window of appointments, instead of a fixed dollar deposit. In this recurring setup, the system is using the service season and appointment count to figure out the payment amount.
Pre-Pay for the Entire Season
If you would like to collect the amount due for the entire season up front, select the following configuration options:
- Required Deposit Amount: For an entire season, enter a number of months that fully covers the period from when the customer accepts through Season Expiration.
- Pay Balance Using: Select Appointments
The system will then determine how much of the season to include in the initial deposit. It looks at the service’s seasonal dates within the range of months you have set, counts the appointments that fall inside that window, then calculates the total deposit/prepay amount from those appointments.

Pay in Monthly Installments
In this scenario, the system divides the proposal total evenly across the number of installments, charging on the interval cadence independent of when each appointment actually happens.
Under Required Deposit Amount pick None, or First Payment Amount if you want the first installment treated as a deposit.
Under Pay Balance Using select Installments.
- Interval Type = Months
- Interval = 1 for monthly, 2 for every other month, etc.
- Number of Payments = the number of months you want to spread payments over — typically the length of the season, e.g., 8 for Mar–Oct billing.
- Optional: Set the First Payment Date if you want the schedule pinned to a specific day (say, the 1st of the month of Season Start) instead of starting on accept date.

The system divides the proposal evenly across the number of installments, charging on the interval cadence independent of when each appointment actually happens.
If you'd rather have installments charged around each appointment instead of on calendar months, pick Appointments instead of Installments for Pay Balance Using and use Date Offset to charge N days before each visit.

Leave the Recurring Appointment Limit empty unless you want to cap how many appointments the plan applies to.
FAQs
Is it better to set up recurring schedule in Control Panel > Services or in individual appointments?
If a particular Service is always on a set timeframe, then set it up at the Service level. That will always carry over your preferences when making the Appointment, which saves you a step every time. You can also edit the timing of recurrence on the Appointment if needed so the settings are not set in stone.
How do I find when Recurring Appointments end using the Appointments Grid?
Make sure you are in the "Upcoming" tab on the Appointment Grid page.
There are several ways to locate when a recurring appointment may have an end date. You can go to column chooser and turn on/off Recurring Status or Recurring Ends.

When this column shows on the grid, you can search for specific dates in the Recurring Ends field or by specific Recurring Status. 
Where can I check to see if there is an end date to a recurring appointment chain?
For recurring chains, there are two places to check if there's an end date; if there is one, that means the chain will be ending at that time; if there is no end date, that means the chain will continue to generate appts based on the recurrence until it is cancelled or stop
- Appointments Grid: There's a column "Recurring Ends" (be default it's usually on the far right end of the grid); a date here for any recurring appointments mean the chain is ending.
- Appointment Details: You can check the first appointment in a chain (the one with the gear icon) and if the chain has an end date, the "Recurring Until" field shows; if it has no end date, this field doesn't show up.
When should I use service-level seasonal settings vs. part distribution?
Use service-level seasonal settings when the entire service itself should only exist during a certain time of year. For example:
- A service that is only offered in one season
- A service whose recurring chain should change by season
- A service where the whole appointment pattern needs a seasonal start/end window
Use part distribution when the service continues, but only some parts happen seasonally.
