Overview
This guide provides a comprehensive introduction to navigating the serviceminder web platform. Whether you're a new user or a seasoned admin, you'll learn how to access key tools, use the navigation menu, manage your daily workflow through grids and shortcuts, and understand core features like Snapshots and the Administration tab. Use this as your go-to reference for getting oriented and maximizing your productivity within the system.
The features available to you may vary based on either your account type or your permissions. If you read about a feature that you're interested in but don't have access to, check with an Owner or Organization Administrator on your team or ask your Brand Administrator (franchisor) or Account Manager for more information.
This article will review:
Keywords
-
Desktop Interface - Also called serviceminder|desktop or simply the desktop app. This version is designed for use on PCs and tablets.
-
Grids – Spreadsheet-like pages for viewing and organizing large volumes of data. Learn more about Grids »
-
Breadcrumbs – The breadcrumb trail is located just below the logo on the top left of the page. It tracks your page viewing history. As you drill down to other pages, it will display a list of other pages you have visited. You can click a link to go back to a specific page.

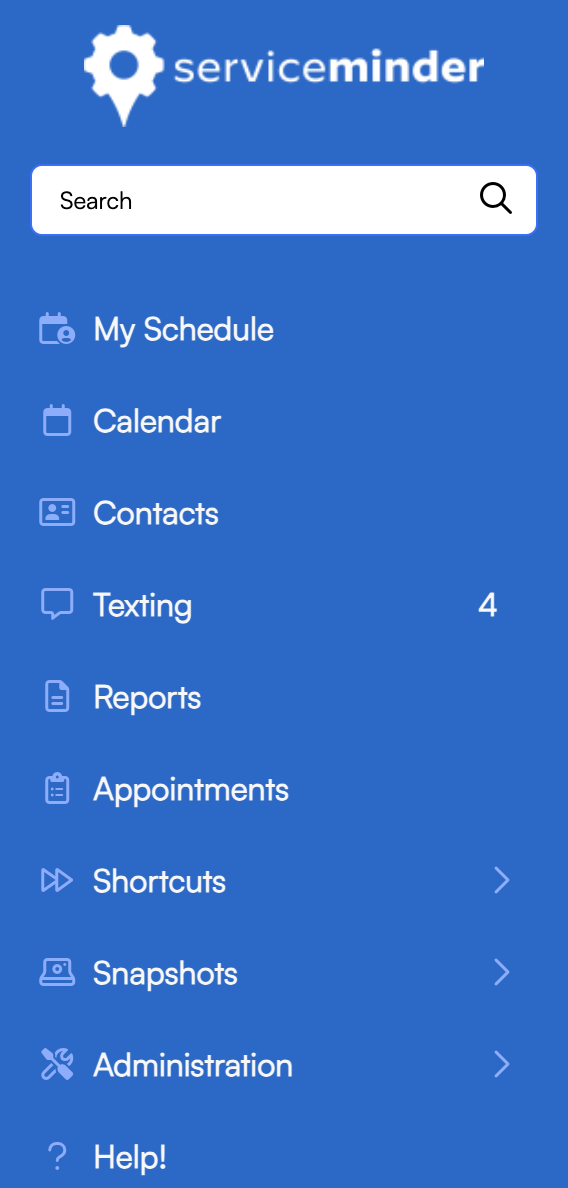
Navigation Menu
This is the main menu where common daily tasks are located for regular users. This is located on the left side of the screen of the desktop interface. It can be collapsed or expanded using the small blue arrow on the side. Some of these options may not available to you depending on your user permissions.
-
Search Bar: Search for Contacts using name, company, address, email, or phone.
My Schedule: Review any upcoming appointments or tasks assigned to you in the system.
-
Calendar: The default “Home” screen with month, week, and day views of scheduled appointments.
-
Contacts: A grid of all customers and other contacts. Sort, filter, and organize columns to fit your workflow.
Texting: If you have the Two-Way Texting add-on feature, review all text messages here.
Reports: Access reports, charts, and downloadable insights.
-
Appointments: View all appointments with filters for status (e.g., Upcoming, Completed)
Help!: Open support tickets or read product documentation.
See the sections below to learn more about Shortcuts, Snapshots, and Administration.
Shortcuts Section
Everyone has specific things they need to access frequently. To make it easier to bookmark your favorites, we created the Shortcuts section, accessible from the navigation menu, Shortcuts help you jump to frequently used items. It can be expanded or collapsed using the arrow symbol.
Default Shortcuts
- Add a Contact
- Schedule an Appointment
- My Schedule – Appointments/tasks assigned to you
- Texting – Available if the Two-Way Texting feature is enabled
- Recent Activity
Adding Custom Shortcuts
Grid Filters:
1. Apply your desired filters to a grid (i.e., filter your contacts grid to contacts from a specific marketing channel).
2. Scroll to the bottom of the grid.
3. Enter a Name for your new View and click Save.

4. Click Views.

5. To share with others, check Shared.
6. To add to your Shortcuts section, check Shortcut.
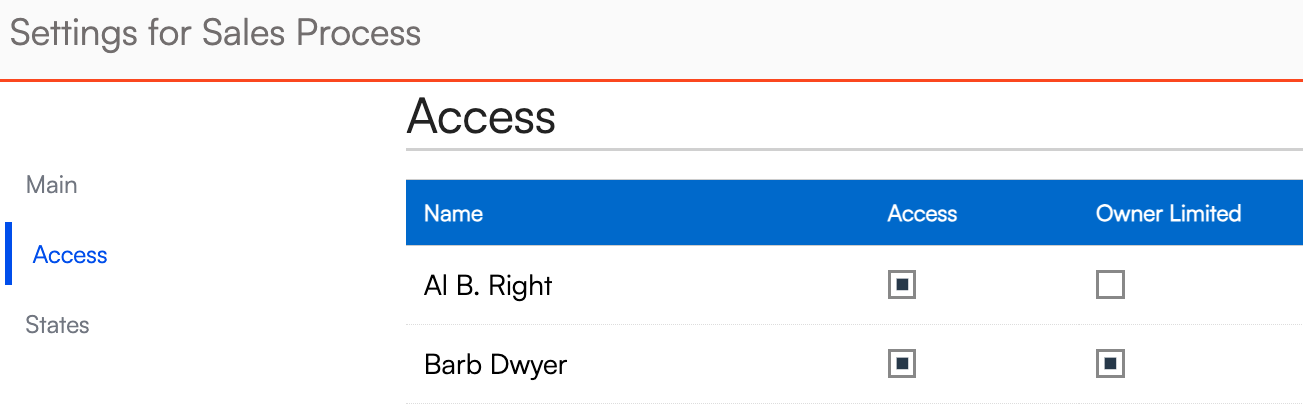
TaskBoards:
1. Edit a TaskBoard via Control Panel > TaskBoards.
2. Under Access, assign to users.
3. Use Owner Limited to restrict visibility to contacts owned by the user.
Snapshots Section
The Snapshots section provides a high-level overview of key business metrics and workflows—offering direct access to filtered data grids. Each snapshot displays a count (and in some cases, currency totals), allowing users to quickly identify what needs attention. Clicking on any snapshot opens a detailed view with the relevant records.
Use Snapshots as your operational dashboard to stay on top of outstanding tasks, revenue opportunities, and customer needs.
Pulse – Leading indicators of business performance.
- At a Glance – High-level daily summaries.
- Invoices Grids
- Open Invoices – Unpaid invoices with options to send or process payments.
- Unapproved Invoices – Invoices awaiting review.
- Proposals Grids
- Projects – Proposals tagged as long-term projects.
- Open Proposals – Proposals not yet accepted or expired.
- Projects – Proposals tagged as long-term projects.
- Appointments Grids
- Backlog – Unfinished appointments with total estimated value.
- Expired/Expiring Services
- Recurring Billing – Customers on active subscription plans.
- Failed Payments – Retry failed installment charges.
- Expired Service – Customers past their “Next Service Date.”
- Print Queue – Print documents in bulk.
- Tasks – All tasks assigned across your organization.
Administration Section
The Administration section is your central hub for configuring and managing both brand-level and organization-level settings. Depending on your role and permissions, you may see some or all of the options listed below.
This section is especially important for Brand Administrators and Organization Administrators or Owners who are responsible for managing system behavior, automation, internal communication, and user access.
- Dashboard(Brand Administrators only) – Configure brand-wide settings including default services, parts, pricing, and templates. Use the Deploy tool to push configurations to franchise locations and maintain consistency across the brand.
- Dispatch – A centralized call center module designed for internal teams to manage incoming calls, schedule appointments, and route jobs. Ideal for brands that operate a shared support or scheduling team.
- Drips (Add-on feature) – Build automated workflows triggered by actions like scheduling an appointment or sending an invoice. Automate emails, create tasks, or assign checklists to streamline operations and maintain consistent follow-ups.
- Control Panel – The primary configuration area for your organization. Set up services, parts, user permissions, email templates, scheduling rules, and more. This is where franchisees or local admins manage the day-to-day setup of their individual business unit.
- Maps - View Maps and GeoZones to do geographic reporting and scheduling. Here you can review where Contacts, Proposals and Appointments are located on the map. It can also be used to schedule appointments based on geography. Configure GeoZones from this section as well.
- Messaging – Send direct messages to other users within your organization. Ideal for quick updates or internal communication tied to contacts, appointments, or tasks. Messages appear in the user's in-app notification area.
You may see other options here, depending on which add-on features are a part of your billing plan. If you read about a feature that you're interested in but don't have access to, check with an Owner or Organization Administrator on your team or ask your Brand Administrator (franchisor) or Account Manager for more information.
FAQs
Q: Why can’t I see some navigation options?
A: Access is based on your user permissions. Contact your Brand Admin or Organization Admin/Owner for changes.
Q: The sidebar is missing. Where did it go?
A: Look on the left side of your desktop screen. Locate the small blue arrow and click it to maximize the menu.
