Overview
The Configuration section contains all of your brand-level settings. These settings are initially reviewed and configured during onboarding, based on your brand’s preferences and operational decisions. While the onboarding team handles the initial setup, you can update these settings at any time as your needs evolve.
To access these settings, go to Dashboard > Tools > Configuration.
This article highlights the most commonly used settings, organized in the same order as they appear on the Configuration page. Some advanced configuration topics, such as Data Subscriptions and Feedback, are covered in dedicated articles within the Brand Admin section of our knowledge base. While these options appear on the Configuration page, you’ll find more detailed guidance in their respective articles.
This article will review:
System
Postal Code Editing - Toggle this setting on to allow brand admins access to update/add postal codes at the organization level
Territory Restrictions - Determine if you will allow adding contacts in postal codes owned by other organizations. Determine if franchisee will receive a warning when they are trying to add a contact not owned by an organization.
Settings
Organization Permissions
Use this section to control which areas franchisees can view, add, or edit within their accounts. For example, your brand may choose to restrict locations from creating or modifying their own Parts and Services lists to maintain consistency across all territories.
These permissions are all-or-nothing, meaning that if a franchisee does not have permission for Parts, they will not be able to perform any related actions—such as updating individual part pricing. In this case, only the Brand Admin can make those changes on their behalf or apply pricing updates in bulk from the brand account and deploy them to all franchise organizations.
You will go through this list of organization permissions with your Onboarding Manager:
- Allow organizations to edit Accounting Classes
- Allow organizations to edit contact Accounting Classes
- Allow organizations to edit Channels
- Allow organizations to edit Campaigns
- Allow organizations to edit Contact Categories
- Allow organizations to edit Services
- Allow organizations to edit Parts
- Allow organizations to edit Part Categories
- Allow organizations to edit TaskBoard States
- Allow organizations to edit their own set of decline reasons
- Allow organizations to edit Proposal Text
- Allow organizations to edit Contact Custom Fields
- Allow organizations to edit Appointment Custom Fields
- Allow organizations to edit Proposal Custom Fields
- Allow organization admins to delete invoices
- Allow organizations to edit their Public Name
- Allow organizations to upload their own logo
- Unit Cost is required for parts/add-ons
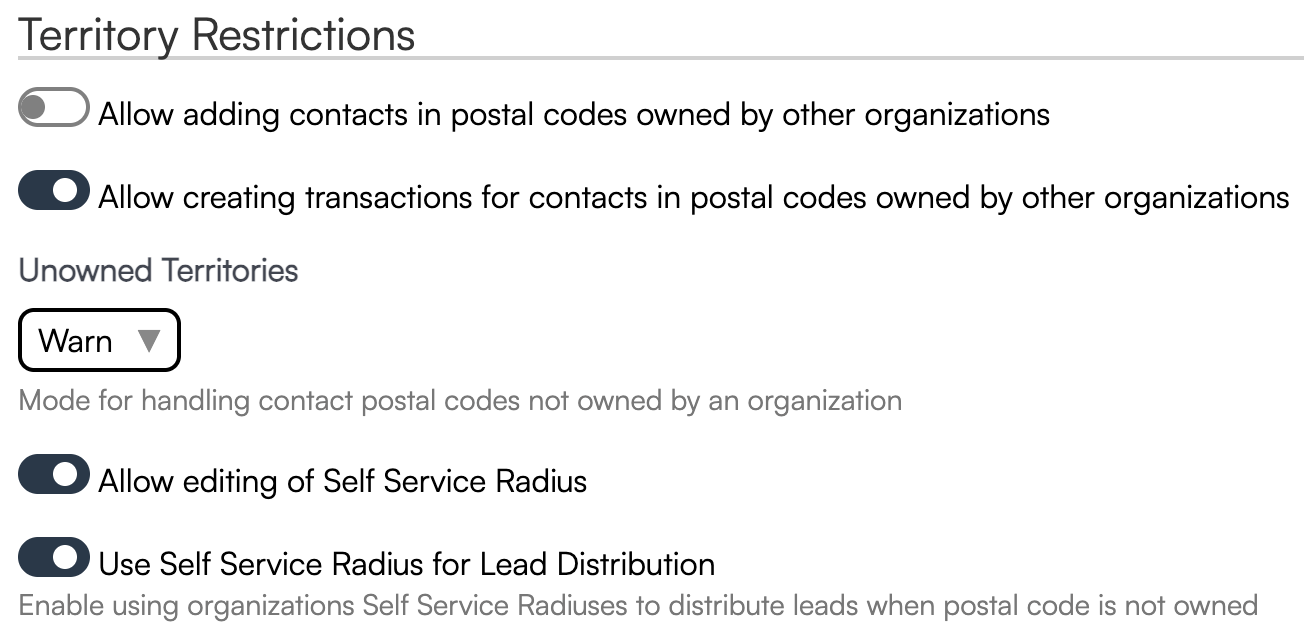
Territory Restrictions
These settings control how franchise territories are managed across your brand. They define what franchisees can do with contacts and transactions in areas outside their assigned postal codes, as well as how leads are distributed within or beyond a location’s service area. Adjusting these options helps maintain clear boundaries between territories while allowing flexibility when needed.
- Allow adding contacts in postal codes owned by other organizations
- Allow creating transactions for contacts in postal codes owned by other organizations
- Choose to warn franchisees when handling contacts in postal codes that are in unowned territories
- Allow editing of the organization's Self Service Radius
- Use the Self Service Radius for Lead Distribution
National Accounts
Go here to learn more about how to set up National Accounts.
Contacts
The Nickname field has proven useful to certain types of businesses to store additional information about a contact. A few common use cases for this field are storing property manager names for commercial locations or recording pet names for training or grooming businesses.
Use this section to give the Nickname field a custom label that fits the needs of your brand.

Proposals
Use this section if you want to override the default label of "Proposal" and "Accepted Proposal" at the brand level.

End of Period Reporting
This section is where you will configure brand level royalty reporting. Reference Royalities and Revenue Categories for details on how to set this up.
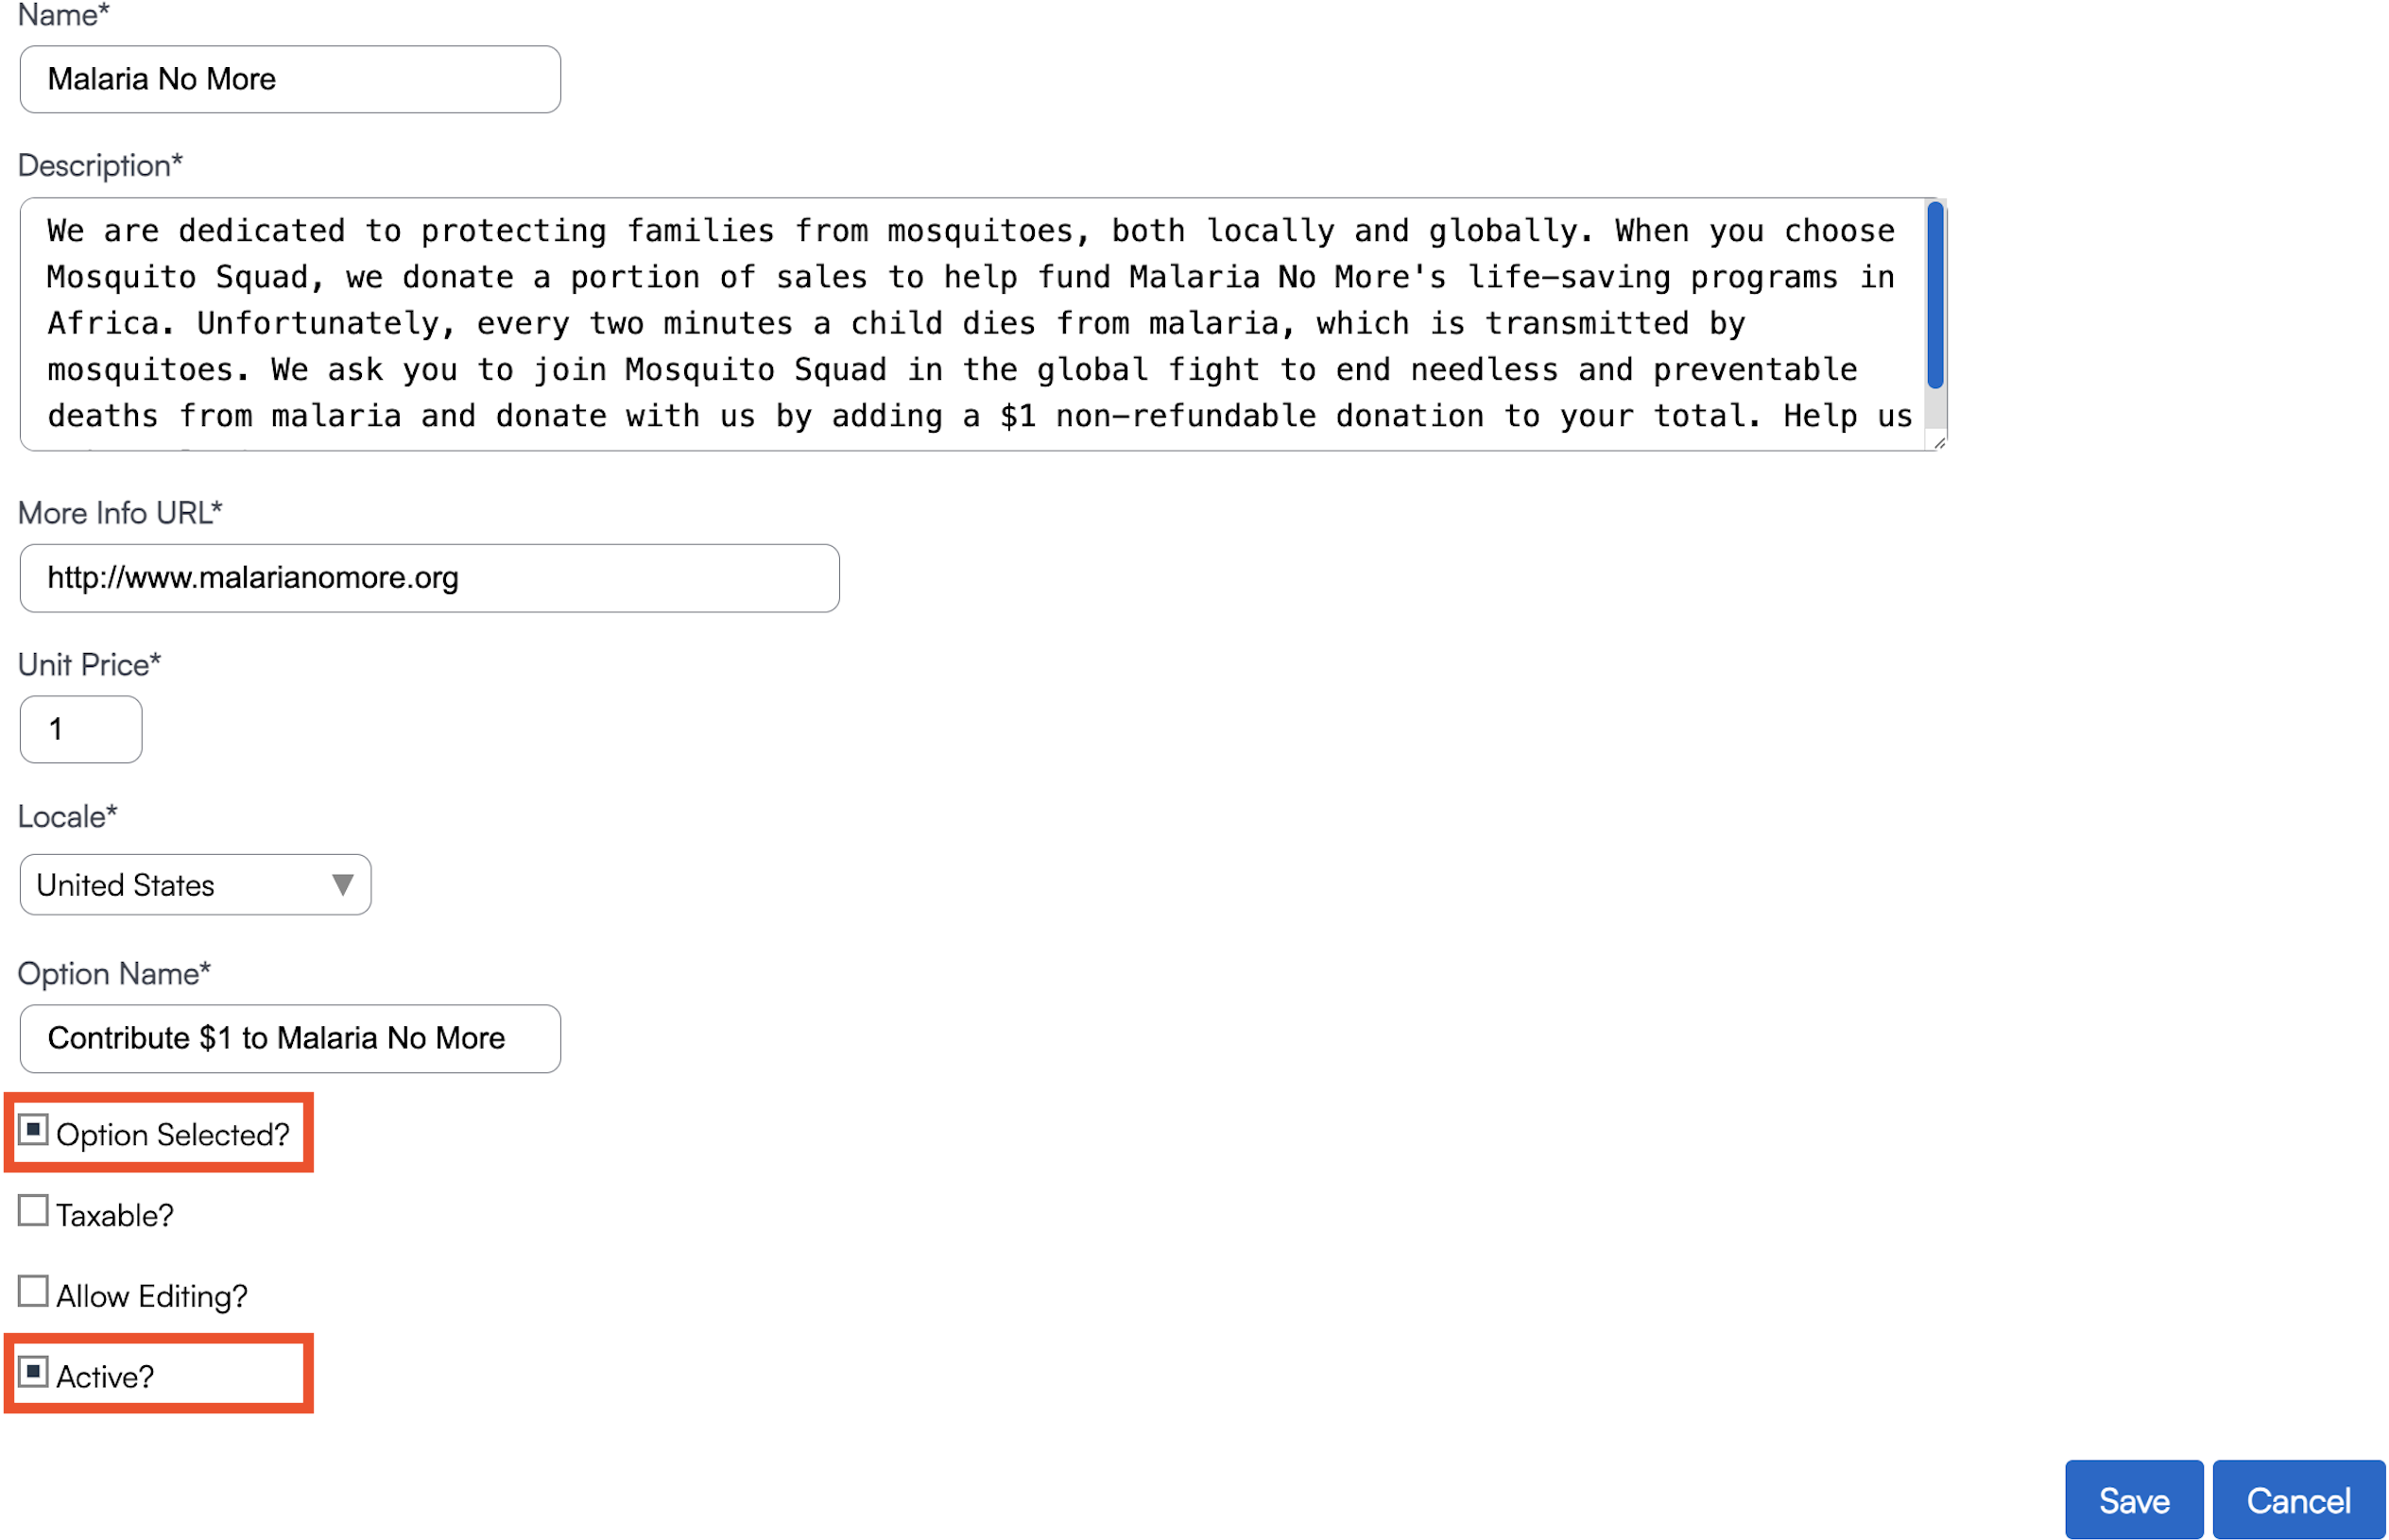
Donation Parts
Have a donation campaign you’d like to share with your customers? You can easily set this up by creating Donation Parts.
-
Go to Dashboard > Tools > Configuration.
-
Click Add to create a new donation part.
-
Check the Active box to automatically include the donation part on all proposals. When the campaign ends, simply uncheck this box to deactivate it.
-
If you select Is Option Selected, the donation option will be checked by default—customers will need to uncheck it if they choose not to donate.
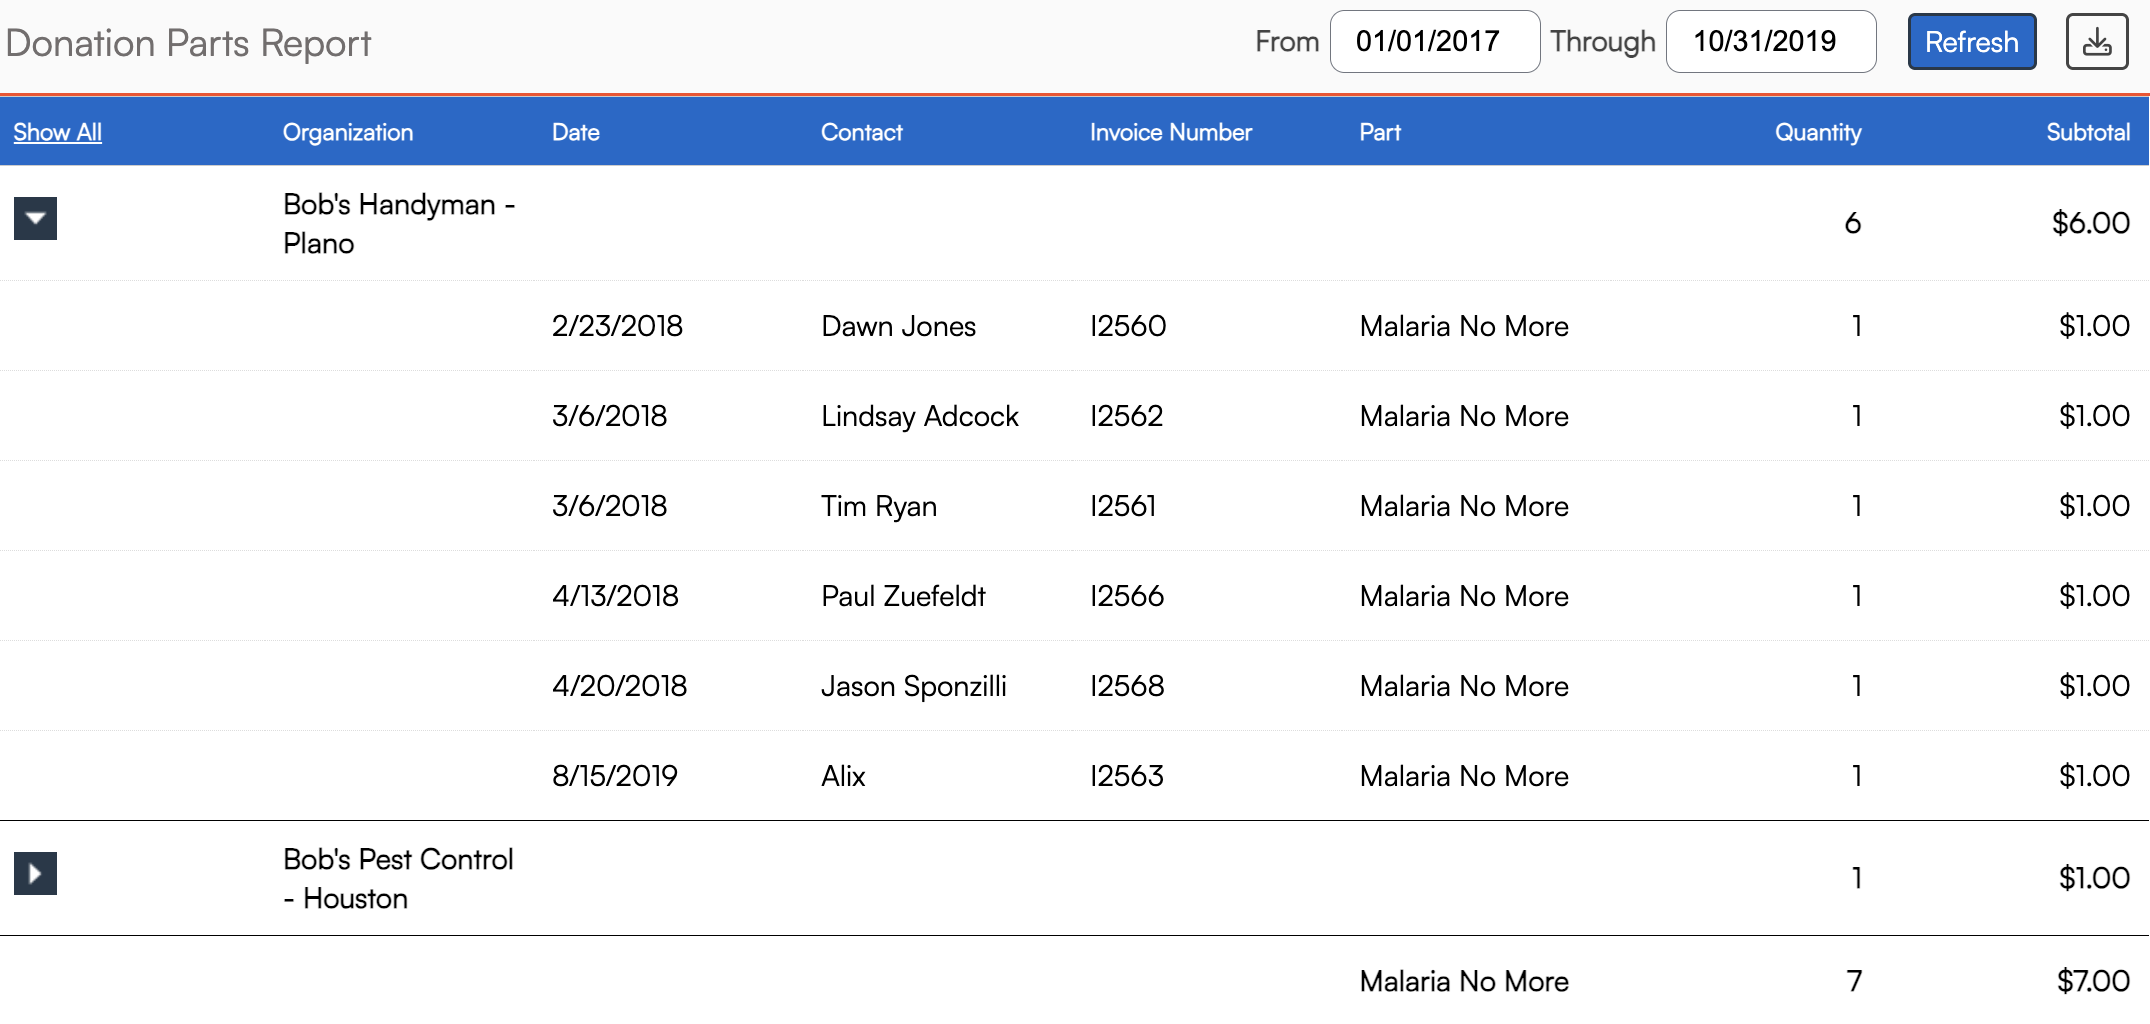
Donation Parts Report
You can track donation activity using the Donation Parts report, found at the brand level. This report shows all donation parts purchased within a specified date range.
At the top of the report, you’ll find:
- Date range fields to filter results
- A Refresh button to regenerate the report
- A Download button to export results in CSV format
Each entry includes links to the related Contact and Invoice records. Donation parts are grouped by type, and each group includes a summary line for quick reference.
DataSubscriber
Learn more about DataSubscriber Feed API.
Integrations
Configure brand-level integration settings for the following platforms:
- Analytics Odyssey
- Consumer Fusion
- Encircle
- Eulerity
- FranConnect
- Google Analytics
- PulseM
- Quote Countertops
- Rallio
- Rikor
- Scorpion Automated Reviews
- Voxie
- WebPunch
- Chatmeter
- Twilio
