Overview
Services are the core of serviceminder scheduling and workflow. Every appointment, proposal and invoice will have a Service associated with it. The name you give a service is what will show up when you're scheduling, for example, or creating a proposal. It is used in all of the email communications so it needs to be descriptive of the type of work you're going to be doing.
For example, if you go to a customer first to do an estimate for some kind of installation, you might have two services:
- Estimate
- Install
If you follow this pattern, when you schedule the appointment for the estimate, the customer will get an email about the Estimate appointment. Then while you're there, you'll be able to create a proposal for an Install. If they accept the proposal, you'll schedule an appointment from the proposal and it will also be an Install.
Services are highly customizable, so please take a moment to review settings and learn more about what parts of the system derive from your services.
This article will review:
Video Tutorial
Settings and Navigation
You can find the service list in Control Panel > Services.

You can filter the services grid by All services or only by Active services. This is handy if you have added or removed services in the past and may have a library of Inactive services, which you don't want to get confused with current offerings.
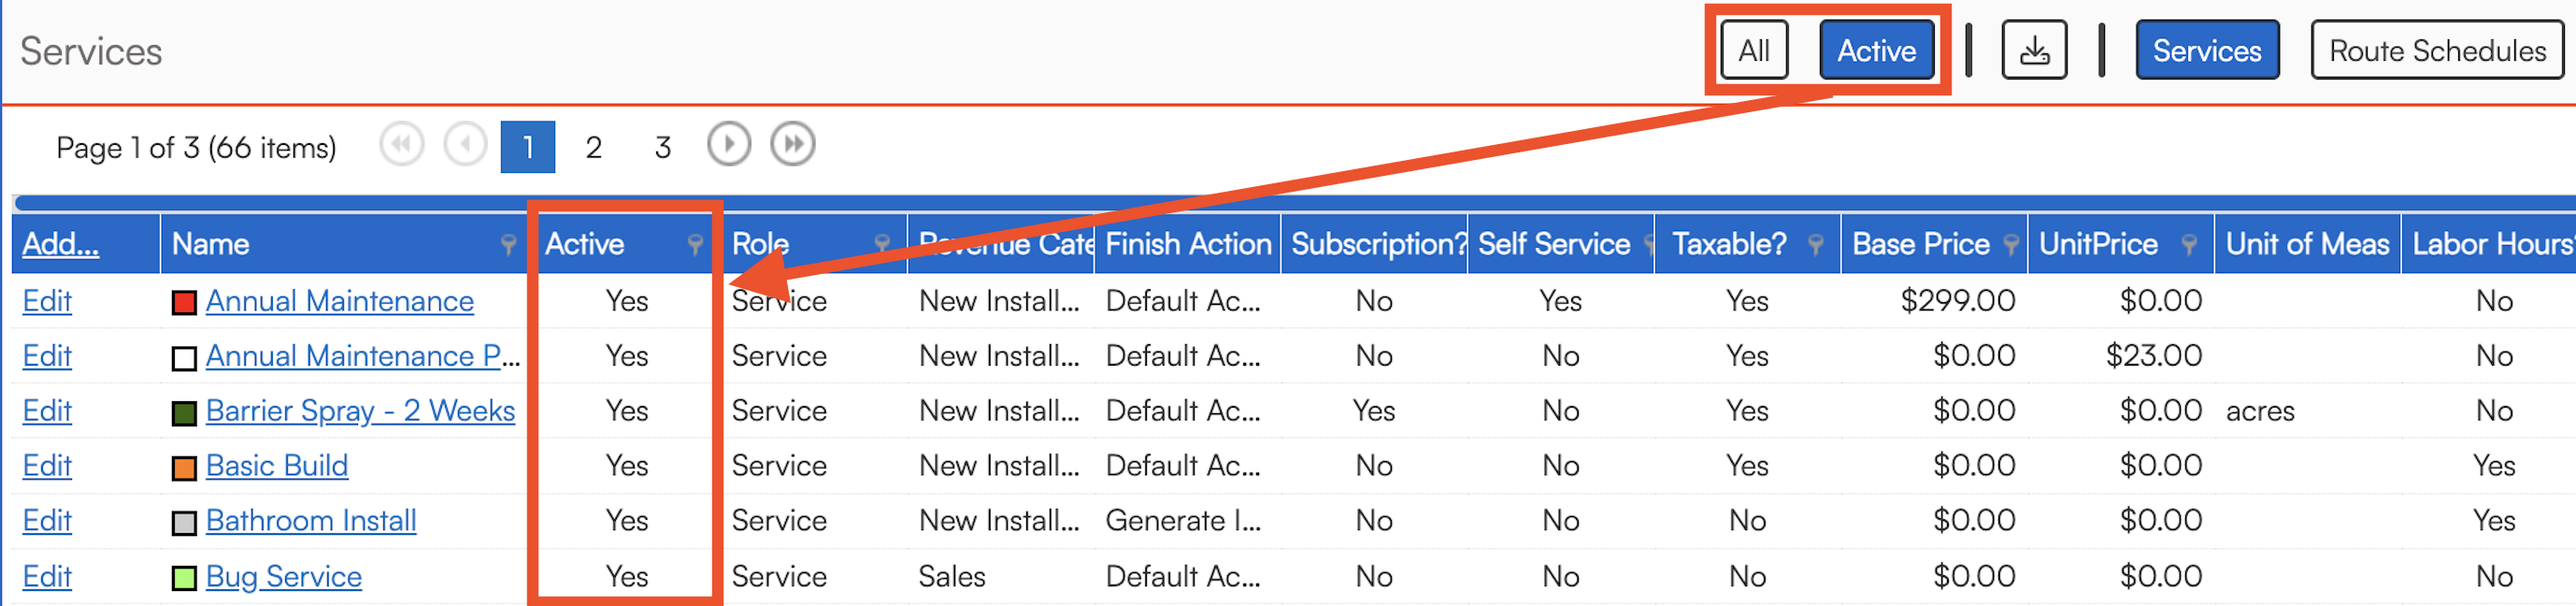
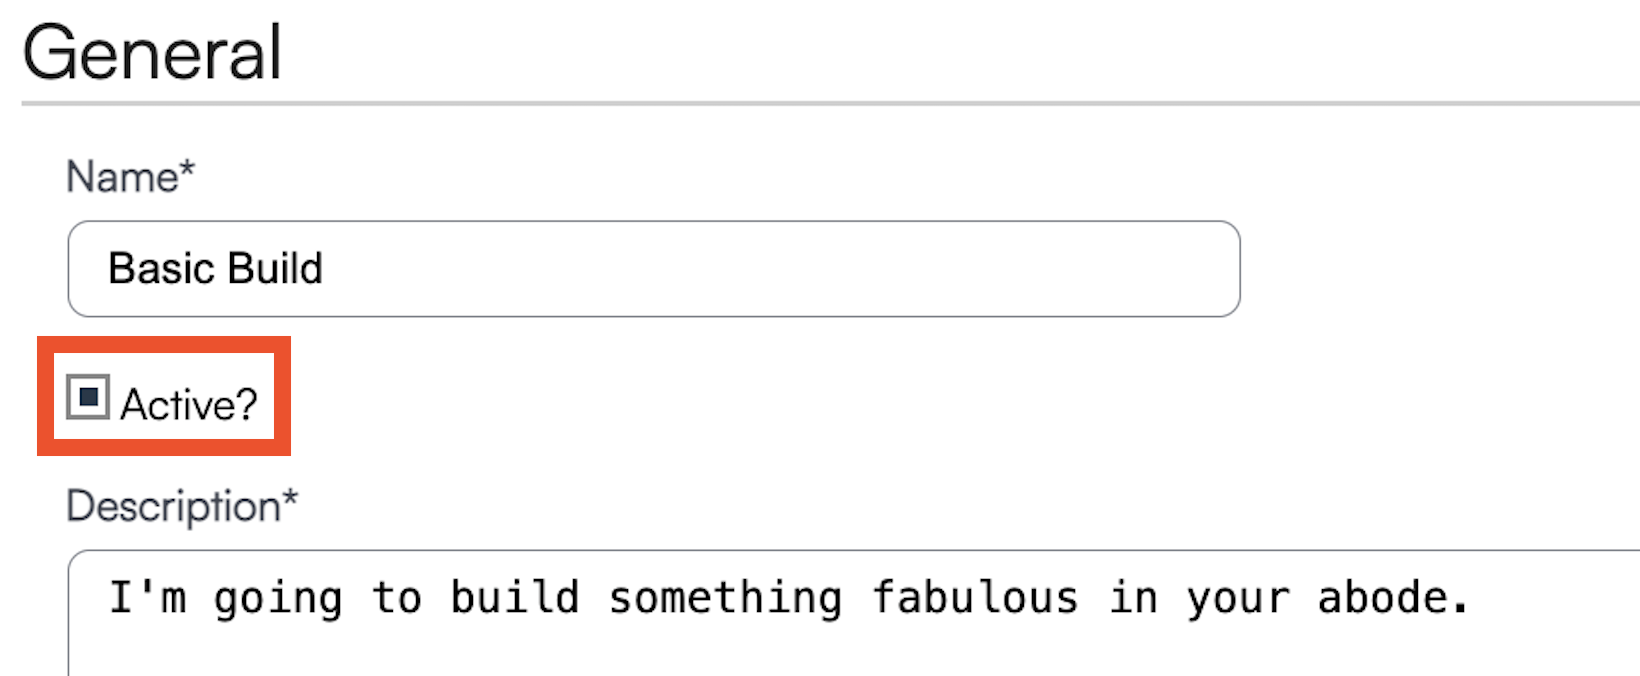
To mark a Service as Inactive click Edit next to the name of the Service and uncheck the Active box.
You can create as many services as you want but it's a good idea to create as few as possible to describe your activities clearly to your clients and to minimize the angst of selecting the service while on the phone with the client.
There are many settings that live on the Service and connect throughout serviceminder. Here are some top things to consider when setting up or reimagining your service offerings.
- Require Media Uploads to Complete Appointments
- If Checked: Photos must be fully uploaded before the appointment can be marked as complete.
- If Unchecked: Appointments can be marked complete while photos continue uploading in the background.

- The picture tag set to "Appointment Finish"
- A minimum requirement of 1 photo
- The specific service(s) selected where you want this requirement to be mandatory
- When creating a new Service, the Duration will default to 30 minutes. You will need to adjust this if you do not want the default time duration.
- Service Role - This determines what type of service agents can perform this service. For example, you might have a couple of dedicated sales guys in the Sales service role. Any services you want them to be able to do should be in the same service role.
- Taxable - This controls whether a proposal or invoice is taxable. It works in conjunction with your Part taxable status. In order to add tax, you must mark the taxable Parts as taxable and then the Service must also be marked as Taxable. This allows you to have taxable parts and then use them on both taxable services and non-taxable services. For example, a part might be taxable if it's used in a service call but would not be taxable if it was part of an installation.
- Invoicing Mode - Determines how appointments/proposals are invoiced. Service Invoicing Modes
Messaging
This section determines the communications which go out for this service's appointments, proposals, and invoices for all users in your organization. These are tied to the specific service, so Appointment A can function separately from Appointment B with tailored customer communications.
If these settings are changed, they will affect all appointments, proposals, or invoices moving forward. Settings updated at the service-level are for all users.

Default Messaging
The default messaging can be seen in Control Panel>Automated Emails. These are controlled by Control Panel > Notifications. For instance, if you turn on the notification for Confirmation Reminder, our system will send the default automated email to remind the contact about the upcoming appointment.
Confirmation message is what sends when you schedule an appointment and click the "Save and Send" button.
If you do select the "Save and Send" button, then the The Confirmation Reminder email will go out automatically the day before the appointment.
Neither confirmation message will go out if you schedule an appointment and only click "Save". If the original confirmation message does not go out, then confirmation reminder message will not go out.
Learn more about Automated Email Templates.
Ad Hoc Messaging
If desired, you can substitute an Ad Hoc email for the serviceminder standard message. For instance, if the brand has a specific service where instructions need to be given about the use of a chemical, safety information, or general "what to expect" about the appointment - you may choose to use your own crafted email for the appointment confirmation rather than generic messaging.
Learn more about Ad Hoc Email Templates.
Combine with Drip Triggers or Drip Campaigns
If you have Drips functionality, this module allows you to configure different ad hoc email templates for each of the main service notifications:
- Confirmation
- Confirmation Reminder
- Completion
- Proposal
- Proposal Reminder
To learn more, please reivew Taskboards and Drips.
Multi-Step Confirmation Schedule
Additionally, some users want even more customizable confirmation reminder for multi-day communications leading up to the appointment.
Users who have activated Email Campaigns functionality (this is a separate marketing module that is an add-on) have the ability to add additional pre-appointment reminders, with different ad hoc messages for each reminder. For instance, a business may want to send an installation appointment reminder:
- 2 weeks ahead for a big project, with reminders for certain preparation
- 1 week ahead, a different reminder
- 1 day before, they may want to have just the standard confirmation go out.
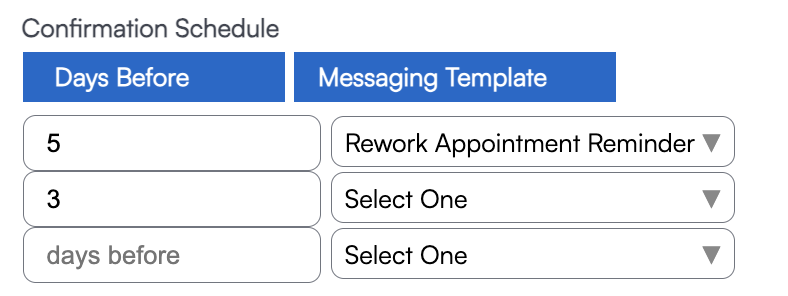
If you set the Confirmation Schedule, it will override any of the other confirmation messages set on the service. Meaning, if the default confirmation and confirmation reminder emails are turned on, they will not send if you enter even 1 step in the Confirmation Schedule section. It overrides what is set at the Control Panel > Notifications regarding schedule.
Scheduling
Lead Time Days and Lead Time Hours are fields that allow you to specify a minimum lead time for available time slots. For example, a lead time of 3 days will push your scheduling window 3 days ahead.
Days are measured in business days, while hours are measured in availability hours, dependent upon Service Agent's availability. In almost all circumstances, Lead Time Days is recommended over Lead Time Hours.
To learn more about settings for scheduling by specific service, go to Service Settings: Scheduling Mode.
To learn more about techs in the field, please review our article about Service Agents and Subcontractors.
To learn more about self-scheduling, please review The Contact Portal and Self-Scheduling.
If you have specific subscription-style services to set up, please review Subscription Style Services.
Invoicing
The Finish Action determines what happens when an appointment is marked Finished.
Default Action - The default action selection means to use the Finish Action setting on the Service Category. This is a convenience for cases where all the services in a Service Category work the same way.
Generate Invoice - This action will walk you through the process to create an Invoice from the Appointment. The invoice will include all of the details and pricing information from the Appointment.
Generate Proposal - This action will mark the appointment as finished and then let you create a Proposal for the contact.
Close Appointment - This just marks the appointment as finished. It lets you track actual start and finish times for reporting purposes but won't automatically create an invoice or proposal.
Only Services that are set to Default Action or Generate Invoice will be available when creating a Proposal.
For more information on Finish Actions and how they relate to Invoicing Modes for appointments please see this detailed page.
Auto Pay Upon Complete & Consolidate Payments
If you want to be able to specify a day of the month to process the credit card payment for a set of invoices you can do that with this setting. Go to Control Panel > Invoices and check the box Consolidate Payments.
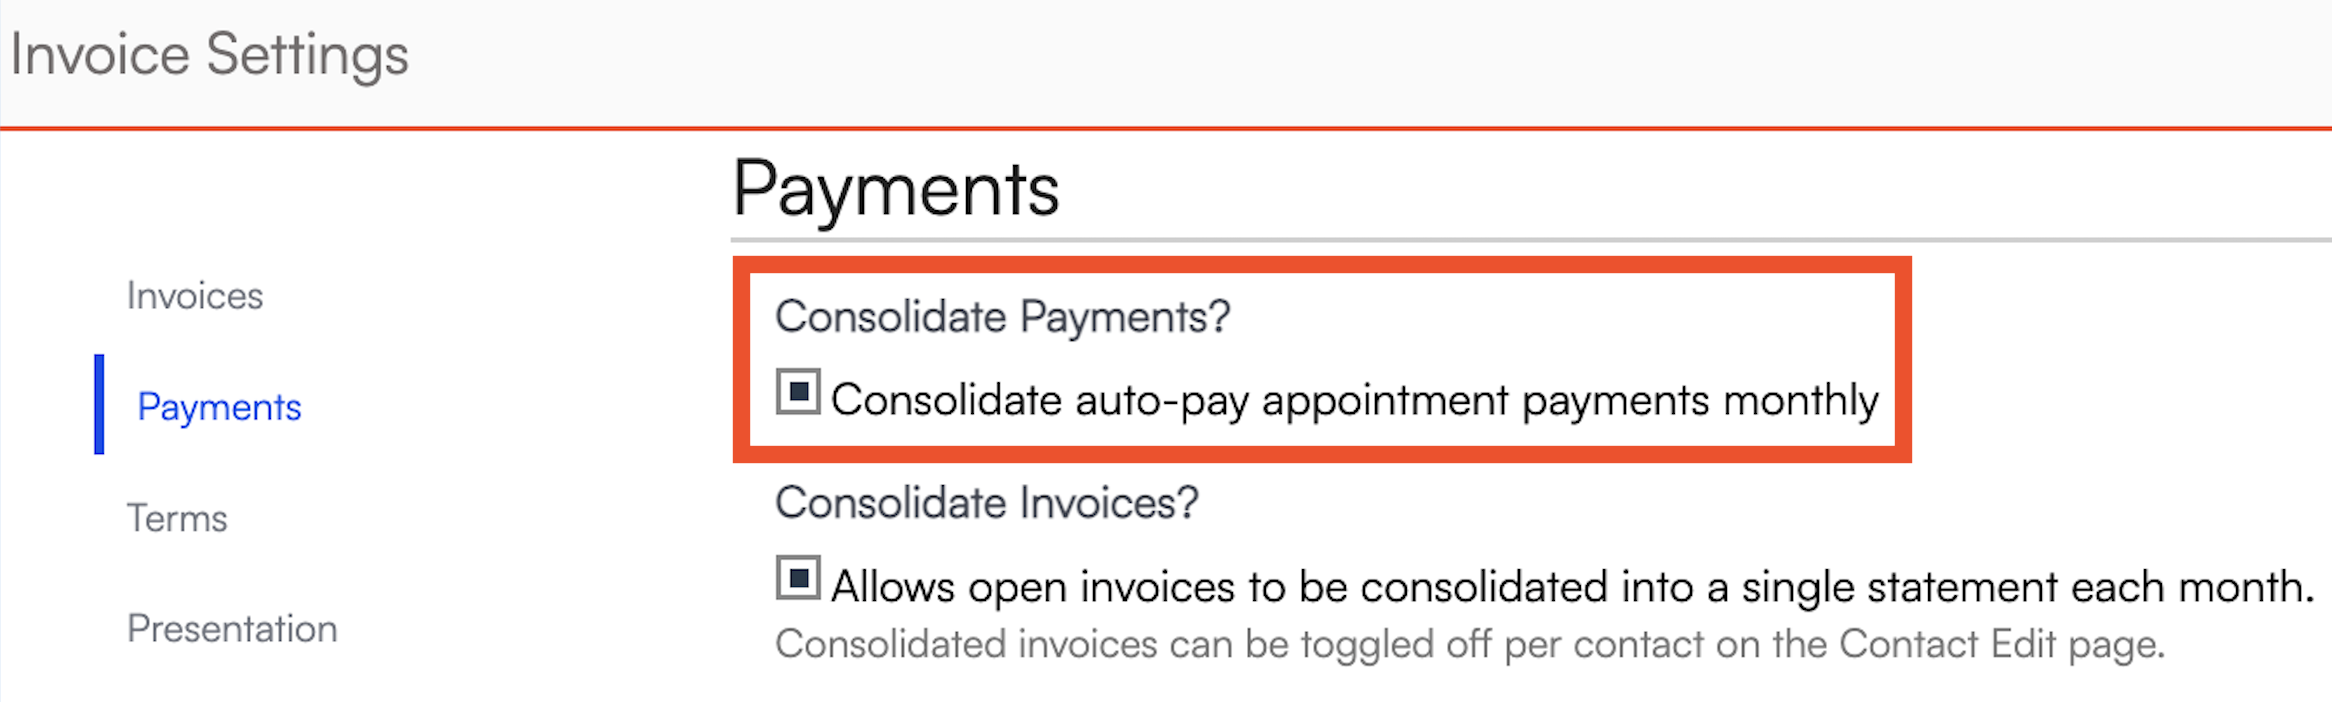
On your service (Control Panel > Service) the check box Auto Pay Upon Complete also has to be checked. Once these to settings are on, you can go to the Contact create/edit pages and it will allow you to specify which contacts should have their payments consolidated.
 To learn more about Automatic Payments, please review how to set up and some additional functionality.
Default Expenses
This section allows you to specify any default expenses you would like applied to any appointment completed with this service. You will need to add Vendors to your system before utilizing this area.
Go to Control Panel > Expense Vendor, and Add. Then go back to the Service (probably need to refresh if you still have it open on a separate tab) and you should see that Vendor appear on the dropdown list.
Task Chaining
Task Chaining is a mechanism to create tasks automatically when an appointment is finished. This is a great way to set up reminders for doing things like follow up calls, or customer satisfaction calls. You can even use it to remind you to send a thank you gift.
You can create as many tasks as you want.
If you are curious about chaining services together, please review Service Settings: Repeating Chaining Options. This will allow you to automatically attach follow up services or automatically queuing seasonal appointments for many customers in bulk.
FAQs
Are we able to create a checklist WITHIN a type of service?
Unfortunately there's not a great way to accomplish this. Outside of adding the checklist manually on the appointment, you could create a drip trigger that would assign a checklist to that User, but it wouldn't be tied directly to that appointment. You could do this similarly with a drip trigger that creates a task for that User upon that type of appointment being scheduled, but again, it wouldn't directly be tied to the appointment.
You could create a series of Appointment Custom Fields that would be a matter of checkboxes, dropdowns, or fields for typing that would reflect those 16 points, however they would appear on all appointments and not just the one type of service. You could additionally add another required Appointment Custom Field checkbox reminding the tech "Was this a Preventative Maintenance Service?" prompting the reminder to fill out the other fields if the appointment is applicable.
Can Services and Parts be set as default filters for the Invoices grid?
Yes, you can save the filter views to include the Services and Parts.
Once you have those filters added at the top of the Invoice Grid, scroll to the bottom where you see Views. It may say "Default" right now. However, you can add a new name (Example: Services & Parts) and click "Save".
Then you should see a second option where the "Default" view used to be. You can now switch between the two, but if you exit the page and return, the new view should automatically appear.
