Overview
Proposals describe what you're offering to do for a prospect or a customer. Every proposal contains a single Service and zero or more Parts/Add Ons. Once you've created a Proposal, you can save it or send it to the contact assuming they have an email address. If not, you can also print it.
This article will review:
Video Tutorial
Settings and Navigation
Proposal Settings
Configure your master Proposal Settings via Control Panel > Proposals.
Make further customizations about proposals in Service Settings via Control Panel > Services > Edit.
There are general Notification Settings for proposals in Control Panel > Notifications.
Find User-specific notifications and permissions for proposals. Go to Control Panel > Users > Edit and choose either Permissions or Notifications tabs.
The ability to edit, view, void Proposals are limited based on User Roles and Permissions. You may need to contact your Brand Admin for assistance.
Proposal Navigation
Proposals can be created from an appointment (i.e., at the end of an estimate appointment) or from a contact details page.
Get an overview about proposals in the following locations:
- The Snapshots section of the navigation menu contains several helpful Grids
- Open Proposals
- Accepted Proposals
- Projects (if you track proposals as projects)
- Navigate to Reports for proposal-related reporting
- Open Proposals/Options
- Proposal Declines
- Proposal Pivot Grid
- Proposal Summary
- Pipeline
Start a Proposal
ServiceMinder offers multiple ways to create proposals, giving your team flexibility to match different workflows. Whether your business prefers to create proposals in advance or build them in the field, ServiceMinder adapts to your process.
For example:
- Appointment-first flow: Some businesses prefer to perform an onsite estimate or service and generate the proposal after the appointment, based on the work performed.
- Sales-first flow: Others prefer to create and accept a proposal before scheduling the appointment. The proposal can act as a work order for Service Agents in the field.
From an Appointment or Service
A common approach is to create a proposal as part of your appointment workflow, either during or after the appointment.
There are two main ways this works:
1. Automatic Proposal Creation on Appointment Completion
In Control Panel > Services, you can set the Finish Action to Generate Proposal on specific services to automatically create a proposal when the appointment is marked as Finished.
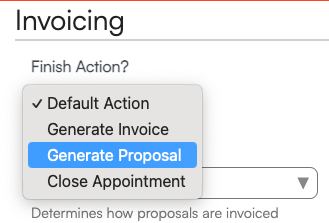
This is great for services like "Free Estimate" or "Inspection" where your goal is to propose work after the initial visit.
2. Manual Proposal Creation During or After an Appointment
Service Agents or sales team members can build and generate a proposal directly from the appointment via the Web App or the Mobile App.
-
- In the Web: View the appointment details page and click Copy to Proposal (found beneath the line items).

-
- In the App: View the appointment details page and click the three dots. Then choose Create a Proposal.

This is useful for creating a formal proposal while onsite, especially when work is being scoped or quoted in real time.
From a Contact
You can also create a proposal at any time from a contact’s record:
-
Navigate to the Contact Details page.
-
Click the Proposal button at the top of the page.
-
Complete the proposal form and send to the customer as needed.
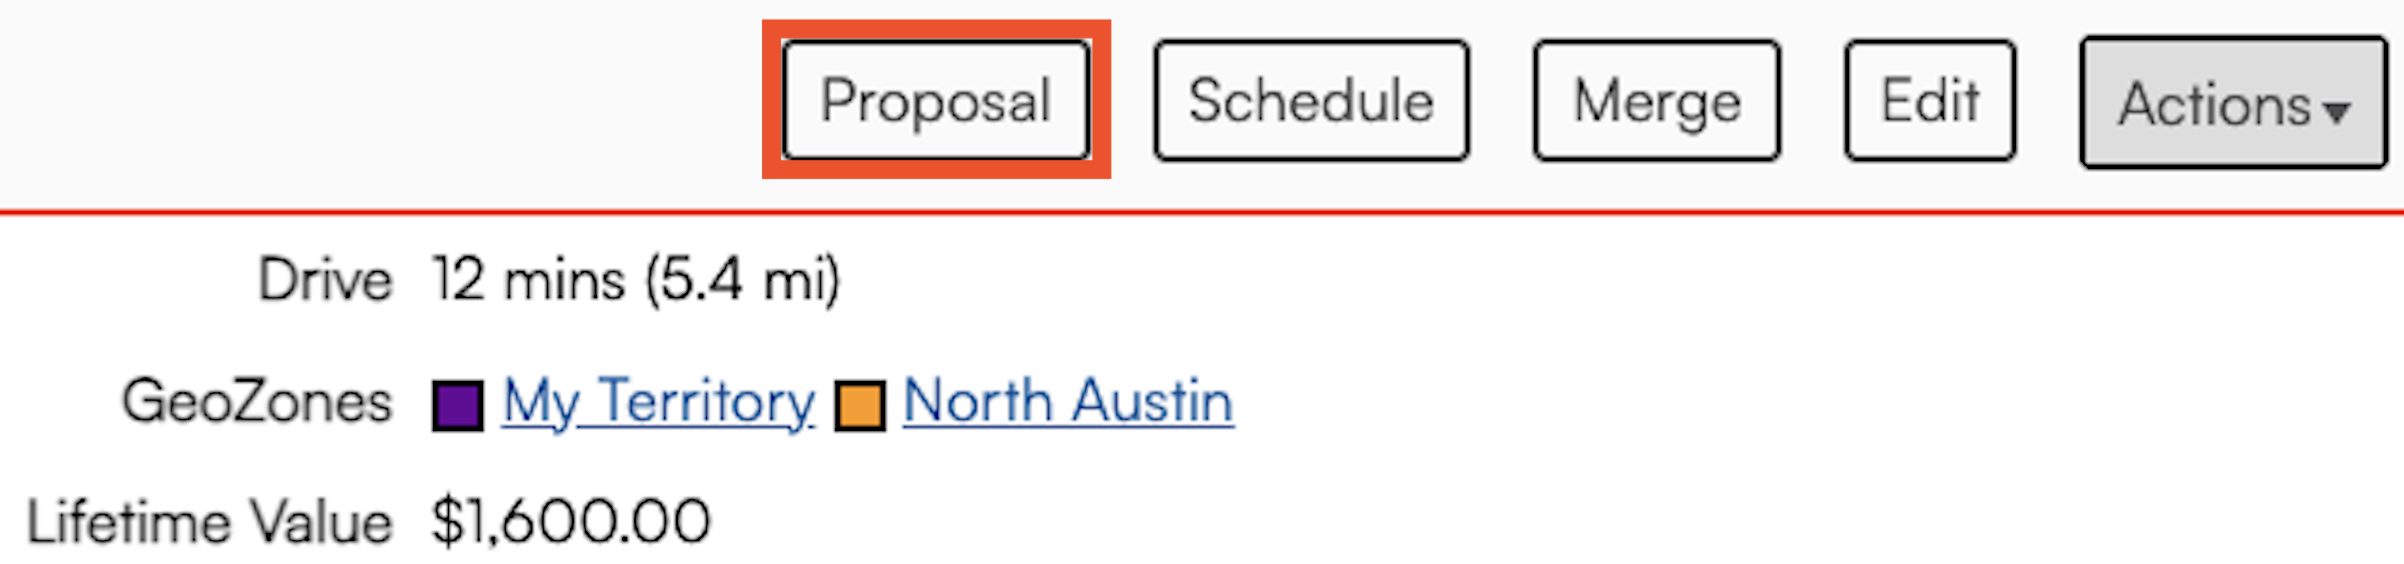
This method is useful for generating a proposal outside the context of a scheduled appointment—such as in response to a phone inquiry, online request, or follow-up.
Configure Settings
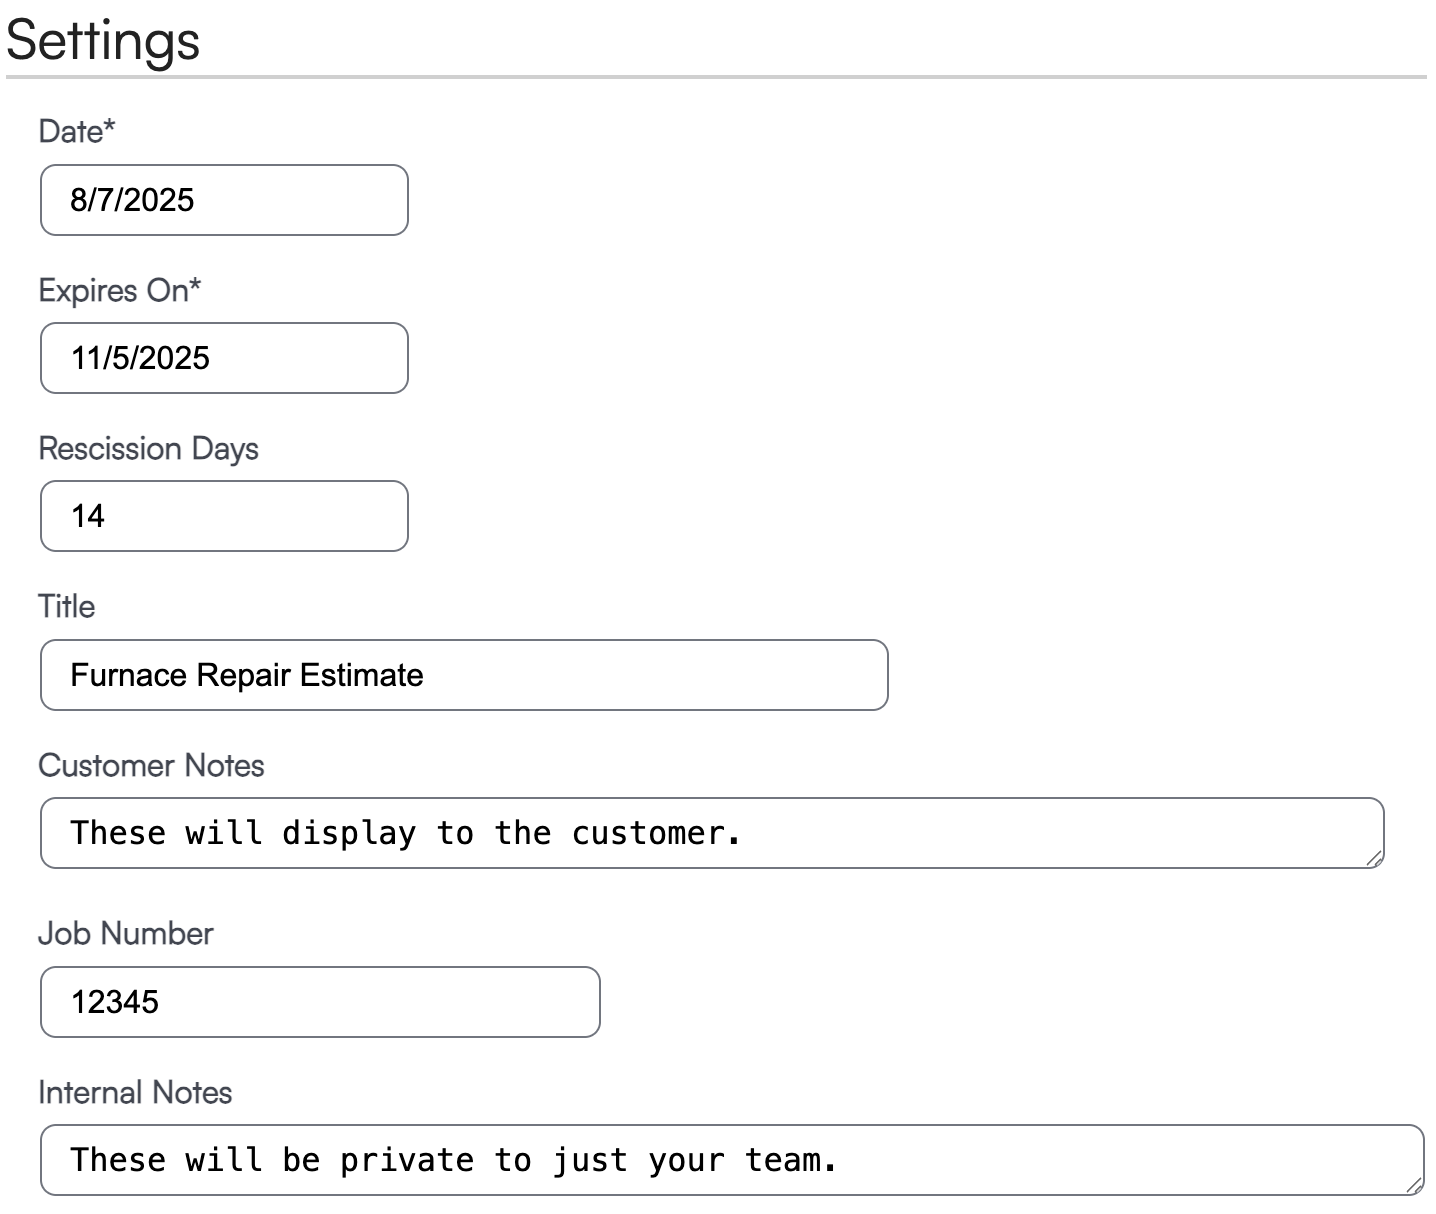
Date: will default to today's date, but can be updated manually.
Expires On: determines when this existing offer is no longer available for your prospective customer to accept.
Rescission Days: sets how many days a customer has to change their mind about accepting a proposal.
Title: a display name for this particular proposal. Helpful when sending more than one proposal to a customer, perhaps as part of a bundle. If this is left blank, it will default to the name of the Service on the proposal.
Customer Notes: notes that are visible to the customer on the proposal (i.e., a summary of the work to be done as well as any specific notes or instructions you want the contact to see).
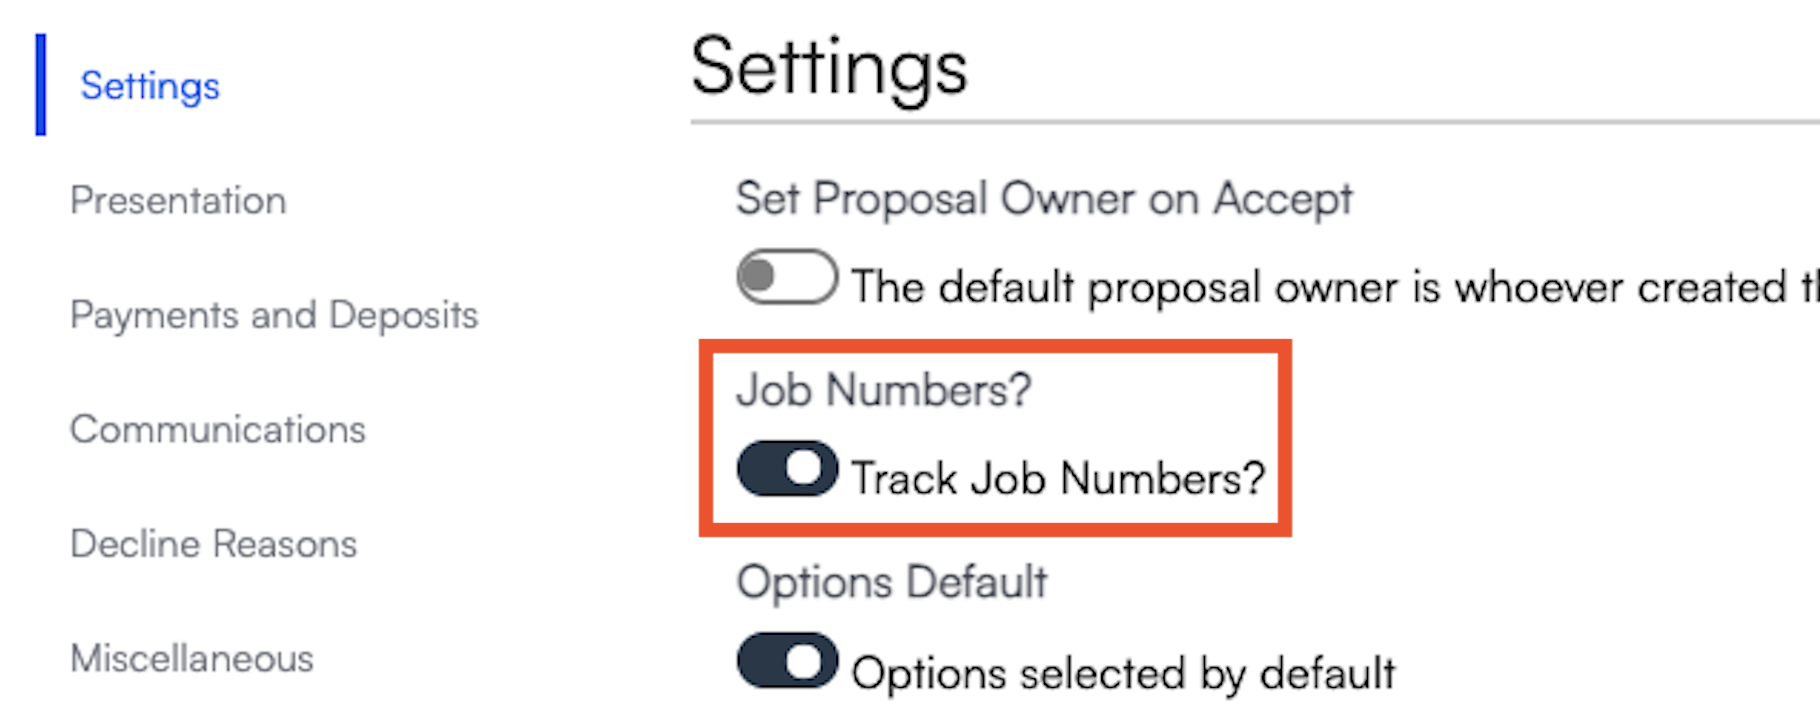
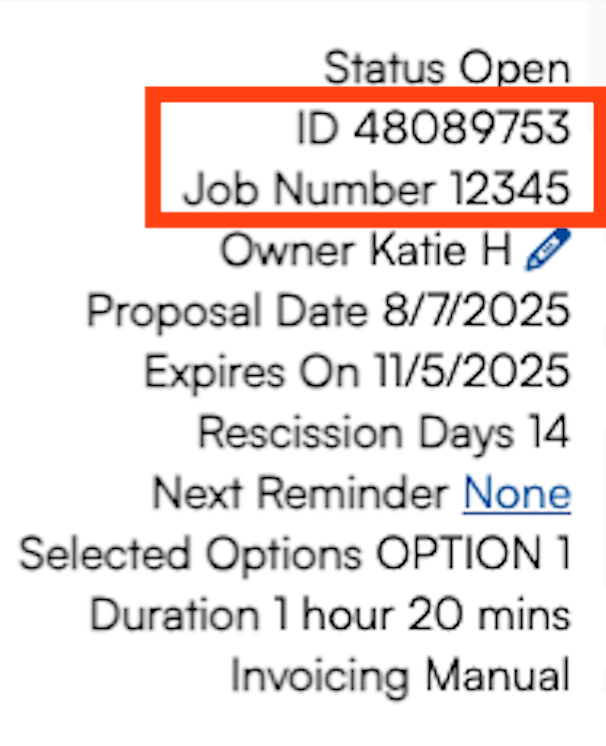
Job Number: this field can be enabled in Control Panel > Proposals and is an externally-facing, customizable identifier for jobs, helping with organization, tracking, and communication beyond the system’s internal Proposal ID.
Internal Notes: notes that will only be seen by your team, including the service agents who might actually deliver the service.
Select a Service and Parts
To build your proposal, you must first select a Service using the dropdown menu. The Service line controls many settings regarding the proposal, and subsequently any related appointments and invoices.
To save time, you can also use pre-built Proposal Templates to get started. If you have templates built, you can select the template and it will pre-populate the service and part line items for you.
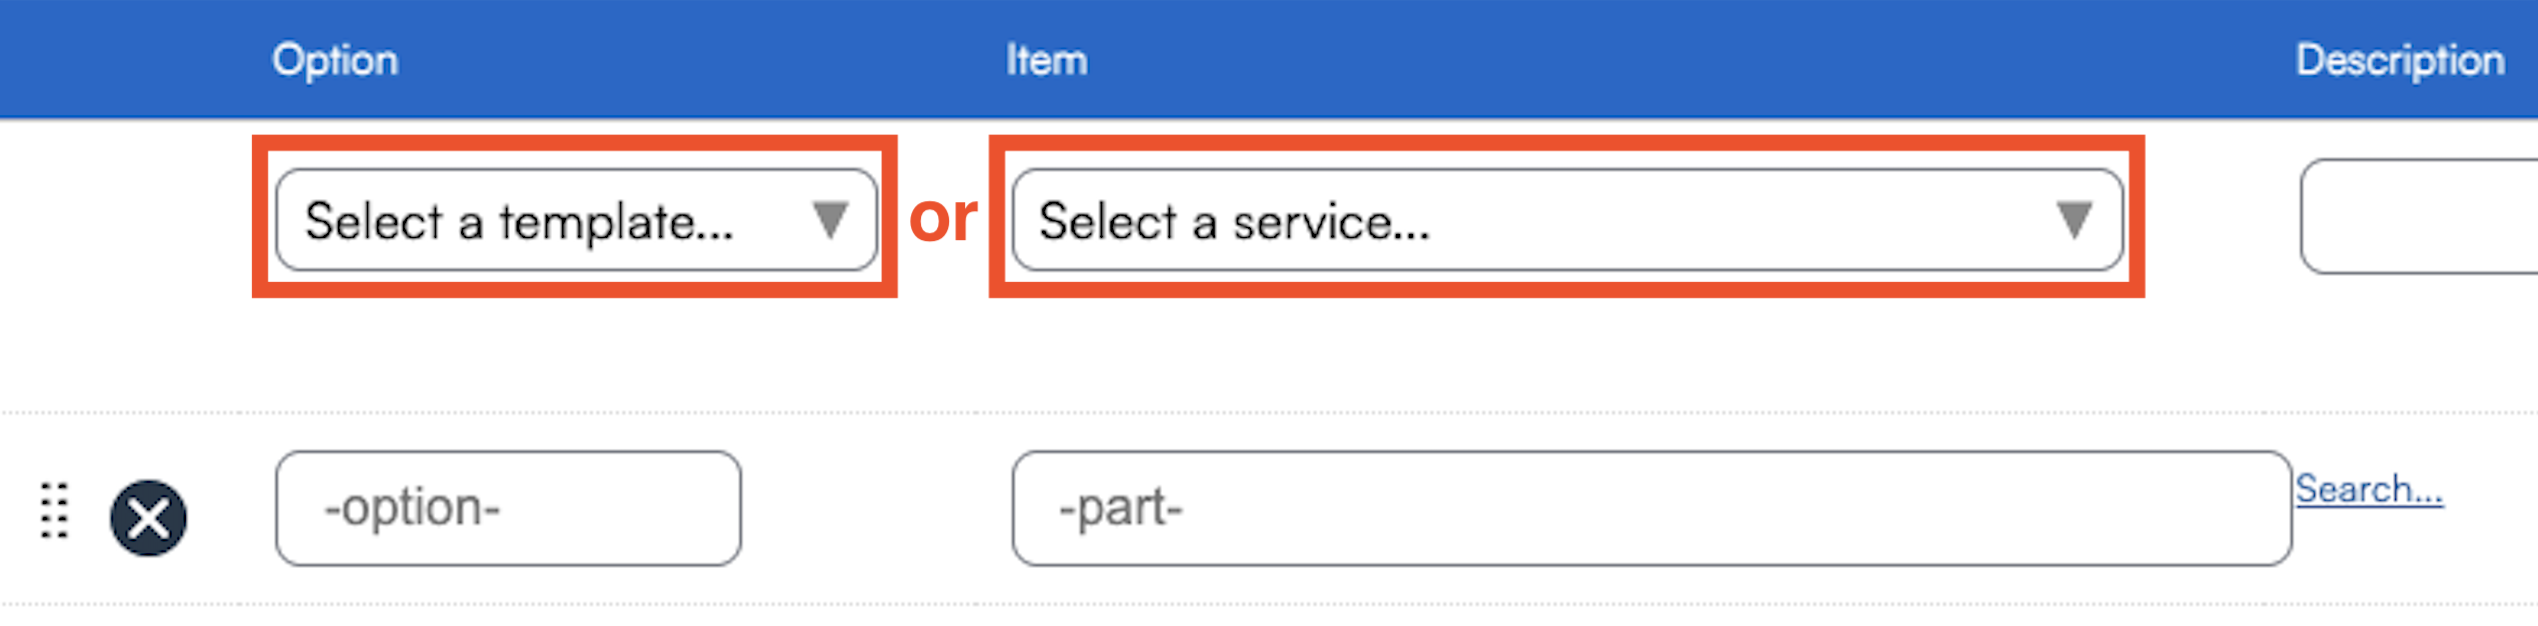
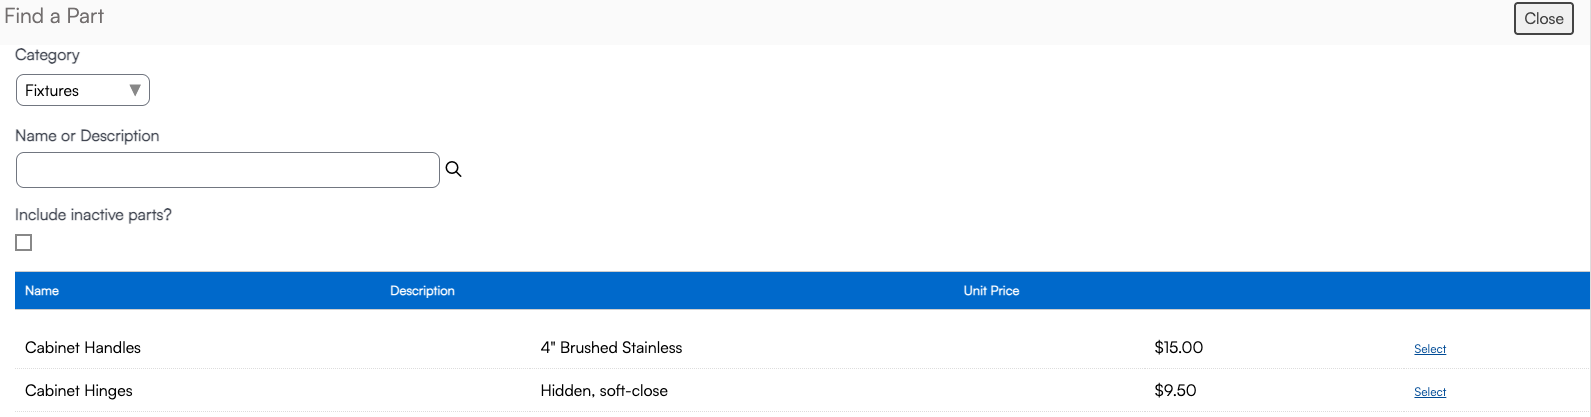
If you are building this proposal manually, the next step will be choosing Parts to add to the project. You can add parts two different ways:
- Click in the box labeled Part and search for the name of the part you want to add.
- Click Search to narrow down what you're looking for by Part Category. Select a Cateogory and review the list of parts that populates below. Click Select to add that part to your proposal.
Adjust Details
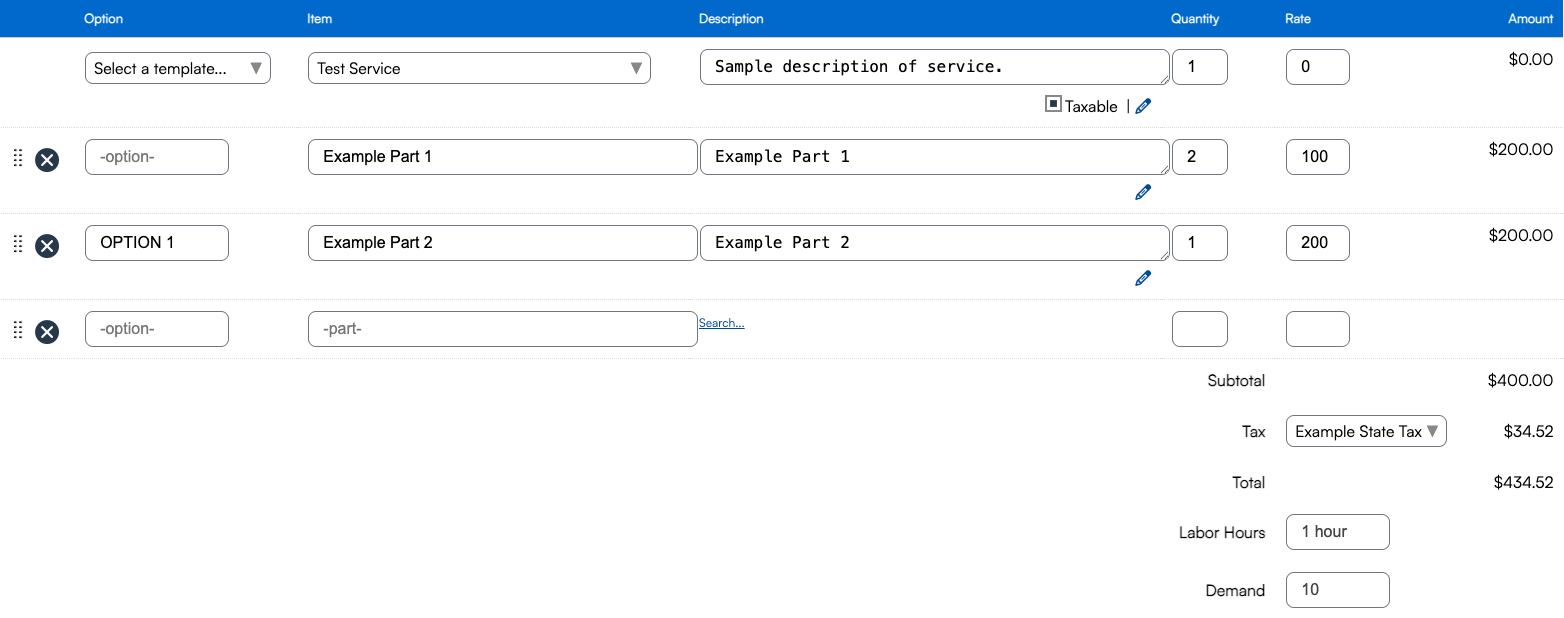
Line Items
After selecting a Service or Part, you can have a few additional configuration options:
- Taxable: The Taxable box on the service line must be checked in order for the entire proposal to be taxed. Learn more about tax settings.
- Edit Details: Use the pencil icon next to any line to adjust details about that item.
- Quantity: Adjust how many of the item will be needed for the proposal.
- Rate: Adjust the unit cost of the item.
- Options: Group parts together into Options that can be accepted or declined as part of the greater proposal. Learn more about options.\
- Tax Rate: If you are charging tax on this proposal, make sure a Tax Rate is selected in the dropdown menu below the subtotal.
- Labor Hours: Define how many hours of labor it will take to complete this job for the purpose of later scheduling the appointment and calculating hourly rates.
- Demand: Sets how much of a service agent's capacity will be taken up by this job (i.e., how many gallons of water will be needed for a pest control visit).
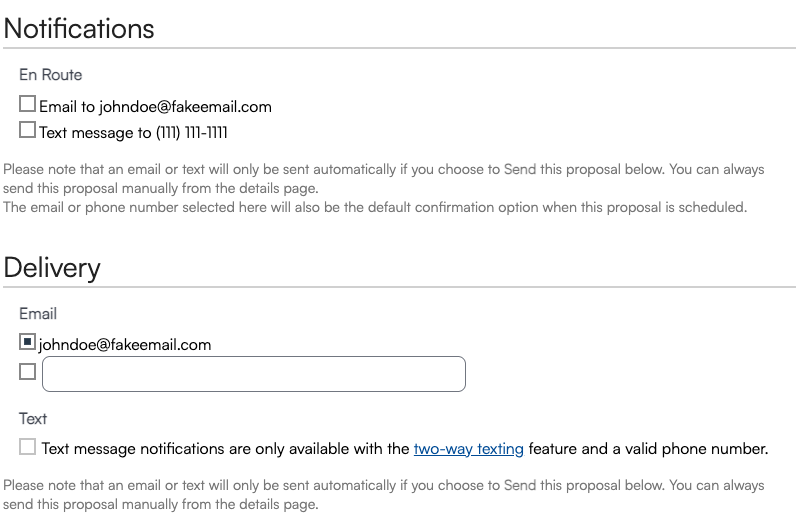
Communications
- En Route Notifications: Choose to send En Route messages via email, text message, or both.
- Proposal Delivery Method: Designate email addresses and phone numbers (if you have two-way texting enabled in your organization) to send the proposal to.
Save or Send
- You can Send the proposal, meaning you can email it to the customer for review and acceptance. This will also save the proposal.
- You can Save the proposal, meaning you do not email it to the customer yet but have it created and saved in your org.
A newly created Proposal will appear on the Contact Details page. Click Proposals from the options on the right-hand side, make sure you are on Proposals (not Change Orders), and you will see every proposal created with status, the date, and the option to Edit or Accept.

Add Attachments
After saving the proposal, you can go back and add attachments. Below the proposal total, you will see several options:

- Camera Icon: Upload photos directly to the proposal.
- Upload Icon: Upload documents directly to the proposal.
- Collateral Library: Choose photos or documents from your organization to add to the proposal. Select the items you want to add, then click Save.
- Contact: Choose photos or documents from the contact to add to the proposal. Click the down arrow on the item to pull it onto the proposal, then click Close.
Once photos and/or documents have been added to the proposal, you can manage them in the following ways:
- Click the X to remove the item from this proposal.
- Click the pencil icon to add a note to the item or to mark it as internal (hidden from the contact).
- Click the magnifying glass icon to enlarge the view of the picture.
- Click the document icon to download a preview of the PDF.

Additional Settings
At the top of the proposals details page, you'll find a Settings button that allows you to control certain master settings for this individual proposal. These settings are typically determined in the Control Panel at the Service or Proposal level, but they can be overridden here for special circumstances.
- Track as Project: Useful for tracking the completion of proposals that will require multiple appointments over the course of several days.
- Invoicing Mode: Changes if and when an invoice is automatically generated.
- Summarize Pricing: Moves all pricing to the Service or Option lines, effectively obscuring the price of individual line items and presenting a larger sum.
- Extra Signature: Allow for a second signature to be taken when the proposal is accepted.
- Target Date: Helps you budget your time by setting a date that you want to complete this appointment.

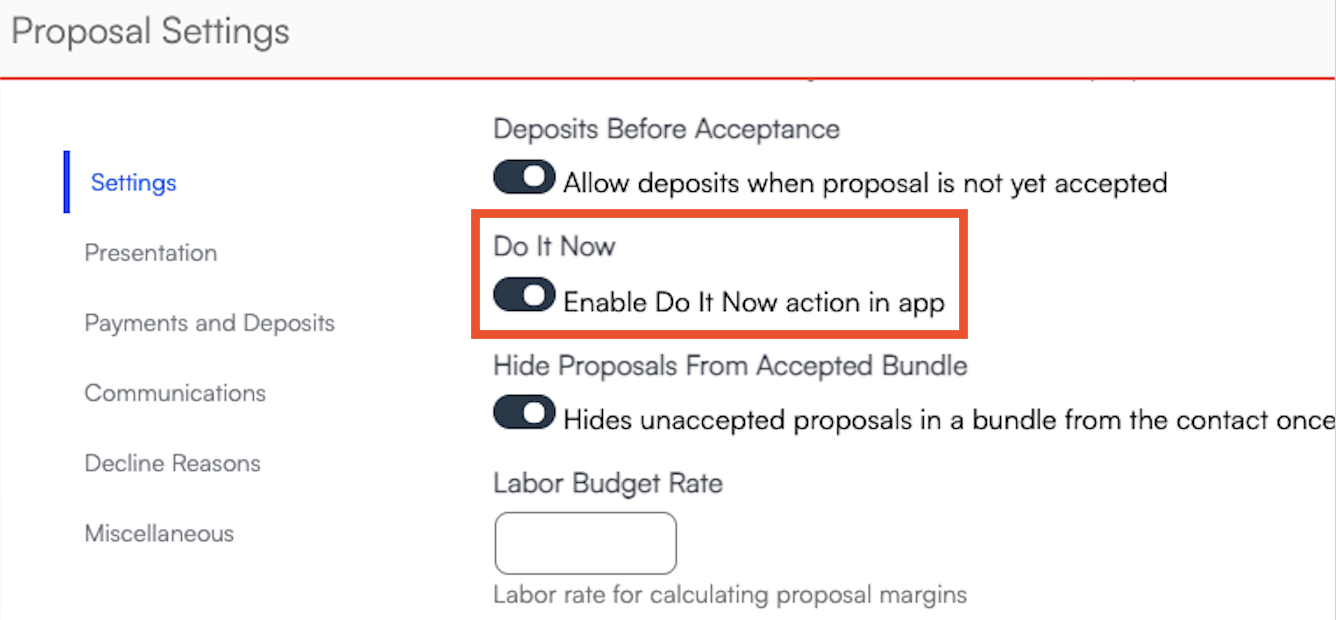
Do it Now (Mobile App)
If you are out in the field creating a proposal in the mobile app, the Do It Now option allows you to immediately start an appointment from the proposal so you can get to work right away. Create the proposal and save it. Then select the three dots in the top right corner and choose Do It Now.

You have to turn this feature on by going to Control Panel > Proposals > Settings.
FAQs
Why do my proposal show blank boxes where rates should be?
This is typically caused by the Summarize Pricing setting in Control Panel > Proposals and scroll to the Presentation section. Although this setting may be turned off now, Proposals that were created before that setting was turned off, still retain their original attributes and settings. You can turn these off per Proposal via the Settings button at the top of the proposal.
How can I display a proposal number for my customers?
By default SM has Proposal ID numbers that generate automatically and that is the ID number shown on your proposals. Typically, these are for internal use and are not seen by the customer. If you go to Control Panel > General > Basic Info, you can select to Show IDs. The ID will then appear on new proposals created.

Another option is to use Job Numbers. Job Number Tracking is enabled in Control Panel > Proposals > Settings. They are for external use and can be entered when creating the proposal.
Both Proposal ID and Job Number can be reviewed on the proposal details page.
How do I update a work order if I can’t edit an accepted proposal?
Instead of directly editing the accepted proposal, you can use a Change Order to:
- Add or remove line items (negative quantity removes).
- Accept the change order.
- Merge the invoices to reflect the updated details.
