Overview
Video Tutorial
Settings and Navigation
Start in Control Panel > General to enable Inventory Tracking in your organization. Here, you can choose to track inventory at the Warehouse or Service Agent (or truck) level. 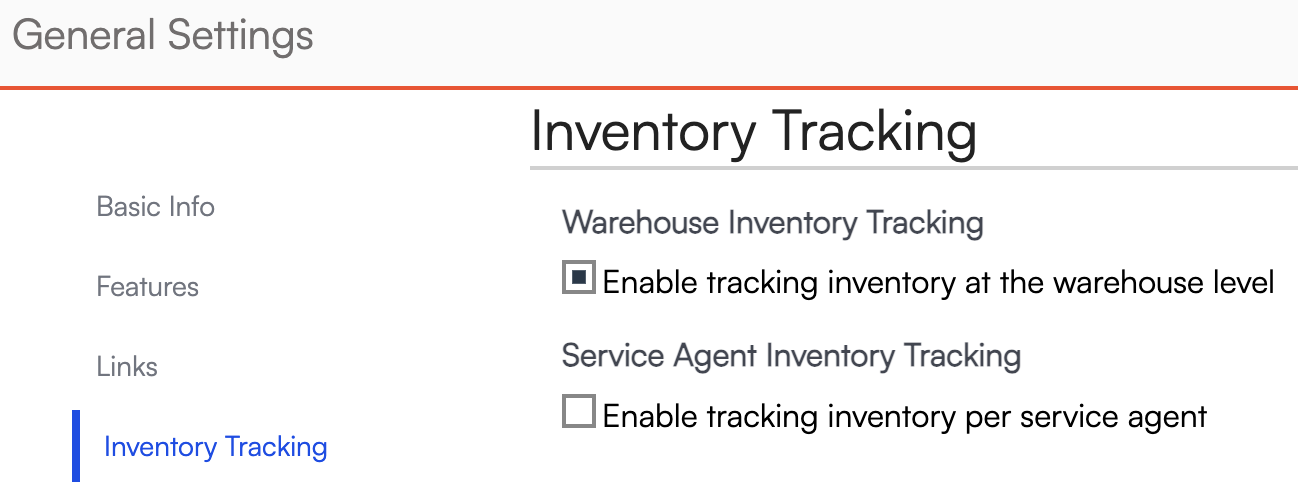
- Warehouse Inventory Tracking: Monitoring and managing inventory quantities for the entire organization at a central warehouse or office location.
- Service Agent Inventory Tracking: Tracking inventory quantities separately for each individual technician or vehicle, allowing you to monitor what each field agent has on hand.
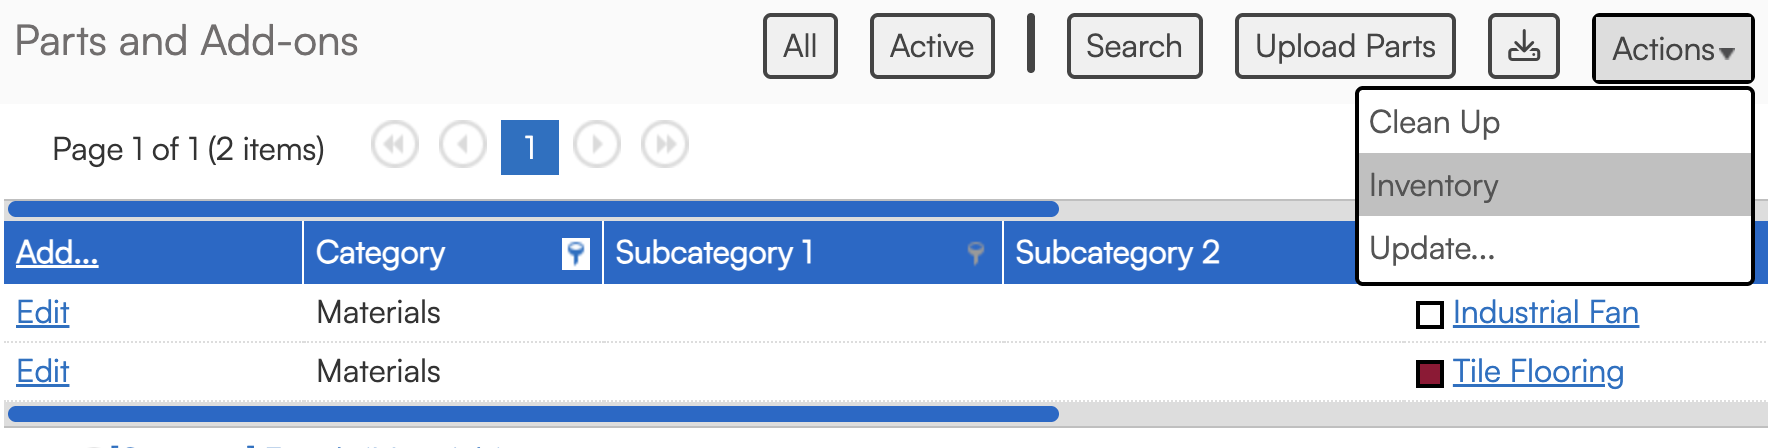
Parts
Next, navigate to Control Panel > Parts/Add-Ons. If you have not already created the Parts you want to track, this is where you will do so. You will enable inventory tracking with Part Categories, so click over to that tab to create or edit a category.

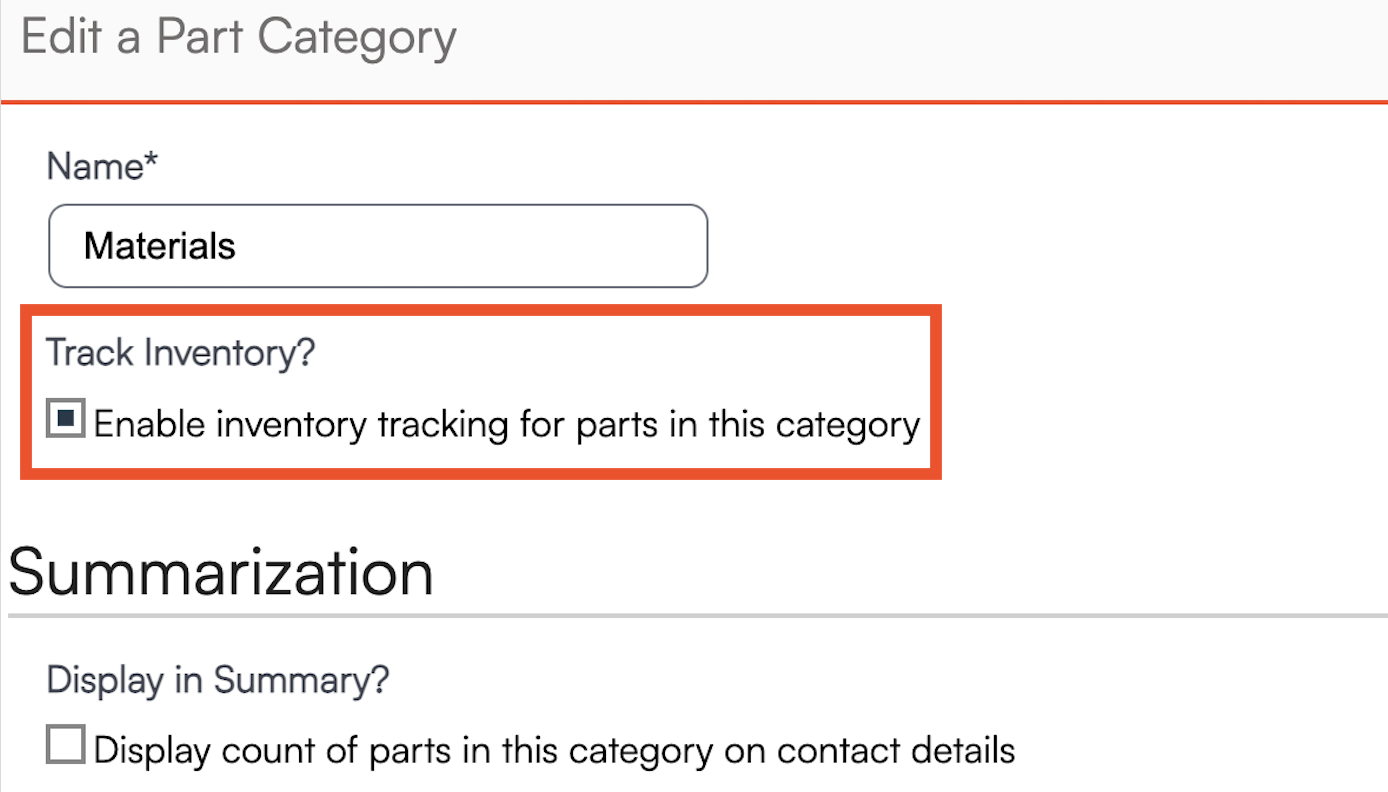
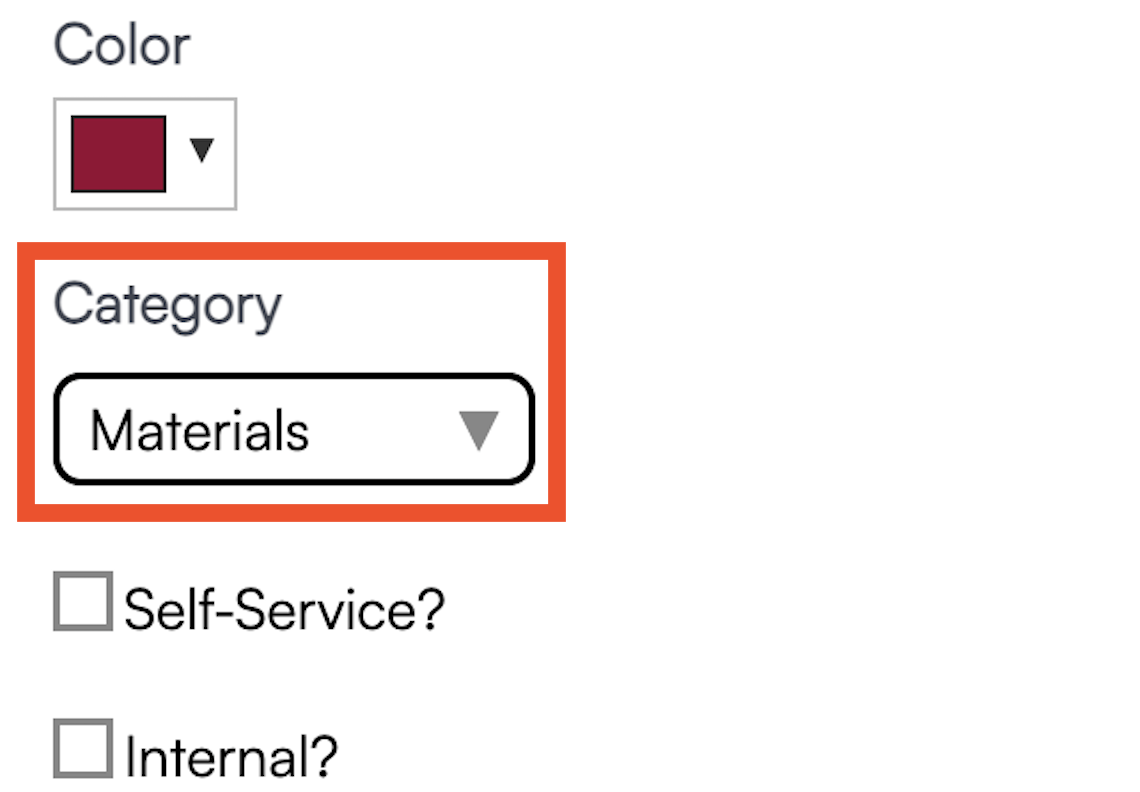
Then, you can edit your parts and assign them to a category which has Inventory Tracking enabled.
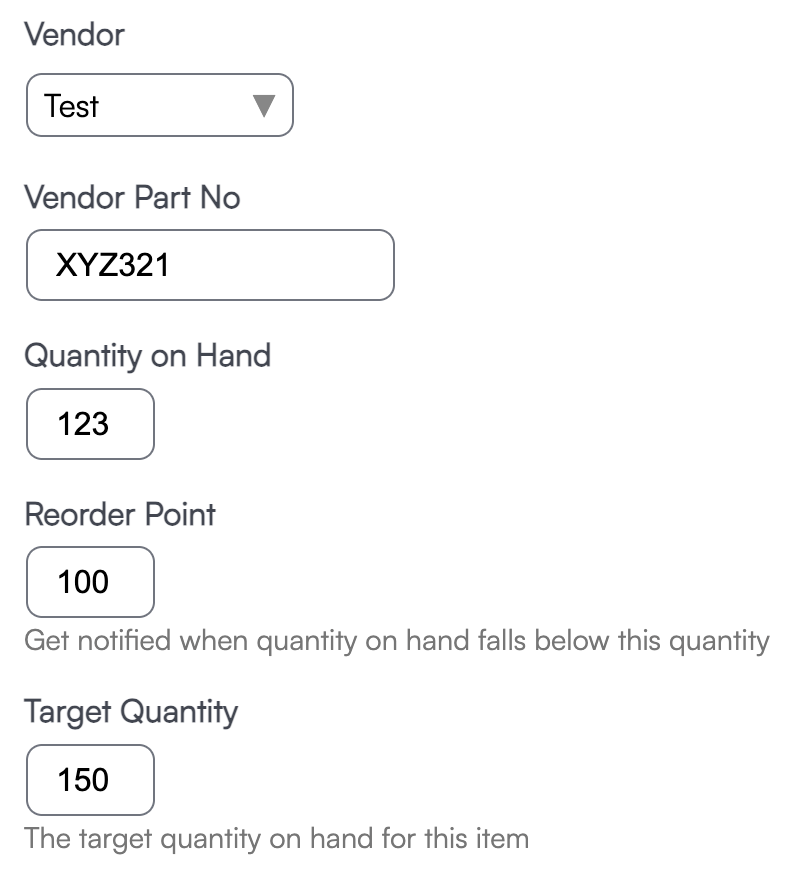
On the "inventory" part/parts, the user also has the option to enter inventory information. Vendor information may be added to help with streamlined reordering . Quantity on Hand, Reorder Point, and Target Quantity are also available settings. See the Reorder Point Notifications section(below) for more information about notifications when quantity on hand reaches that level.
To be tracked, these parts must be line items on appointments or invoices. These may be "no charge" items, but they must be included to be "consumed."
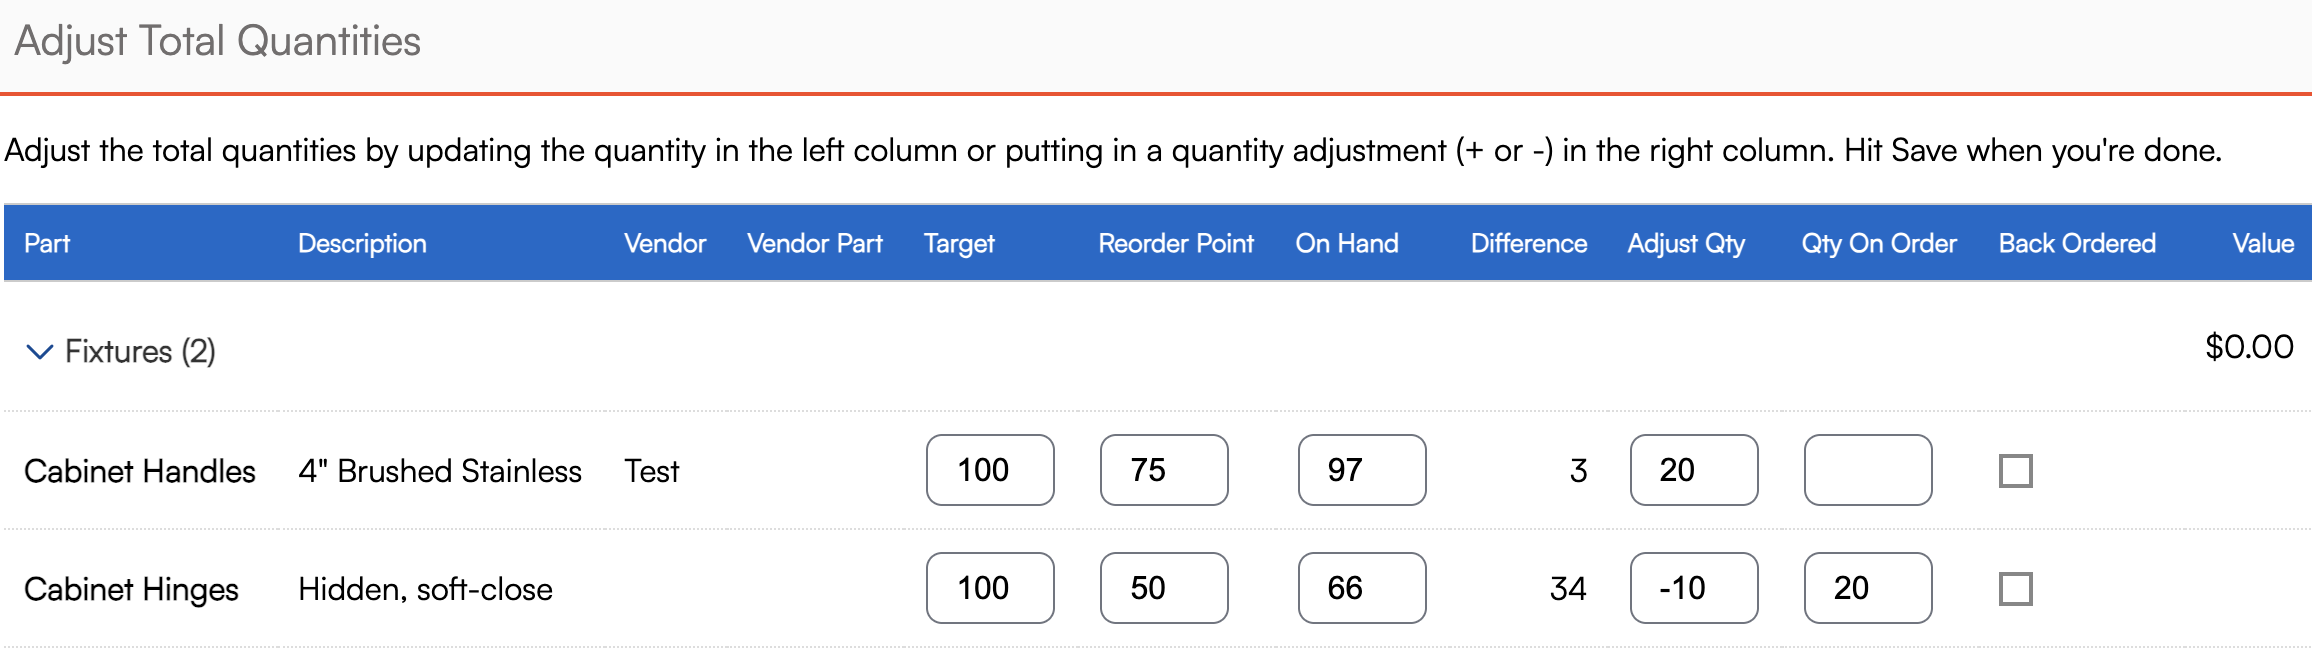
Bulk-Adjusting Quantities
When viewing the parts list, you can click the Actions button then choose Inventory.
That will take you to the Adjust Quantities page, which looks the same whether you're using per-Service Agent tracking or tracking at the organization/warehouse level.
There are arrows (min/max) for all of your Part Categories. Click on any category dropdown then enter in the quantity on hand in the left input and/or the quantity you want to change by in the right hand input for each part. Click Save to update.
On the Mobile App, Service Agents can access the Adjust Counts Function from the Contact details page. From an appointment, tap on the Contact name, then hit the Action menu and select Adjust Part Counts.
Service Agent Inventory
If your organization wants to track inventory based on the Service Agent (whether that's a person or a vehicle), the process is similar. If you've enabled "Enable Tracking Inventory per Service Agent," then the inventory grid will appear on the service agent's page.
Click on the Service Agent's name (not User name) and you'll see Inventory just below their details. Remember, this won't appear if you are tracking inventory at the Organization level.

Click on the "Inventory" icon to reach the Adjust Quantities Grid:

Here, a user can manually adjust quantities for that agent/vehicle. Any set target quantities will be displayed as well. The drop down at the top right is how one may quickly "move" inventory quantities from the warehouse or another agent to the Agent in question.
Reorder Point Notifications
When a service agent finishes an appointment and an invoice is generated, any parts on that invoice will be checked for inventory tracking. If they have a reorder point set, then the quantity specified on the invoice will be decremented from either the service agent's quantity or the organization's quantity. If the new quantity is below the part's reorder point, an email notification will launch (see notification settings.)
That's all there is to it! Keep in mind that this functionality is basic.... helping you track quantities for things that you want to ensure you keep a certain quantity on hand. We don't track when they are consumed, so we don't provide any reporting that shows how many of a particular item were on hand at any point in the past. We track the current quantity.
Inventory Reporting
Part Usage Report
The Part Usage Report provides a summary of the quantity of parts that have been used during jobs and appear on invoices. It includes only parts that were actually consumed in completed appointments and invoiced, not those listed on unaccepted proposals or incomplete estimates. The report displays key metrics such as:
- Part name
- Quantity used
- Quantity on hand
- Subtotal value
- Number of times a part was used (lines)
- Filtering options by service agent (technician), part, contact, owner, or date range
This report is essential for tracking inventory consumption trends, understanding which parts are being used most frequently, and comparing usage to current inventory levels. It helps organizations prepare for future appointments by ensuring that sufficient stock is available and by identifying when to reorder parts. The report can be filtered to show usage by individual technicians, making it easier to monitor consumption at the field level.
Service Agent Inventory Report
The Service Agent Inventory Report (also known as the Technician or Field Agent Inventory Report) provides a detailed overview of the inventory items assigned to each service agent. It tracks:
- Parts and materials assigned to each technician
- Quantity on hand for each part
- Usage of parts over a specified period
- Reorder points (minimum thresholds for restocking)
- Target quantity on hand
This report helps organizations ensure that each technician has the necessary parts for their appointments, reduces the risk of stock-outs or overstocking, and supports efficient inventory management at the individual agent or vehicle level. It allows for manual or bulk adjustments of inventory, and inventory can be moved between agents or from the warehouse as needed. The report can be filtered by agent and date range for detailed analysis.
FAQs
Why don't I see any quantities in inventory?
The owner will need to add "On Hand" quantities to all of the parts they want to track. So they need a beginning number for the system to go off of. They can also add this part-by-part, but it is easier to use this grid to do many parts at once.
