Overview
Deployment refers to the ability for Brand Admins to send out configurable settings from one org to the other. The purpose of this feature is to allow the brand to make decisions about email templates, parts lists, etc., then build and test, then send out from that org to other locations.
Please communicate with franchisees before a mass deployment, especially if they are an existing org within serviceminder and not a brand new organization. They may have built out areas of their org that you will deploy over and override. Adequate time to review and record settings will be a great help to their business.
This article will review:
Video Tutorial
In this video, we show you the process of deploying and explain the difference between Add and Update. Click to watch!
Settings and Navigation
Go to Dashboard > Tools tab > Deploy.

Deployable Settings
This is a list of fields/areas that can be configured in serviceminder. As with many things in the system, these are organized alphabetically. Each of these sections can be configured at the brand level, typically in the Franchising/Template account, and then deployed out to all of the brand organization locations.
Some of these sections are core to the functionality of flow within serviceminder, those are highlighted in Bold below.
- Categories
- Campaigns
- Channels
- Checklists
- Custom Fields
- Groups
- Parts
- Services
- Skills
- Offer Codes
- Cancel Reasons
- Decline Reasons
- Tags (Contact/Document/Picture)
- Research Links
- TaskBoards
- Terms and Conditions
- Automated Emails
- Ad Hoc Emails
- Print Templates
- Ad Hoc Print Templates
- Proposal Templates
- Misc. Templates
- Recurring Billing Templates
- Ad Hoc Forms
- Drip Triggers
- Drip Campaigns
- Grid Views
- Invoice Terms
- Organization Settings (General, Proposals, Invoices, Scheduling, and Notification Settings found in the Control Panel)
How To Deploy
Again, you are deploying what lives in one org to one or more other organizations. You first need to make sure you know what you are moving, where you are moving it from, and where you are moving it to.
Make sure you are in the org that you want to deploy from. For instance, some brands only have one brand org and some have many. It is usually named something like brand template or deploy account. If you are new as a brand admin, then we urge you to check with your leadership team to make sure you know what is the correct brand organization for your franchise.
In this example, I am deploying two Contact Categories from Monsters, Inc. to Bob's Pest Control - Houston.

Deploy Tabs
When deploying sections, you'll work through the tabs one at a time.
When you select an org to deploy to and from, you will see a message with the choices of Add and Update.
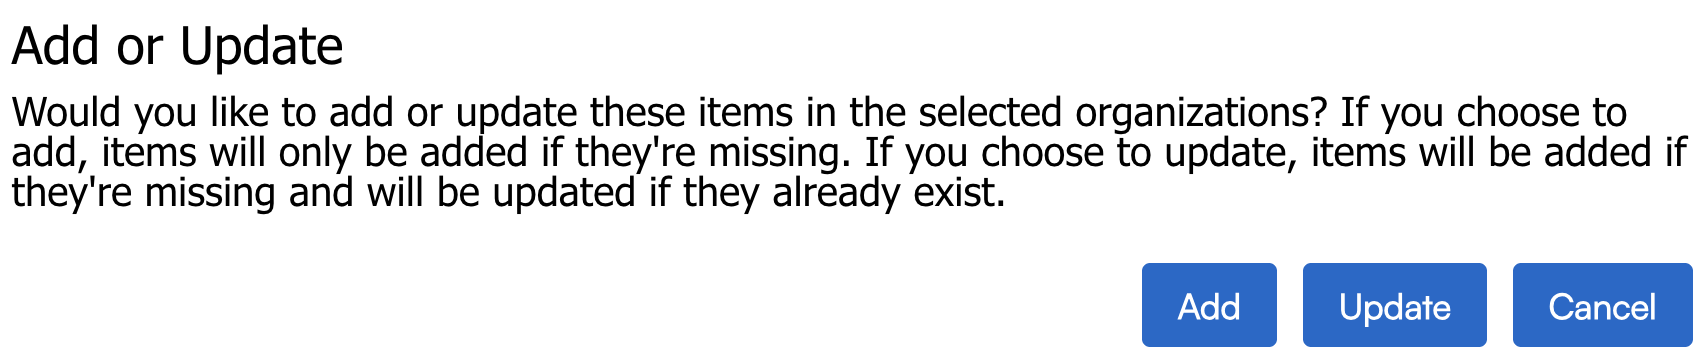
- Add means it will be added to any orgs that don’t have that item, currently. So it is brand new to that org.
- Update means it will add to all orgs and overwrite any existing stuff if orgs are using the same name for that item (this is particularly tricky with Taskboards.)
Inactive Items
When you are deploying from an org, you can select the options you want to send out to other locations. If you have old parts, services, settings then those will be included in the list of things to deploy out. If you want to make a clear distinction between new and old, you will need to go through the deploy account and make things inactive.

There is no option to delete when using the deploy feature. Each org will need to have parts, services, triggers, etc. manually made inactive.
Deploy in Required Order
You'll also need to do some of these sections in a particular order. For sections that relate to each other, there's an order to follow. The other sections can go in any order, you'll just want to remember that for anything that uses a special template, the template should go first.
When deploying, it's just like the chicken and the egg. Somethings have to be deployed first so they exist be for you deploy the secondary thing. When deploying sections, you'll work through the tabs one at a time.
Channels and Campaigns
You want to deploy Channels before Campaigns. Due to the hierarchy of data and how things are built within serviceminder, you cannot have a campaign reference a channel that does not exist.
Drips
Drips are an add-on feature, meaning that this is sometimes included in the serviceminder plan purchased by the brand or the franchisee needs to purchase it separately to have access to some of the fields mentioned below.
- Taskboards
- Ad Hoc Emails
- If you do not have ad-hoc emails associated with campaigns or triggers, you can skip this step.
- You can also do ad hoc emails before taskboards, but they definitely need to be deployed before campaigns and triggers.
- Drip Campaigns
- Drip Triggers
If you have Contact Tags and Categories that referenced by triggers and those are newly created, the existing orgs will not have those categories and tags, so you need to deploy those BEFORE the triggers.
If some triggers filter on Services or Parts and those are newly created, then orgs will not have those in their system. If you deploy triggers before those services exist, those filters will remain blank and fire on all Services or Parts.
Services and Parts
- Services
- Parts
- Proposal Templates
Again, if you use taskboards and drip triggers or emails, they may reference or filter based on these fields. Start with the Services and Parts and deploy everything else from there.
Once you have items deployed to your organizations, you may find a time where you need to update the name of one or more of those deployed items. For example, you may need to change the name of a custom field that all of your locations are using. You can edit that item in Control Panel, change the name, and click save. Upon saving you will be prompted to choose whether or not you want to deploy that name change out to all organizations that have that item.

Deploying Organization Settings
The ability to deploy Organization Settings streamlines the new organization onboarding process, reduces human error, and saves time by letting you reuse existing configurations across your brand.
From the new Organization Settings tab, Brand Administrators can select and deploy key configuration values across multiple categories:
| General Settings | Proposals Settings | Invoices Settings | Scheduling Settings | Notification Settings |
|---|---|---|---|---|
| Business Number | Set Proposal Owner on Accept | Reporting Mode | Service Color Blocks | Reminder Notifications |
| Nearby Radius | Job Numbers | Invoice Number Template | Service Agent Color Blocks | En Route Notifications |
| Show IDs | Options Default | Invoice Due Days | Calendar GeoZone Color Blocks | |
| Time Clock | Long Line Descriptions | Appt Invoice Mode | Scheduling GeoZone Color Blocks | |
| Contact Managed By | Extra Signature | Appt Inventory Mode | Recurring Appointments for Teams | |
| Contact Owned By | Deposits Before Acceptance | Send $0 Invoices | Optimize Drive and Start | |
| Auto Offer Codes | Do It Now | Print All Invoices | Collate Covers | |
| iCalendar Feeds | Hide Proposals From Accepted Bundle | Filter Zero Items | Day Click Action | |
| Bids | Labor Budget Rate | Blank Zero Amounts | Default Tentative | |
| Subscription Hours | Rescission Days Default | Print Format | Default Ad Hoc | |
| Granularity Minutes | Rescission Calendar | Consolidate Payments | Options Default | |
| Print Format | Send Invoice | Open Time Granularity | ||
| Proposal Completion Mode | Consolidated Payments Day | Lead Time Hours | ||
| Multi-day Duration | Run Installment Payments At | Lead Time Days | ||
| Thumbtack | Show Total Below Date | Finance Charge Rate | Scheduling Granularity | |
| Show Owner Info | Finance Charge Part | Drive Time Granularity | ||
| Youtube | Service Line | Timeslot Sorting | ||
| Summarize Pricing | Exclude Tentatives | |||
| Houzz | Blank Zero Amounts | Appointment Window | ||
| Yelp | Hide Quantity | Nearby Radius | ||
| NextDoor | Hide Unit Price | Nearby Count | ||
| HomeStars | Hide Parts | Include Nearby Queued | ||
| Google Review URL | Redirect to Invoice | Include Nearby Scheduled | ||
| Facebook Review URL | Notes Label | Auto-select Slot | ||
| Houzz Review URL | Terms and Conditions | Contact Owner | ||
| Home Advisor Review URL | Alt. Legal Entity Name 1 | Contact's Schedule Window | ||
| Angi Review URL | Alt. Legal Entity Name 2 | Hide Past Appointments | ||
| BBB Review URL | Proposal Deposit % | Approximate Times | ||
| Yelp Review URL | Require Deposit | Confirmation Reply Email | ||
| Require Service Address | Payment Plan Default | Show Schedule Dates on Proposals | ||
| Include Title for Contacts | Auto-select First Plan | Show Schedule Dates on Invoices | ||
| Include County for Addresses | Let Contact Pick Notifications | Expired Subscription Date Mode | ||
| Include State | Proposal From Organization's Email | Cancel Reason Required | ||
| App Picture Quality | Expires After | Online Scheduling | ||
| Contact Notes Default Private | Reminder Interval | Account Creation | ||
| Proposal Documents/Images Default Internal | How Many Reminders | Self Service Radius | ||
| Notes Results Window | Cancellation Hours | |||
| Warehouse Inventory Tracking | Cancellation Fee | |||
| Service Agent Inventory Tracking | Show Team Slots Only | |||
| Hide Pricing on Tickets | Exclude Self Service Internally | |||
| Additional Start/Finish | Self Service Phone | |||
| Recent Appointments Window | Hide Queued Appointments | |||
| New Contact Category | Confirmation URL | |||
| New Contact Channel | Require Payment | |||
| Campaign Required | Appt Start Proximity | |||
| Warehouse Address 1 | Require Confirmation | |||
| Warehouse Address 2 | Require Internal Note | |||
| Warehouse City | Send Internal Note Alerts | |||
| Warehouse State | Auto-Close | |||
| Warehouse Postal Code | Show Part Summaries | |||
| Mailing Address 1 | Expired Service Window | |||
| Mailing Address 2 | Expiring Service Window | |||
| Mailing City | Backlog/Future Window | |||
| Mailing State | Default Capacity Units | |||
| Mailing Postal Code | Default Rate Per Hour | |||
| Duration Alert Percentage | ||||
| Duration Alert Percentage Over |
Asking Support for Help
Yes, our Support team can assist you with deploying. You would send a Support ticket, but we ask that you provide as much detail as you can about what should or should not be deployed.
For instance, we have absolutely no idea if your brand created new ad-hoc email templates. Have you made sure that the old ad-hoc email templates are made inactive? If not, our Support person may deploy both new and outdated information to the new org.
Do we need to deploy taskboards? Are Contact Categories and Tags connected to those taskboards? We will not know, so you need to include that on the list of things to deploy.
This is one reason why some brands choose to do this step on their own since they are more familiar with the correct and incorrect material.
Please also make special note of which is the correct brand account to deploy from if you have several brand accounts. Some call their deploy account DO NOT USE and other brands label it DEPLOY FROM HERE. Sometimes it is easier than others for us to determine it on our side, but it is always best if you can provide everything we should know to mitigate possible errors.
If you would like suggested email templates to the Support team on how to frame these requests, read Support Ticket Templates for Brand Admins.
FAQs
Can I undo a deployment if I selected the wrong things?
It requires a database wipe to remove deployed fields from orgs. Database wipes take a long time to process and complete, and means that other work has to be halted putting strain on the other clients and the serviceminder team. To undo a deployment may be an additional charge to the brand depending on the time and work involved.
If you wish to go through with the database wipe, you will need to submit a support ticket explaining in detail what you deployed, which account you deployed from and what orgs you deployed to. We need to know what needs to be removed. For instance, if you deployed contact categories - do we remove all contact categories from Orgs A and Orgs B? Do they have existing contact categories before the deployment that need to stay?
Can I have you wipe certain aspects of an account using the Database?
Yes, however, you have to be EXTREMELY DETAILED with what you want to stay. If you don't want all categories and channels deleted, which ones? If you tell us to keep drip triggers but don't mention they are connected to drip campaigns, we will wipe the drip campaigns not knowing they were supposed to stay. This is why we recommend that you keep detailed records of active fields that need to be deployed and what fields are connected to taskboards or services.
Our system is highly adaptable and can connect so many pieces together that it can be hard to remember all of it over a period of time. If you don't remember to tell our Support team something, it can cause headaches in the future.
Are there any other considerations I need to make before deploying?
It is worth your time to go review several franchisee orgs to check what parts, services, categories, tags, drip triggers, taskboards they may have built in their organizations. There are settings that limit what the owner can create for their location. If they name something similar to what you named taskboards or services (and you deploy those) you will override what they have done simply because the name is the same.
For example, I am an owner and I created a service called "Move Out Service". I have made it so that service is tied to a skill that only one Service Agent has - that way, only that agent can work those appointments.
If the brand independently creates a service called Move Out Service, but they don't attach a skill set to it, my settings are reset when they deploy. Suddenly, all of my agents are available to schedule for the Move Out Service. My Office Admin didn't know this happened and accidentally scheduled the wrong agents to those appointments.
Is there a list of things that I cannot deploy?
If it isn't a tab that you see on the deploy page, you cannot deploy that section directly. However, you can send a support ticket to ask if we can use the database to deploy from the backend. However, somethings cannot be deployed en mass.
Can you deploy settings in any other way?
Yes, in addition to sending a support ticket to use the database to deploy what is not shown on the deploy page, you can use the bulk update setting on the Organization Grid page. Go to Dashboard > Tools tab > Organizations.
You can download the list, make changes via Excel, then upload. Not everything can be changed in this way, but is a possible way of adding Open Since dates or adding Account Managers to several orgs at a time.
