serviceminder|pay
Did you know the average franchisee pays around 3.5% in payment processing fees, which can limit growth potential? That’s why we’re offering a solution to help our clients eliminate these high fees—serviceminder|pay. With serviceminder|pay, we're not just reducing costs—we’re changing the way you manage payments, boosting efficiency, visibility, and profitability.
As a trusted franchise supplier for over 12 years, supporting nearly 60 brands and more than 2,500 franchisees, we've continuously tackled our clients' challenges with a comprehensive approach. Now, we’re going a step further to remove another major obstacle from your brand’s daily operations: the hassle of payment processing fees, visibility, and reconciliation reports from third-party gateways.
With our new solution, serviceminder users can benefit from:
- Get started with no commitments, payments included, and no minimums or monthly fees
- Instant approval with prefilled applications
- Direct support from the serviceminder client success team—no extra vendor to manage
- Faster access to your funds
- Reconciliation and reporting all in one platform
- Seamless integration with QuickBooks Online
- Instant approval and clear, transparent pricing
Wisetack - Consumer Financing
Consumer-friendly financing, integrated with serviceminder makes it easy for your customers to afford the work they want. They pay over time, while you get paid when the work is complete. View our Webinar and Blog Post for more information.
Already signed up for WiseTack?
For the integration to work with serviceminder, you'll need to sign up via our link (described below) so the correct merchant ID will flow over to our side.
Signing Up
In Control Panel > Integrations > Other, find the Wisetack section and follow the Sign Up link. When you are ready to go live, you will need to submit a support ticket requesting that a "Live" box be checked for you.

When the account is connected, the Financing section will appear on proposals automatically. It will calculate the pricing based on the total and your specific Wisetack settings.

Customers can choose Financing next to your other standard payment options when submitting a payment.

WisetackFAQs
How do my customers know they can apply for financing with Wisetack? What do they need to do?
Once you've connected your account, a section will show up on proposals and invoices for your customers to click and apply. If approved, that info is sent to us and recorded in serviceminder.
Do payments to Wisetack show up on the invoice?
Payments do not automatically record on the invoice for approved customers, so you will manually record those payments on the open invoice in SM.
Why isn't the apply section showing up on my customer's proposal?
If the Apply section isn’t displaying, it may be due to one of the following:
- The Wisetack Merchant ID in your ServiceMinder account is incorrect.
- A maximum financing amount is set in your Wisetack account, and the proposal total is higher than that limit.
- Wisetack was set up outside of ServiceMinder. If selecting Wisetack on a payment screen takes you to the invoice instead of opening Wisetack, this typically means the merchant signed up directly with Wisetack and manually entered their Merchant ID. To fix the setup issue:
1. Remove the manually added Merchant ID from the Wisetack setup in ServiceMinder.
2. Reapply for Wisetack directly through ServiceMinder to ensure the integration works correctly.
Your business "vitals" - P&L's, balance sheets, operations data - are vital to your success. serviceminder supports the following integrations:
Quickbooks Online
Paro
Paro is a full-service, outsourced finance department for small businesses. They enable business owners to focus on growth by managing their bookkeeping, accounting, forecasting, and tax needs. Paro also offers franchise packages designed to efficiently support both franchisors and franchisees.
Mission
Paro’s mission is to serve as end-to-end finance support for small businesses and franchises. Our model starts by understanding your needs and current pain points in detail. The result is a prioritized set of projects designed to eliminate your back-office headaches and provide consistent insights into the financial health of your business. During franchise engagements, our focus is on optimizing processes and standardizing financial insights across multi-unit operations.
Interested?
Once a need is identified - whether it be bookkeeping, accounting, financial modeling, tax, and/or part-time CFO support - Paro coordinates a team of professionals uniquely qualified for your business. Every professional in Paro’s network is highly vetted; we currently are accepting only 7% of applicants into our talent pool. But we go the extra mile to match you with individuals who not only have the correct skillset, but also the domain expertise that can only come from working with other firms in your industry. By deploying professionals on a part-time basis at highly competitive rates, we consistently deliver cost-effective solutions.
The result? Give us a 30 minute call and we’ll give hours of your life back each month and a trusted, on-demand financial advisor for the future. Just click the link below and someone will contact you shortly to discuss your needs.
Cultivate Advisors
Learn how to do more with all the stats that serviceminder.io generates with Cultivate Advisor’s tailored 1:1 business advising services.

Cultivate Advisors helps passionate entrepreneurs & owners achieve financially rewarding businesses that grow and thrive. They offer tailored 1:1 advising, access to hundreds of resources, and a community of small business owners to help you grow your business at an exponential rate.
To learn more, visit Cultivate Advisors today!
GbBIS
GbBIS offers analytics, data, and mapping solutions for your franchise from the top down, C-Suite to Franchisee. Plan your growth strategy with market insights you can trust.
What is GbBIS?
GbBIS is a mapping and territory management solution designed specifically for franchise brands. It provides a robust platform for organizing and visualizing territories across the U.S., Canada, and other regions. Brands use it to define, sell, and manage franchise territories with built-in reporting and visualization tools.
How the Integration Works
The integration between GbBIS and ServiceMinder streamlines the process of managing territory data:
Automatic Zip/Postal Code Syncing:
When a new organization is created—or when an existing one is updated—ServiceMinder automatically imports the associated zip or postal codes from GbBIS. This keeps each franchisee’s territory data up to date without manual entry.Accounting Class Support:
For brands that segment operations using accounting classes, GbBIS maps zip codes to both the location ID and accounting class ID. This ensures accurate reporting and territory tracking within ServiceMinder.Real-Time Updates:
Any updates made in GbBIS are pushed automatically to ServiceMinder via API, eliminating the need for duplicate updates.
Why Use Accounting Classes?
Accounting classes link territory data to revenue tracking, making it easier for brands to:
Break down revenue by territory in QuickBooks and ServiceMinder.
Generate royalty reports based on accounting class or territory performance.
Apply royalty rules—such as different rates for in-territory vs. out-of-territory work or discounts based on the number of territories owned.
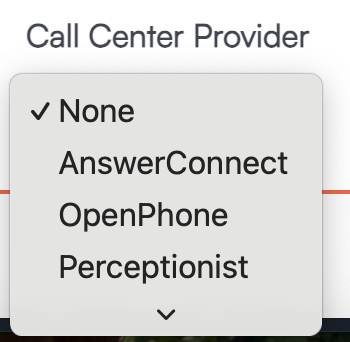
Call Center API Keys
In order to ensure it's linked up correctly, the API key needs to have the Call Center Provider selected in the dropdown menu.
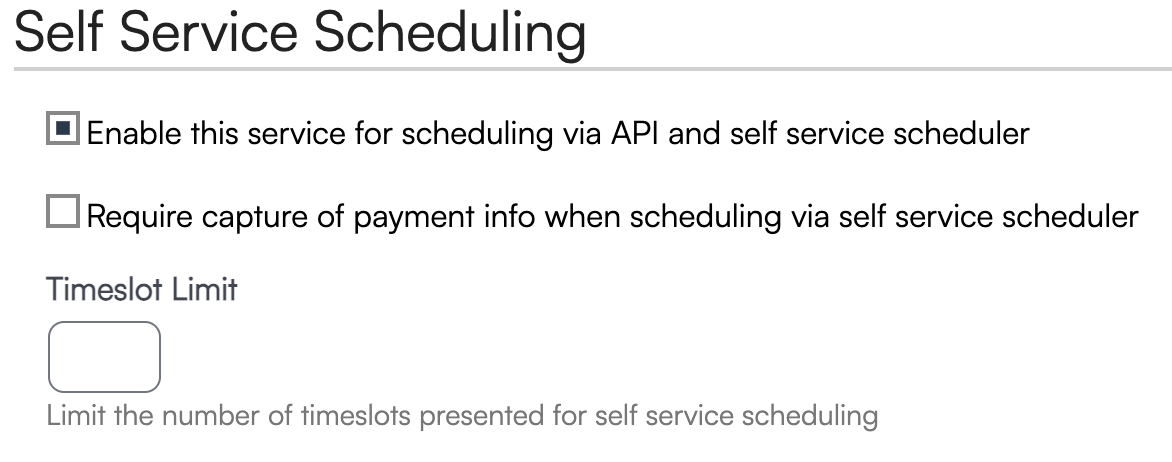
For services to be available for booking through an API key, they must be set to self-service. Enable this by editing the service in Control Panel > Services and finding the Self Service Scheduling section, then checking the box for Enabled.
AnswerConnect
AnswerConnect is a people-powered live answering service. They provide virtual receptionist services, so you can have someone available 24/7 to answer your calls, schedule appointments, and do all the other things you’d expect from a receptionist.
Franchise Answering Service
Professional, upbeat, friendly customer service experts answer your calls, reinforce your brand identity and ensure the lead and the appointment are captured.
Tightly Coupled
AnswerConnect staff answer your phone as if they are your staff and have direct access to your serviceminder clients and appointments. They can add new clients and then schedule appointments based on your team's availability and your configured scheduling constraints — as if you were scheduling it yourself.
AnswerConnect is on 24x7 so you don't have to be.
Perceptionist
Founded over 24 years ago, Perceptionist Inc has become one of the largest North American providers of small business call center services.
They provide a way for businesses to capture 100% of their sales opportunities by offering overflow sales support during days, evenings, and weekends. Instead of sending customers to voicemail, calls are redirected to a team of specially trained sales representatives who know the business and have the skills to close the sale.
They specialize in supporting independent and franchise service businesses in the US and Canada. They provide:
Inbound and Outbound Sales Support
Chat Service and Messenger Sales
Internet Lead Sales
Software Integration Solutions
Perceptionist can be added through the MarketPlace or by creating an API key for them to use for scheduling.
Unique Perceptionist Custom Fields will display at the very bottom of each service details page (Control Panel > Services).

Nexa
Sign up here | Home Services Experts
Nexa is a leading provider of call answering and remote receptionist solutions for home services businesses across the country.
We train our receptionists to specialize in your business’ procedures. Whether it’s answering a call to capture a new lead, or turning a new lead into a booked appointment, Nexa is ready to help you make the most of every call you receive, 24/7/365.
Our 500+ home services clients across the United States have benefited from our industry expertise. Nexa serves everyone: HVAC businesses, plumbers, electricians, commercial technicians, franchises, and more.
Learn more here.
Download the case study on how we helped an HVAC company increase customer conversions by 20%.
Don’t forget to ask about special pricing for serviceminder clients!
ProNexis
It's more than just an answering service! Access 24/7 sales & support, digital lead conversion, and business growth solutions all designed especially for home service businesses. With trained agents to answer your phones and technology like their Lead Machine, ProNexis can help grow your business with serviceminder integration
Contact: VP of Sales Bryson Naylor (831)747-4771 bryson@pronexis.com
Angi
Angi (formerly Angie's List) is a very popular service that consumers use to find service providers. When they narrow down what they are looking for, their information is then shared with service providers. If you choose to buy the lead, Angie's List will then send you the consumer's contact info.
Angi supports integrating with serviceminder so you can just click a link and the consumer's info will be added to your account. It takes just a couple of steps to set up the integration and requires you to send some information to Angi so they can set up the connection.
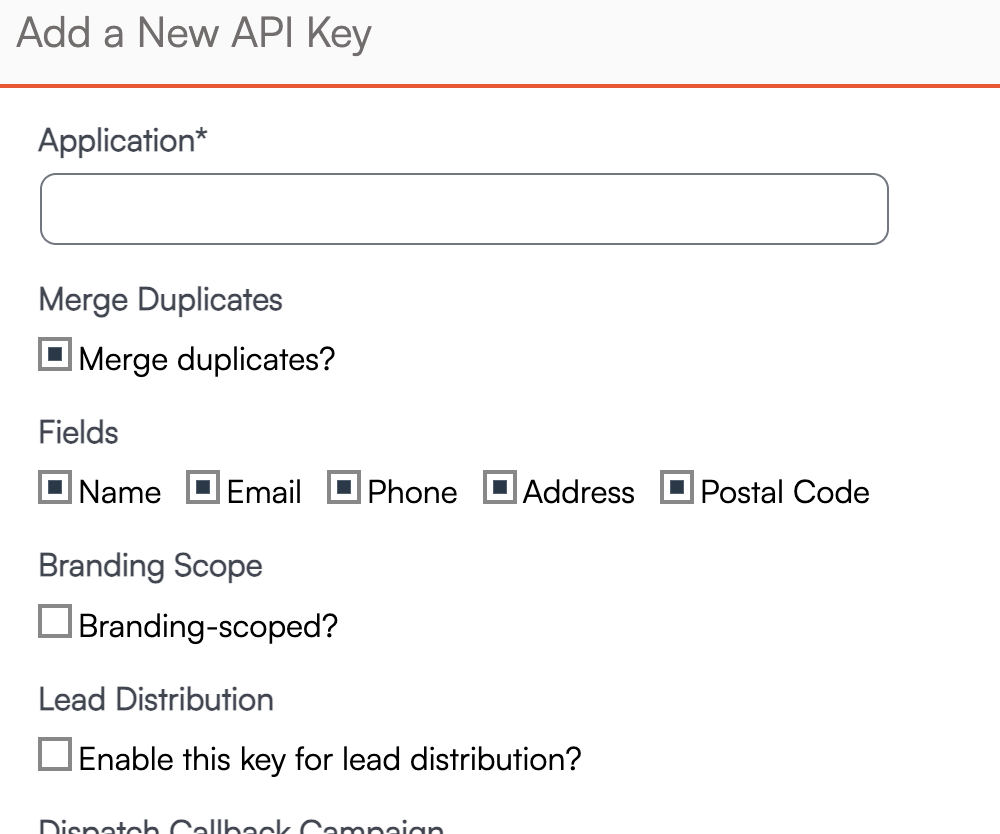
Create an API Key
The first step is to create an API key. This is a magic identifier that will be given to Angi that uniquely identies your account. When Angi sends the lead to us, we use that to figure out which account the lead should go in to.
To create an API key, go to Control Panel > API Keys > Add. Type in a name (such as "Angi") and then select a channel and optional campaign to use for these leads. For example, you may choose "Online" for your channel and "Angi" for the campaign. (You may need to set up the channel and campaign if you don't already have one).
Note: if you set your key to brand-scoped with lead distribution turned on, then you can use this integration to distribute leads based on zip code. You'd only need one key for your entire brand with this method.
Notify Angi List
Angi may require the following information to set up your integration:
Testing Endpoint URL: https://staging.serviceminder.io/webhook/angieslist
Production Endpoint URL: https://serviceminder.io/webhook/angieslist
X-API-KEY: Give them the API key you created in the step detailed above
Success string: we will return a JSON response with the word "success" in the payload to indicate the lead was successfully added.
Home Advisor
Home Advisor is a very popular service that consumers use to find service providers. When they narrow down what they are looking for, their information is then shared with service providers. If you choose to buy the lead, Home Advisor will then send you the consumer's contact info.
Home Advisor supports integrating with serviceminder.io so you can just click a link and the consumer's info will be added to your account. It takes just a couple of steps to set up the integration and requires you to send some information to Home Advisor so they can set up the connection.
Create an API Key
The first step is to create an API key. This is a magic identifier that will be given to Home Advisor that uniquely identies your account. When Home Advisor sends the lead to us, we use that to figure out which account the lead should go in to.
To create an API key, go to Control Panel > API Keys > Add. Type in a name (such as "Home Advisor") and then select a channel and optional campaign to use for these leads. For example, you may choose "Online" for your channel and "Home Advisor" for the campaign. (You may need to set up the channel and campaign if you don't already have one).
Send Email to Home Advisor
Once the key has been generated, copy it and then send an email to crmintegrations@homeadvisor.com. Include the following information in the email:
serviceminder.io Integration Company Name: your company's name HomeAdvisor Account Number or Phone Number: either your HA account number or the phone number where they all you with new leads CRM Key: put the API Key you generated here.
Once you send them this email, they will update your account and let you know how to fetch the leads.
Craftjack
Craftjack is a popular service that consumers use to find service providers. When they narrow down what they are looking for, their information is then shared with service providers. If you choose to buy the lead, Home Advisor will then send you the consumer's contact info.
Craftjack supports integrating with serviceminder so you can just click a link and the consumer's info will be added to your account. It takes just a couple of steps to set up the integration and requires you to send some information to Home Advisor so they can set up the connection.
Create an API Key
The first step is to create an API key. This is a magic identifier that will be given to Home Advisor that uniquely identies your account. When Craftjack sends the lead to us, we use that to figure out which account the lead should go in to.
To create an API key, go to Control Panel > API Keys > Add. Type in a name (such as "Craftjack") and then select a channel and optional campaign to use for these leads. For example, you may choose "Online" for your channel and "Craftjack" for the campaign. (You may need to set up the channel and campaign if you don't already have one).
Note: if you set your key to brand-scoped with lead distribution turned on, then you can use this integration to distribute leads based on zip code. You'd only need one key for your entire brand with this method.
The URL you'll configure in Craftjack will be: https://serviceminder.io/webhook/craftjack/__api-key__
Thumbtack
The ServiceMinder integration with Thumbtack allows businesses to seamlessly connect their Thumbtack account with ServiceMinder, enabling automatic lead import and streamlined workflow management. This integration is designed to help users manage Thumbtack leads directly within ServiceMinder, improving efficiency and ensuring no opportunities are missed.
Settings and Navigation
To access and configure the Thumbtack integration:
- Permissions Required: You must have access to the ServiceMinder Control Panel and an active Thumbtack account.
- Navigation Steps:
- Log in to your ServiceMinder account.
- Go to the Control Panel.
- Select the Integrations section.
- Click on the Marketing tab.
- Scroll down to find the Thumbtack option.
- Click Connect and follow the prompts to log in to your Thumbtack account.
Once connected, the Thumbtack section will appear in your Shortcuts sidebar.
Integration Features
- Automatic Lead Import: Leads from Thumbtack will automatically populate in ServiceMinder as they come in.
- Centralized Management: Manage all Thumbtack leads and related activities directly from the ServiceMinder platform.
- Quick Access: The Thumbtack integration is accessible from the Shortcuts sidebar for easy navigation.
Overview
ServiceMinder makes it easy to capture leads directly from your website or marketing landing pages by using HTTP POST requests. This allows you to seamlessly integrate lead capture forms with platforms like InstaPage, Unbounce, or custom-built websites. Whether you're using FORM POST or JSON POST methods, ServiceMinder’s lead capture process ensures that new contacts are automatically created or updated in your system. This article outlines how to set up and configure lead capture forms using API keys, supported fields, and configuration options.
API Keys
For capturing leads, you can create API Keys to hook up your different lead sources to push those into serviceminder automatically.
- An API key is created to use with our webhook: the key can either be brand-scoped or at the organization level.
- A brand-scoped key will be one key for the whole brand and set up to distribute leads based on the zip code entered in the web form - so each location will get their leads as long as the postal codes are set up.
- If a lead comes in with a zip that doesn't match a location, it can go into a "parking lot" so the leads aren't totally lost.
- An organization level key will need to be created individually in each different organization (location) so it will be unique to that org and it won't distribute leads based on zip. Any leads entered on a form with that key will go into that corresponding location, no matter what.
- Deciding which to use may depend on how the web form is setup/managed; for some clients, the web team finds it easier to just have individual, unique keys tied to different forms, or they may want to have one master brand API key (as long as postal codes are being gathered in the form.)
- One key can be used in multiple forms
You can create an API Key by going to Control Panel > API Keys and clicking Add.

You'll provide the basic details about your API Key and configure a few specific settings for it.
For a Lead Capture form, the important fields to consider are:
- Merge Duplicates - If leads come in with the same details, do you want them to automatically be merged with the existing contact?
- Fields - Which fields do you want to cross-reference when deciding to merge?
If a duplicate contact is merged with a different lead source from the original contact record, this new lead source will be tracked in the system and tied to the invoice. Learn more about that HERE.
- Lead Distribution - This decision is made at the brand level when deciding to distribute leads to various territories/locations within the brand. If you are a single organization, do not check this box.
- If you enable Lead Distribution for the API key, we'll use the zip/postal code from the form to distribute the new lead] to the correct organization. You can read more about Lead Distribution here.
- Owner Distribution - If you have Contact Owners enabled, you can distribute leads that come in via this API key in a round-robin style.
- Lead Notification - If this box is checked, an email will be sent to the designated Lead Notification email address (set up in Control Panel > Notifications).
- Default Lead Source - This will place all leads that come in from this API key into a specific Channel and Campaign, if designated.
Once you have your API key, you'll then configure your form's ACTION to point to the URL. We recommend creating a separate API key for each form you create. This will allow you to better track which form a contact came from.
The leads are pushed over using a webhook (along with your unique API key.) There are two methods, FORM POST and JSON POST. *This information can be/may need to be passed over to your web team.
FORM Post
Use FORM POST to submit data directly to ServiceMinder using a standard HTML form. The form’s ACTION should point to the following URL (with your API key at the end):
https://serviceminder.com/service/contact/addupdate/api-key
Field names must match the expected format. You can view supported fields HERE.
Supported FORM POST fields include (* = required field):
| Field Name | Details |
|---|---|
| Email* | Primary email address |
| Name* | or FirstName and LastName as separate fields |
| Company | Optional company name |
| Address1* | Primary address |
| Address2 | Address continued, if necessary (e.g., appartment number) |
| City* | City |
| State* | State or Province |
| PostalCode* | Zip/postal code |
| Phone1* | Main contact number |
| Phone1Type | e.g., Mobile, Home, Work |
| Phone2 | Optional secondary number |
| Phone2Type | e.g., Mobile, Home, Work |
| Notes | Saved as a note titled "Form" on the contact |
| ContactType | Maps to Contact Category - e.g., “Customer” or “Prospect” |
| Channel | Marketing source channel. |
| Campaign | A unique campaign within the channel.
If it doesn't exist, we'll create it. If not supplied, we will leave blank |
| Tags | Comma separated list of Contact Tags to add to the contact |
| ReferredByHash | The contact.hash value from the referring contact |
| RedirectURL | If this field is included, serviceminder will return a 302 redirect response to the value in the field rather than a JSON payload with the results |
| HashKey | The contact.hash value from the contact you want to update. This can be embedded in a hidden field in the form |
In addition to the above standard fields, you may also include custom contact fields defined in your account. The field name for each custom field is shown on the custom field details page labeled "Form Field." Custom fields will all start with a "cust_" prefix.
The posted form returns a JSON-formatted response with the following properties (if a RedirectUrl value is not present):
-
Result => A value of 0 indicates success. A -1 indicates an unexpected error. A 1 indicates a validation error (such as missing name or email fields)
-
ContactId => The internal identifier of the added (or updated) contact.
-
Message => A text message with either the error info or validation info
If a value of 0 is returned for Result, then the operation was successful and you can redirect on to the next page. Any other value indicates that the data was not saved and so you should either allow the user to correct and re-submit or you may want to log the data for processing later.
JSON Post
Use JSON POST to push lead data into ServiceMinder from your backend or automation platform. Submit a JSON payload to the following endpoint:
https://serviceminder.com/api/contacts/addupdate
Payloads must be encoded as application/json and include valid key-value pairs. You can view our full API documentation at: https://serviceminder.com/api
Supported JSON POST fields include (but are not limited to)***:
| Field Name | Description |
|---|---|
|
Email* |
The email address of the lead |
|
Name* |
or FirstName and LastName as separate fields |
|
Company |
Optional company field |
|
Address1* |
Primary street address |
|
Address2 |
Optional second line of address |
|
City |
City name |
|
State* |
State, province, or region |
|
Zip* |
Zip/postal code |
|
Phone |
Primary phone number |
|
PhoneLabel |
Type of phone (e.g., Mobile, Work, Home) |
|
Category |
E.g., 'Customer' or 'Prospect' |
|
Channel |
Name of the marketing channel |
|
Campaign |
Campaign name under the channel |
|
Tags |
List of contact tags |
|
ReferredByHash |
Hash of the referring contact |
| Notes*** | Saved to the contact's note history with the title 'Form' |
|
CustomFields*** |
Key-value pairs for custom fields |
* Required field
**Notes and CustomFields are Objects and must include structured key-value data (e.g., notes with a title and text, or customFields with field names and values).
***For a complete list of supported fields visit https://serviceminder.com/api#ServiceMinder.Areas.api.Models.Contact
Birdeye
Collect reviews, convert leads, run surveys, text customers - all in one place. As soon as an appointment is completed or a customer is invoiced, we'll automatically send their info over to Birdeye. They'll take everything from there.
Don't Have Birdeye? Visit www.birdeye.com and get a demo!
CallRail
Want more info about CallRail? Click Here
Already have a CallRail account? Here are your easy integration steps:
- Step 1: You need to login to your CallRail account and get the "API V3 Key" (copy that)
- Step 2: Control Panel > Integrations > marketing tab, Paste the API V3 Key to the CallRail box and save
- Step 3: Control Panel > Call Tracking (this will show up once you have added the API Key)
- Step 4: Your phone numbers with CallRail will show up on this screen, click "Assign" and pick the Channel and Campaign you want linked to that phone number.
- Step 5: Do Step 4 for each phone number
- Step 6 (Optional): Click the Settings button in the top right corner and check the box to "Auto-Create Contacts." This will result in a contact being created automatically when the call is shared via the API key containing the phone number, channel/campaign, and a contact tag for easy identification.
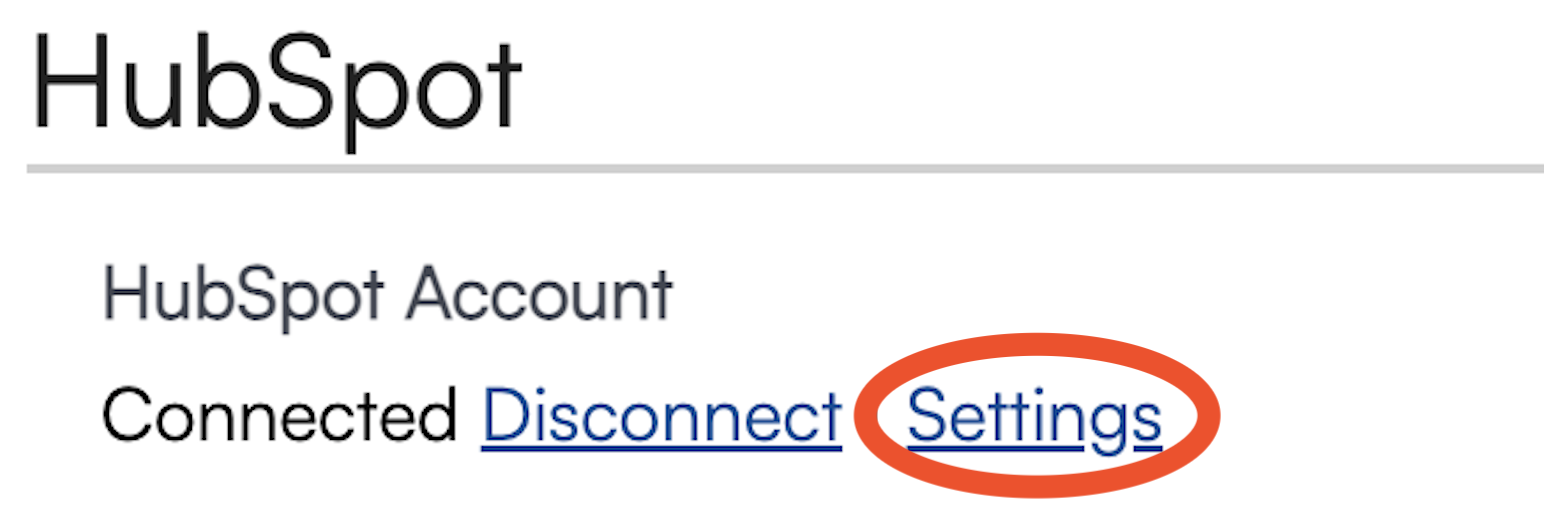
Hubspot
Easily connect your HubSpot account to ServiceMinder to automatically push leads into your CRM and streamline your marketing and sales workflows.
Step 1: Connect Your HubSpot Account
Navigate to Control Panel > Integrations > Marketing tab.
- Navigate to Control Panel > Integrations > Marketing tab.
- Click Connect next to the HubSpot integration.
- Sign into your HubSpot account and grant access to ServiceMinder.
Once connected, standard contact fields—such as Name, Email, and Zip Code—will automatically sync from HubSpot into ServiceMinder whenever a new contact is added.
Important: This is a one-way sync—from HubSpot into ServiceMinder.
Leads or contact updates created in ServiceMinder will not push back to HubSpot.
Step 2: Map Custom Fields (Optional)
To sync custom fields from HubSpot:
Click Settings under the HubSpot integration in the Marketing tab.
Use the format:
yourSMCustomFieldName = yourHubSpotCustomFieldName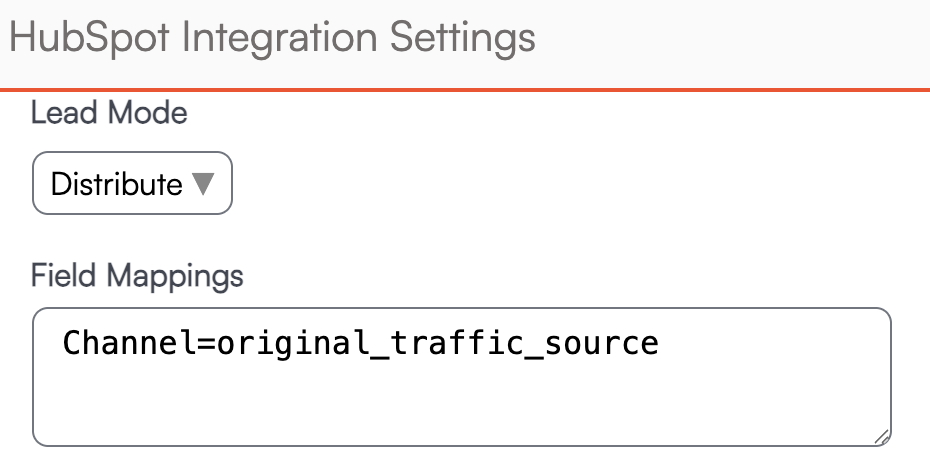
Save your mappings.


This allows HubSpot custom properties to populate your ServiceMinder contact fields.
Custom field mapping only works after you’ve connected your account. Changes will apply to new leads going forward.
Enhanced Integration Features
Marketing Attribution Fields
The following fields now sync from Hubspot to serviceminder when mapped:
- leadsource
- channel
- campaign
To ensure data syncs correctly from HubSpot into ServiceMinder, the internal field names in HubSpot must exactly match the format in serviceminder. For example, "Lead Source" will not work, it must be "leadsource".
If you prefer to combine both Channel and Campaign into a single field, you can do so using the leadsource field. To format it correctly, separate the two values with a forward slash (/).
Example:Internet/Google AdWords
These fields will populate automatically when leads are created in HubSpot and sync over to serviceminder, providing clearer attribution and more accurate marketing performance reporting serviceminder.
Lead Distribution by Postal Code
You can now route incoming HubSpot leads to specific organizations based on zip code:
In the Marketing tab, click Settings under your HubSpot connection.
Use the top dropdown to select Distribute.
Ensure your field mappings are configured to support lead routing.
Key Notes & Limitations
This integration begins syncing only from the time of connection forward. It does not backfill existing HubSpot contacts.
New contacts created in ServiceMinder will not sync to HubSpot.
Only the HubSpot account connected at the brand level can distribute leads across organizations.
Infusionsoft
How serviceminder.io Talks To Infusionsoft
Infusionsoft is a marketing and sales automation platform. It also supports something they call "Goals" to trigger campaigns. serviceminder.io pushes contacts and optionally invoices to Infusionsoft when they are created. Contact data pushed over includes basic name/email/phone info as well as address fields.
Trigger Events
Data is pushed to Infusionsoft when certain trigger events occur. These events include the generation of invoices as well as booking and completing appointments. When these events happen, the related contacts are pushed over and the API Achieve Goal is called with the goal name based on the Service Name of the related appointment. The Call name is constructed as follows:
All spaces and special characters are removed from the service name. For example, "Service Call" becomes "ServiceCall"
Booked or Completed is appended depending on whether the related event was for the appointment being created or the appointment being marked as complete.
The Integration name should be "ServiceMinder".
Listen360
Listen360 is a popular platform used by franchise systems to help identify and nurture influencers. They work primarily with franchise systems. As such, configuration of Listen360 is done at the Branding level within serviceminder.io and so is not available for our retail customers (or brands that don't currently use Listen360).
PulseM
The #1 reputation management platform built for home services. Easily connect with industry-leading field management software, instantly manage customer service interactions from any device, and turn customer reviews into your competitive advantage.
Scorpion
An all-inclusive advertising solution to empower your brand. Instead of relying on multiple vendors for your website, marketing, and advertising, get it all from a single partner who constantly innovates to build a better way for your brand.
SendJim
Use SendJim to:
Maximize Your Existing Clients and Make Them Raving Fans
Hyper-Target Your Audience to Get the Leads You Want
Create Long-Lasting Relationships with Your Clients to Turn Them into Higher Ticket Sales
SendJim will automatically trigger mailing sequences when you close an invoice in your ServiceMinder account. That means once you go through the quick setup process, there is no need to ever log into SendJim again. Sit back and watch the magic happen! Watch SendJim webinar now...
Have questions or want to signup, go to SendJim.io for details.
Signpost
Signpost is a great tool for automating the curation of reviews and referrals from normal customer interactions. All that's needed to kick things off is a mobile phone number or email address for each customer. Luckily serviceminder.io already has that data. Once someone becomes a customer, serviceminder.io will push the customer info to Signpost. Signpost then takes over and does it's thing.
Configuration
To get things configured, you'll need your Signpost Merchant ID. If you don't know it, or don't know how to get it, just log in to Signpost and open a support ticket and they will help you get that.
Once you have it, just go to Control Panel > Integrations and then click on the Marketing tab. You'll see an entry for Signpost with a spot to put in your Merchant ID. Just paste it in there, hit Save and you're done. New customers will automatically push over to Signpost.
What Types of Data
serviceminder.io will push over the customer's name, email address and phone numbers to Signpost.
Voxie
Voxie uses AI and natural language processing to gather sentiment from your customers, and then gives the best customers a simple way to provide a positive review.
To set up your Voxie integration, you will need your Voxie API key as well as your Team ID.
- Go to Control Panel > Integrations > Marketing Tab.
- Scroll down to Voxie.
- Enter your API key (from Voxie), your Team ID and when you want the review to be triggered.
- Make sure "Enabled" is checked, and hit Save.
WebPunch
Collect, quantify, and view your customer feedback to make data-driven decisions about your business. Address specific areas that need improvement and recognize areas of success.
Connect with serviceminder.io to keep all your customer review data in one place and drive business outcomes.
Credentials
WebPunch creates a custom URL for each client (brand) and sends that to serviceminder along with a user ID and password. Those credentials can be entered into the associated fields in Dashboard > Tools > Configuration. This turns it on for the brand but it will still need to be enabled in individual organizations.

Configuration Options
The Trigger for when to send data to WebPunch has two options:
- Appointment Completed
- Project Completed

The setting applies in all orgs that are opted in to WebPunch.
Enable in Organizations
After setting this up in Dashboard for the brand, individual organizations can be opted in by going to Control Panel > Integrations > Marketing tab and checking the box for WebPunch.
33social
In addition to helping clients get found online through organic SEO, 33social is a certified Google Partner Agency.
33social also specializes in email marketing and drip marketing planning/execution. 33social relies heavily on a variety of analytics to provide smart consulting and analytics-based recommendations to help its clients achieve their digital marketing goals. Founded in 2010, 33social specializes in working with franchises including the 5 concepts under the Outdoor Living Brands family of brands.
33social has strong experience in the home services industry and also serves clients in many other diverse industries.
See how 33social can help you achieve your digital marketing goals? Watch it now...
RingCentral
With RingCentral, you can view recent and historic call volume from the new Call Center and use the incoming call notifications to bring up customer records with a click or start adding a new contact with the phone number already filled in.
Screen pop-ups occur when calls come through. If the caller ID matches a contact, we'll display an alert so you can click to bring up the customer record. If it doesn't match any contacts, it'll give you a prompt to start adding a new contact with that number filled in.
We also log the call history and have reporting to show call volume and to tie calls to users. Once you're connected, you'll see a "Call Center" menu pick under Administration which has some initial reporting.
We also have "click to call" from the contact and appointment details pages (clicking on the phone numbers).
Connecting with RingCentral
- To connect your RingCentral account to serviceminder.io, go to Control Panel > Integrations > Other
- Select the Connect button for RingCentral.
- You'll be prompted to log in to RingCentral and approve the connection.
Note: RC incoming call notifications happen on the Web, not the mobile app. RingCentral is not integrated with your mobile/cell phone provider. Dial from the app just uses your cell phone provider, so if you click the hyperlink on the phone number in the contact record on the app it will open cell call just like if you were dialing it from your phone.
Vonage
serviceminder's Vonage integration brings call data/incoming calls right into serviceminder.
To connect your Vonage account to serviceminder, just go to Control Panel>Integations>Other and click "Connect" under Vonage.
Quo (formerly OpenPhone)
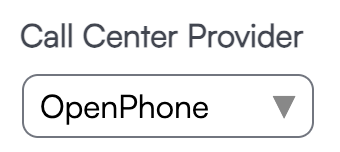
In Control Panel > API Keys, create a key to use for Quo.

You can name your key, configure your settings, and be sure to select OpenPhone as the Call Center Provider.
Then in your Quo account, under Settings > Webhooks, you'll create a webhook using our custom url: https://serviceminder.io/webhook/openphone/*{api_key}*
Replace with your unique API key you just created in serviceminder.
Select the events you'd like to pass over to SM and save.

The event notifications and loggings are:
- When a call comes in on your Quo number, you'll receive a banner notification in your serviceminder account; this will say it either matches an existing contact or asks if you'd like to create a new contact if it is an unmatched number.

- When a text message is sent or received by a contact's number, a note will be added onto their contact details.
- For calls, in Call Center you can see a record of inbound and outbound calls.
Voice for Pros
Our family of brands includes Voice for Pest, Voice for Pros, and Voice for Turf all under Affiliated Technology Solutions. We design and implement unparalleled integrated voice solutions for any size business from coast to coast.
Our integrations and advanced features have led us into many vertical markets, making us the only provider to offer specific phone solutions for the Pest, Lawn, and Home Services industries.
Overview
CompanyCam is a photo and video documentation app that organizes content into job-specific projects. Integrating CompanyCam with serviceminder enables automatic syncing of photos and videos to the correct contact or appointment within your system.
Once connected, photos and videos taken in CompanyCam are evaluated based on project and location data to determine where they should be stored in serviceminder. This makes it easy to keep visual job records tied directly to appointments and contacts.
This article will review:
Video Tutorial
Settings and Navigation
Connect Your Accounts
-
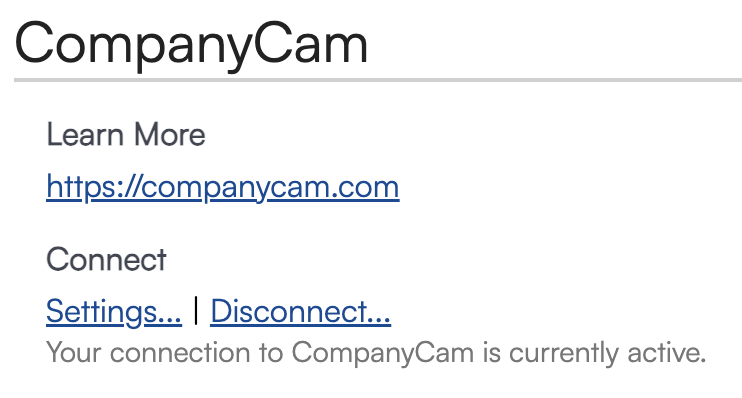
Navigate to Control Panel > Integrations > Other > Connect to CompanyCam.
-
Sign into your CompanyCam account to authorize the connection.
Enable Automatic Project Creation
-
After connecting, click the Settings link.
-
Turn on Auto-Project Creation.
-
Define your project name template using shortcodes
-
For example, {name} - {contact.id} would produce the project name John Smith - 12345.
-
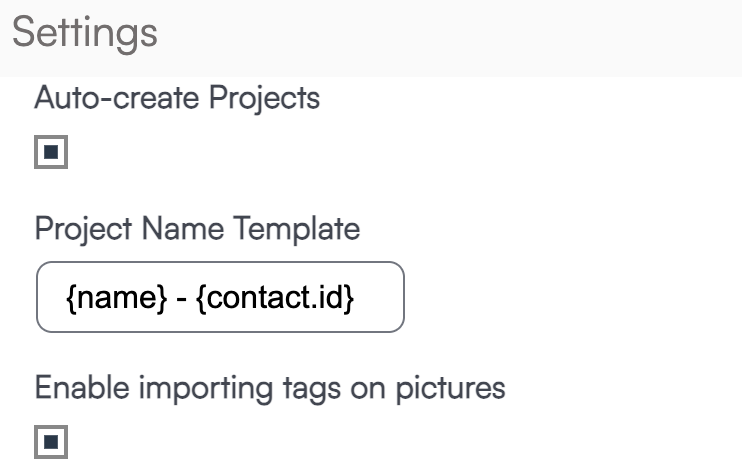
Recommended Setup: Enable automatic project creation and use a consistent naming template. This provides technicians with a clear, designated place to take photos in CompanyCam and ensures that serviceminder knows exactly where to sync them, resulting in the most reliable and consistent photo matching.
Matching Up Users
CompanyCam and serviceminder users should have matching email addresses. This ensures:
- Accurate appointment matching
- User-level audit tracking
- Proper syncing behavior
Double-check that your CompanyCam users use the same email addresses they use in serviceminder.
How Syncing Works
When photos or videos are uploaded to CompanyCam, serviceminder uses the following logic to determine where to store them:
-
Project ID Match: If the Project ID was created by serviceminder (via auto-creation), we know exactly where to store the content.
-
Active Appointment Check: If the Project ID is missing or unrecognized:
-
We check if the user has an active appointment (started in the past 24 hours but not yet finished) at the moment of sync. If we find one, then we attach the photos to the contact on that appointment.
-
If multiple active appointments are found, we use the most recent one.
-
If no active appointment is found, or appointments aren’t properly started/stopped, the content may not sync or may sync to the wrong contact.
-
-
Location-Based Fallback
-
If there is no match via project or appointment, we use the coordinates of the photo to find the nearest contact in serviceminder.
-
Relying on open appointments or location can be difficult in dense areas like apartments or office buildings, where multiple appointments could be active simultaneously or contacts share similar geolocation data. This is why we recommend always using Auto-Project Creation for the most reliable syncing.
Best Practices for Successful Syncing
For the best success when taking photos in CompanyCam during an appointment and syncing them to serviceminder follow these steps:
- Start the appointment in serviceminder before adding media.
- Find the auto-created Project in CompanyCam (or one tied to the appointment).
- Add photos/videos to CompanyCam during the appointment.
- Finish the appointment.
You can continue to add media to the project in CompanyCam after the appointment has been finished and it will sync over to serviceminder. However, we still recommend adding media to the project during the appointment as a best practice.
FAQs
Why aren’t my pictures syncing over from CompanyCam?
Double-check the following:
✅ Integration is active in Control Panel > Integrations > Other
✅ Auto-project creation is enabled in Settings
✅ Appointment is started in serviceminder
If content doesn't sync, download it from CompanyCam and upload it manually to ServiceMinder.
How can my customers see the photos in the contact portal?
Contacts can view the photos from an appointment via an Appointment Report link that will populate next to the applicable appointment. To generate an Appointment Report, you will need to set up a template in Control Panel > Miscellaneous Templates > Appointment Report.
One of the hardest challenges with staying engaged as a brand on social media is generating content. Rallio simplifies social media management by integrating with serviceminder, allowing you to quickly upload and share photos of your work from Lightbox for easy editing and promotion, making it faster and easier to showcase your business.
Don't Have Rallio? Visit rallio.com and request a demo!
Setting Up Your Integration
- Create a Rallio account.
- Email support@rallio.com and tell them you want to add serviceminder.com to your account
- Once confirmed, go to Control Panel > Integrations > Marketing and enter your Rallio login email.

Note: Only one Rallio email can be connected per serviceminder account.
Using Rallio
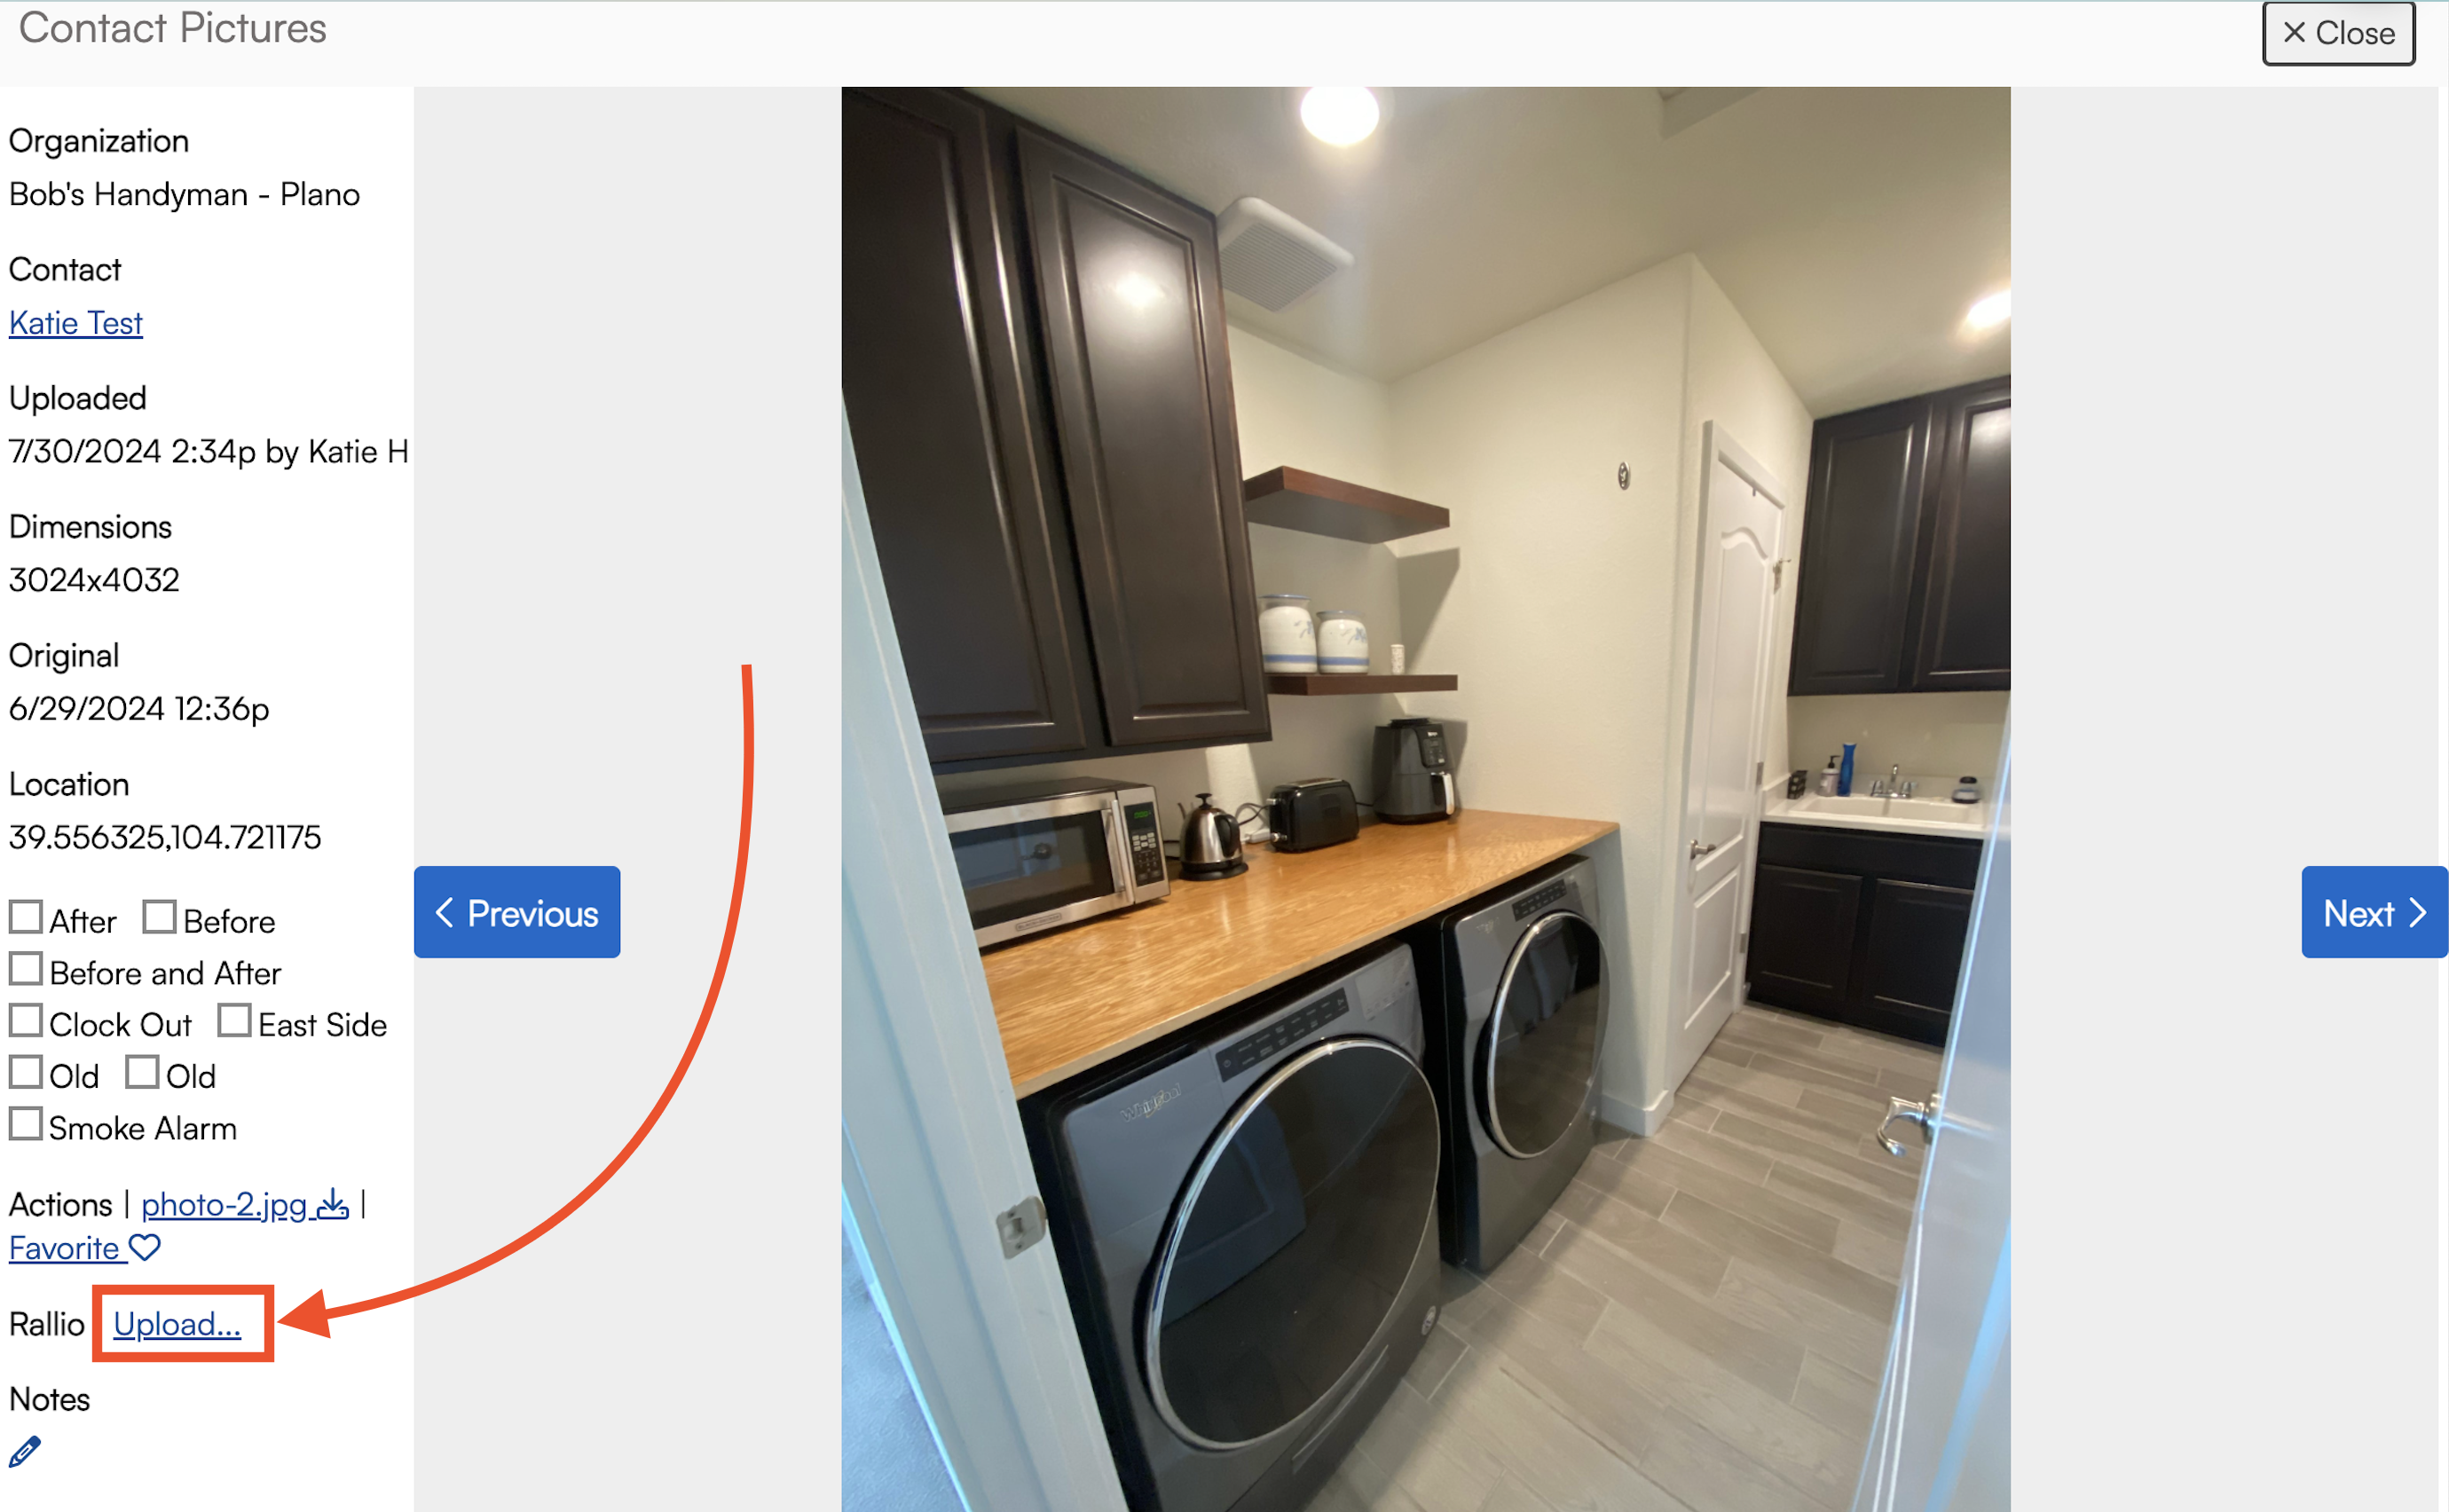
Photos don't automatically sync to Rallio, so you don't have to worry about photos uploading that shouldn't. You select which photos you'd like to upload.
After uploading photos to serviceminder (i.e., to a contact, proposal, appointment, etc), click the magnifying glass to view the details. Here you will find the option to upload them to Rallio.
Revv
If your brand also uses Revv, the survey feature of Rallio, then there is an easy way to integrate that into your serviceminder account and have specific triggers for when the survey sends.
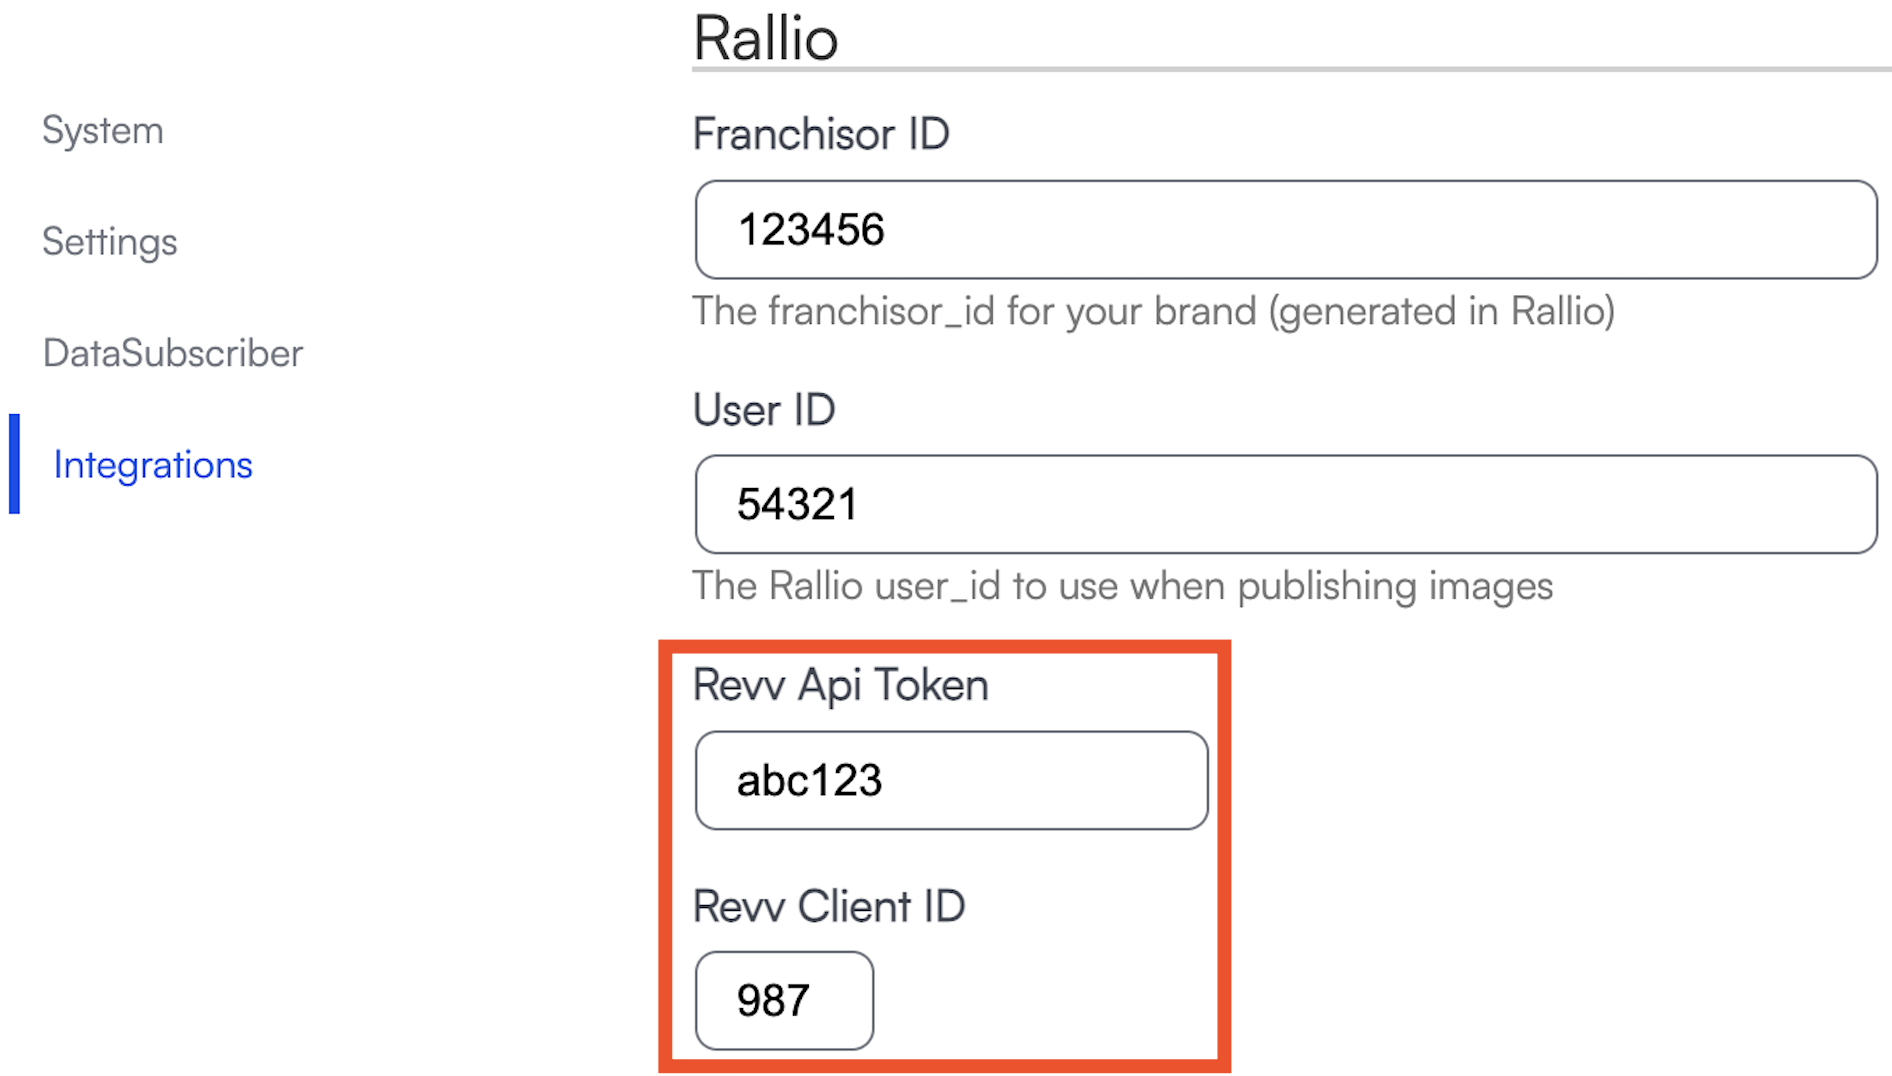
At the brand-level, you need to turn on and connect Rallio. There are additional fields for Revv that need to be filled out.
A brand administrator needs to go to Dashboard > Tools > Configuration > Integrations and fill out the Revv API Token and the Revv Client ID (both of which can be found in your Rallio account).
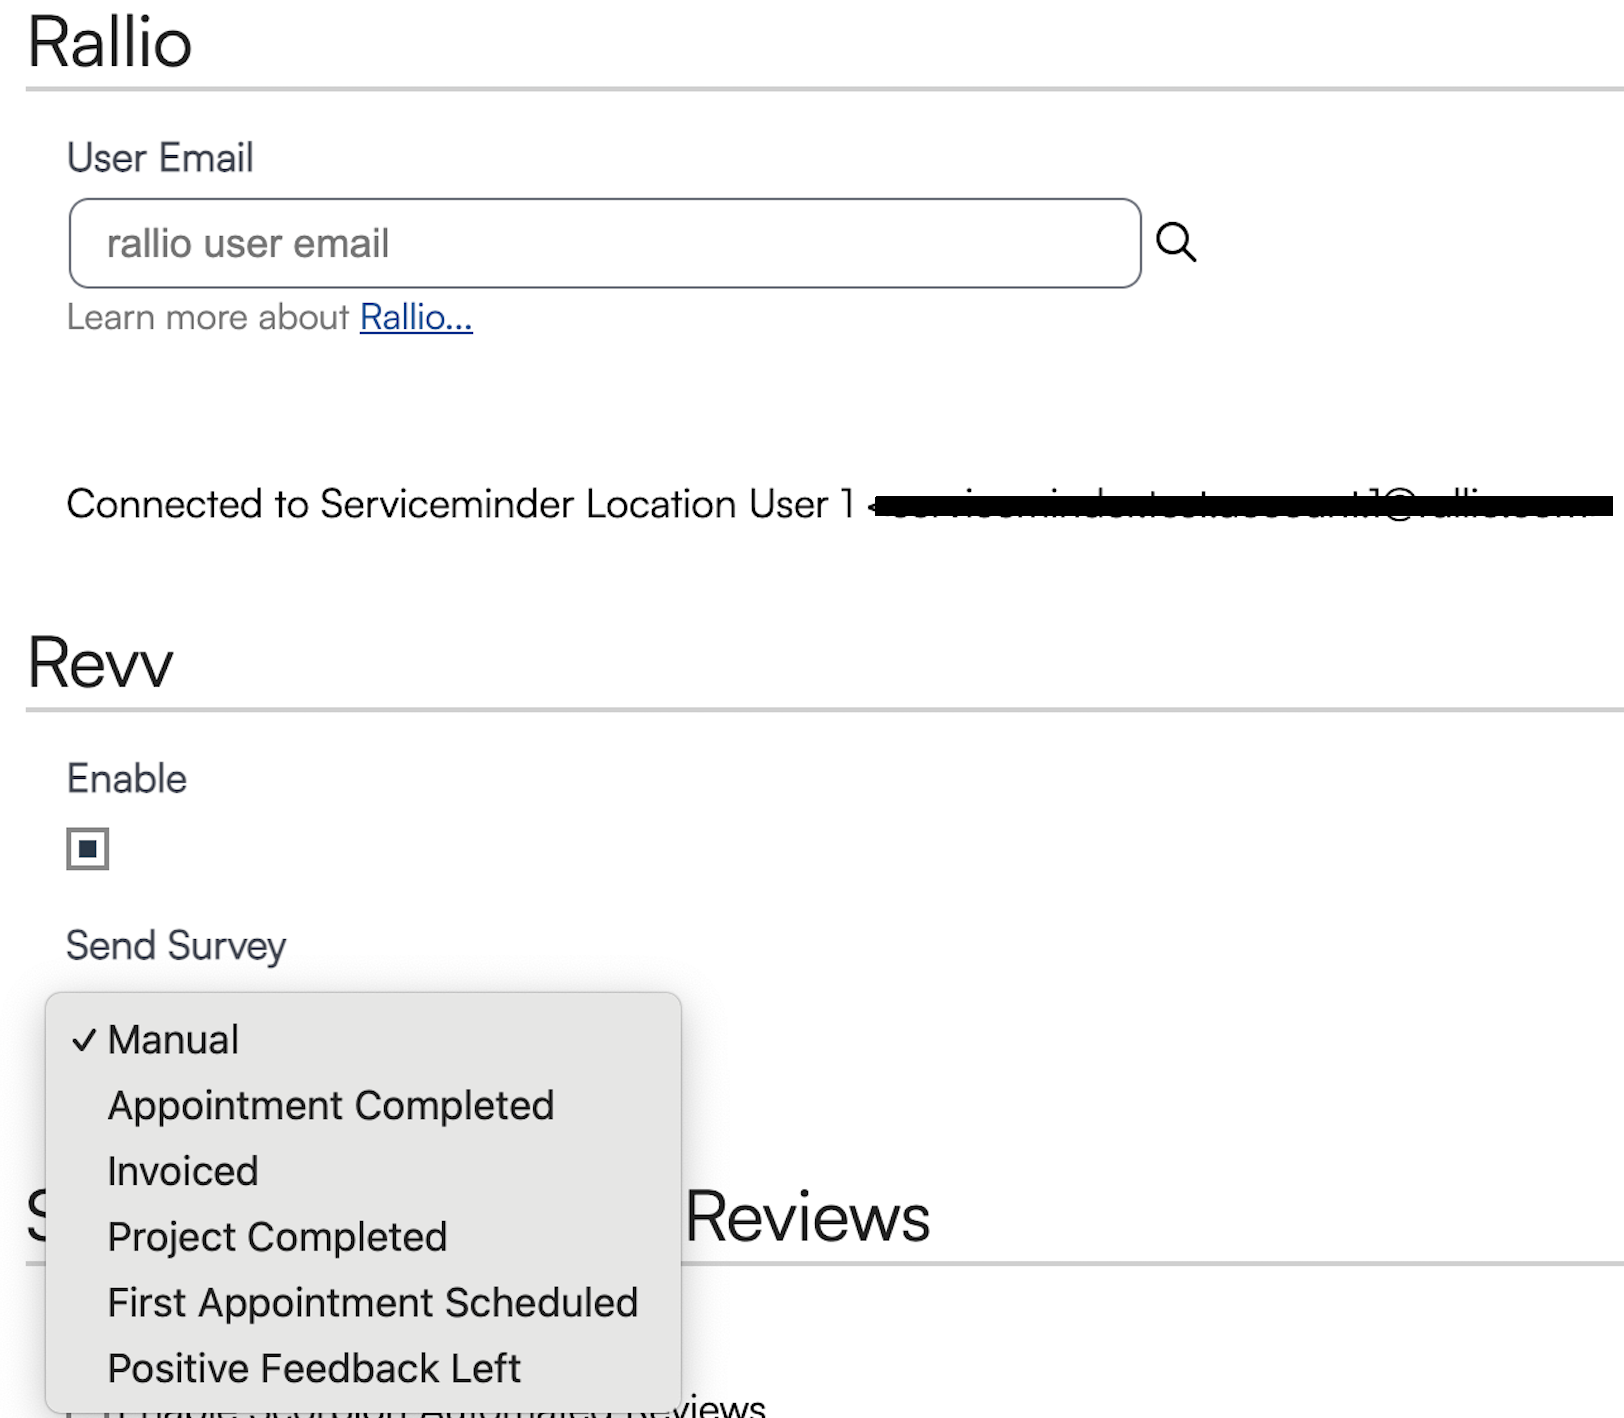
Then a brand administrator or the franchisee should then go to Control Panel > Integrations > Marketing and fill out the Rallio section (if not filled out already) then the Revv section (the Revv fields only appear if the brand has set up the Revv connection.).
- The Enabled checkbox will default to on. If you uncheck that box, this connection will be severed and surveys will no longer be connected to your SM org.
- You will need to choose between the Send Survey triggers provided to determine when the survey will be sent to the customer:
- Manual
- Appointment Completed
- Invoiced
- Project Completed
- First Appointment Scheduled
- Positive Feedback Left (requires the Feedback add-on)
After completing this step, we recommend running a test to be sure things are flowing as you expect.
The Digital Accelerator for Leading Home Service Brands
HouseAccount is the first-of-its-kind digital platform that empowers leading home service providers to offer a seamless, end-to-end customer experience. Our white-label solution integrates directly with ServiceMinder, enabling your customers to manage all their home service needs through a single, intuitive interface.
Key Features:
- Appointment Scheduling: Customers can easily book, reschedule, and manage appointments from their desktop or mobile device.
- Service Management: Customers can upgrade existing services, add new offerings, and receive personalized notifications about their account.
- Billing and Payments: Customers can view invoices, make payments, and leave tips - all within the HouseAccount platform.
- Ratings and Reviews: Customers can provide feedback on their service experience, helping you identify areas for improvement.
The HouseAccount Platform delivers tangible benefits for your business:
- Increased Revenue per Customer: Make it easy for customers to add new services and increase their overall spend.
- Improved Customer Retention: Provide a frictionless digital experience that keeps customers engaged and loyal.
- Enhanced Operations Efficiency: Streamline back-office workflows and administrative tasks.
- Partner with HouseAccount to elevate your customer experience and drive sustainable growth for your home services business.
Overview
Note that QuickBooks Desktop support is deprecated. The methods detailed here may or may not work. QuickBooks does not provide any support for importing IIF files into QuickBooks Desktop.
If you are using QuickBooks Desktop, we recommend either migrating to QuickBooks Online or looking at TransactionPro importer below.
This process will let you download invoices from serviceminder and then import them into QuickBooks.
-
Go to Reports and then click on the Downloads tab.
-
Click the "Download Transactions" button to download invoices for importing to QuickBooks Desktop
-
You have two options:
Check the box "New Transactions Only" - this option is handy if your invoices are not generated in a linear time sequence. Or select the date range you want to pull (Invoices from … through)
-
You have two options of file format, IIF or TransactionPro. We highly recommend TransactionPro. Loading them directly as IIF files means you'll have to apply payment to each as well. TransactionPro tool you can buy from QuickBooks that will load the invoices and payments and apply the payments to invoices.
IIF File
The file will be in a .zip format and contain the customers.iif file and invoices.iif file. You may import both of these into QuickBooks. You can skip the customers.iif file and load just the invoices.iif file if you only need to load the billing address info along with the invoice details.
Open the .zip file and drag and drop both files onto your desktop, or someplace where you'll remember them. Then run QuickBooks.
Make a backup of your company file in QuickBooks. If there are any mapping issues, restoring from this backup will be the easiest way to "undo" the IIF file import.
In QuickBooks, select File > Utilities > Import and then select the customers.iif file first. When that is complete, repeat the process and select the invoices.iif file. Finally, you can load in the payments.iif file.
Common Issues
The Name field in serviceminder.io must match up with the Name field in QuickBooks. That is what QuickBooks will use to determine whether you are adding new customers or updating existing customers. You will need to use the same formatting convention in both applications -- e.g., last name comma first name or first name last name.
The parts and services that you have in serviceminder.io must also exist in QuickBooks. During the import, QuickBooks will attempt to add any items that don't exist. If you have Income Account information configured in serviceminder then QuickBooks will use that information to create the items and associate them with the correct accounts. Note that if the account(s) do not exist, QuickBooks will create them as bank accounts.
Provided that the items already exist in QuickBooks, the Income Account information is not needed. Note also that if you have Account Numbers turned on in QuickBooks, the Income Account values in serviceminder need to not include those numbers. Only the Account Name portion should be present.
Classes
You can use Classes to organize transactions into other groupings. You can apply an Accounting Class to contacts, services and parts. When invoices are sent over to QuickBooks, the Class will be set to the name of the Accounting Class. The Accounting Class is determined by searching the Parts first for any related class. If no parts have a class, then the Service is checked. If the service doesn't have a class, then the invoice's contact is checked. If no class is found, then the Class will be empty in QuickBooks.
Because you can associate Accounting Classes with contacts, you can get all invoices for a given contact (or group of contacts) to all have the same class for QuickBooks reporting purposes.
TransactionPro File
Transaction Pro Importer for QuickBooks Desktop. For more information on how the importer tool works to go to this link.
AirAdvice
AirAdvice enables contractors to quantify indoor air quality (IAQ) health, comfort, and safety issues in the home, and present equipment solutions to homeowners. With our integration, appointments in your serviceminder account can link to the report generated in AirAdvice.
Getting Started:
Create an org-level API key in serviceminder and enter it in AirAdvice.
Configure service agents in AirAdvice—when a report is completed, it will match the report to the appointment assigned to that agent.
Encircle
Encircle provides field service teams with easy-to-use documentation tools, including photo, video, and signature capture, as well as professional PDF report generation. This is especially useful for restoration work with moisture tracking and content inventories.
Setting Up:
Go to Control Panel > Integrations > Other tab.
Enter your Bearer Token in the Encircle section and hit Save.
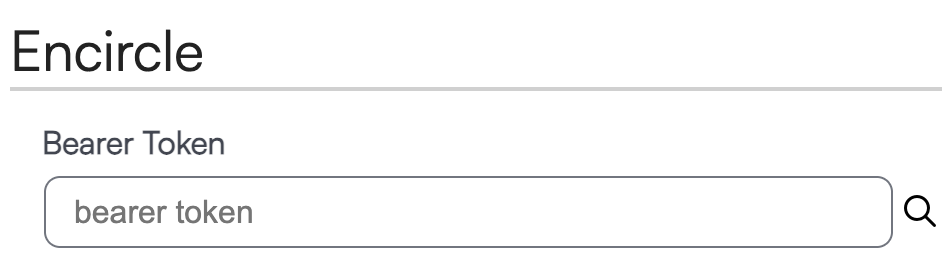
You can now create an Encircle inspection or claim from serviceminder on the web or mobile app.
Any pictures or documents captured in Encircle will automatically sync back to serviceminder.

Rikor
Rikor Insurance Consultancy provides digital insurance brokerage services, managing your franchise’s insurance compliance program. Protect your franchise, protect your brand.
Overview
To set up a webhook so you can send leads from Zapier to serviceminder, first create an API key (Control Panel > API Keys). Be sure to set how you want to handle duplicates. You can set a default channel/campaign for the API key but we also support accepting channel and campaign information in the webhook payload.
This integration also supports lead distribution so if you're capturing data for all organizations in your brand, you can still use the Zapier integration to send the leads to the correct locations.
Zapier Webhooks is a premium feature so you will need to have a paid Zapier account that includes webhooks to use this integration.
About Webhooks
This page has more detailed information on Zapier's webhooks capabilites.
https://zapier.com/help/create/code-webhooks/send-webhooks-in-zaps
At a high level, serviceminder.io supports HTTP POST operations in JSON format.
Setup
Log in to Zapier and choose to add a new Zap. Then follow these steps to create your zap to catch the data from the other application and send it to serviceminder.io. For our example, we're going to show how to do this with a Facebook Lead Capture Ad.
1. Choose Trigger
Choose where the lead is coming from. For example, you might choose to trigger for a new Facebook lead. You'll need to connect Zapier to your Facebook account, choose the correct page and select which form.

2. Choose Action
Search for "Webhooks by Zapier" and select that option.

3. Choose POST as the Type

4. Set Up your Action
Put in the URL for the webhook, making sure your API key is on the end. Set the Payload Type to json. Then add all of the fields. We do support Custom Fields in this integration. The first input is the name of the field in serviceminder.io. Refer to the previous page for the names of the fields. The right hand side is where you pick what fields from your form to map.

5. Test, then Save
Confirm that your screen matches these settings (except for any specific fields you're mapping) and select Test and Continue. You should get the test lead data into your serviceminder.io account pretty quickly. Then name and save this Zap. That's all there is to it.

