Overview
ServiceMinder has four useful grids that provide crucial information about your business - Contacts, Appointments, Proposals, and Invoices. In order to leverage this information in the most powerful way, we provide built-in and custom filtering on each of these grids.
This article will review:
Default Filters
When working with large numbers of contacts, it's always a good idea to filter using the Filter button first, then fine tune your results if needed using in grid filtering. If you click Apply, that condition will be applied to the grid. You can click on other terms without clicking Apply to set up multiple conditions before applying the filter.
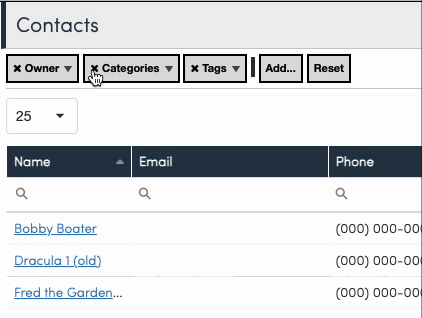
Adding Default Filters
To add more terms, click the Add... button and then choose from the dropdown list of terms. To remove an existing term, click the X on the term. The filter will be automatically applied when you do this.

You can add as many terms as you would like. Keep in mind that each term is "anded" with the other terms and the checkbox lists are "any of" or "not any of" conditions.
For example, by using a Tags term and choosing a few tags with contains and another Tags term and choosing a few other tags with the doesn't contain condition, you can find all contacts who have any tags in the first list and no tags in the second list.
Once you've filtered as much as you can with the main Filter menu, you can find tune your results with In-grid Filtering.
Filtering Appointments
When on the Appointments Grid, you may want to view appointments within a certain date range, not just upcoming. If you click the All quick filter, this will display unfiltered results just for today - this limits the amount of data that is requested at one time. Some locations can have hundreds of thousands of appointments, causing the site to time out. This way, the appointments will load for you quickly and give you the option to filter to a range without being disrupted.
To view older appointments, click Filter, and move to the Services dropdown.
Scroll below your services, and enter your desired dates in the input fields.

Custom In-Grid Filtering
Many grids also support filtering directly on any single column (in-grid filtering). You can click the little funnel icon in the column header. It will display options for showing only rows that contain a specific value or rows that are empty or not empty. Some grids also have the ability to perform much more complicated filtering. If the bottom grid has a Create filter... then the grid supports compound filtering.

When you click the link, a dialog will be displayed in the middle of the grid. You can click on the + icon and select a field to filter on. The next link will let you select the comparison (such as equal, not equal, greater than, between, etc.) Then depending on the comparison you selected, you'll be able to enter values.

Select the comparison (such as equal, not equal, greater than, between, etc.) Then depending on the comparison you selected, you'll be able to enter values.
Getting Rid of Custom Filter
If you have used a Custom Filter, then it will stay on until you turn it off or delete the filter.
If you have an unselected filter at the bottom and don't Clear it, the next time you use a custom grid filter it will automatically add that to the existing, unselected filter.

- You can either Uncheck the box. This will keep the filter if you ever want to use it again.
- Or click on the filter link (it is blue and underlined). Just as you clicked the green + to add a filter, click the red X to delete the filter. Then click Ok.

Special Considerations
Multiple Values - The custom column filters aren't as good at filtering where there may be multiple values.
For example, if filtering on Tags, you may want to filter on just one, but the filter will narrow it down to contact that have that tag only - excluding contacts that may have the tag but also another; it works as an either/or in that way.
Using the Filter button and selecting the Tags you want there will give you more accurate results.

Saving a View
After setting your filters, at the bottom of the screen you can type in a name and hit Save, and this creates a new View for you.

Click Views to see any saved views that you have.
Checking the box for Shared will allow other users in that org to see the saved view.
The Shortcut box will add it into the left sidebar in the Shortcut section for easy access.


FAQs
I only see a fraction of my contacts, what happened?
You may have a filter on. Look at the bottom of the grid and look for a funnel icon. If you see a custom filter turned on, then you need to uncheck the box or delete the filter. Don't forget that there are default filters so if that isn't the issue, check the filters at the top of the grid and make sure you don't have data filtered by category or date.
My grid view is stuck. How can I restore it?
You may not noticeably have any filters set, but you can tell you aren't seeing all of the contacts you should. If the default view ever seems "stuck," you can go into Views (at the bottom) and Reset the Default view to get it back to neutral.

Make sure you don't accidentally reset any custom views you've saved - only do this for the Default if the grid is stuck.
